Sony ICD-UX512 Operating Instructions - Page 46
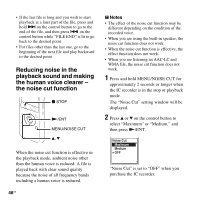
Reducing noise in the playback sound and making the human voice clearer - the noise cut function
 |
UPC - 027242807624
View all Sony ICD-UX512 manuals
Add to My Manuals
Save this manual to your list of manuals |
Page 46 highlights
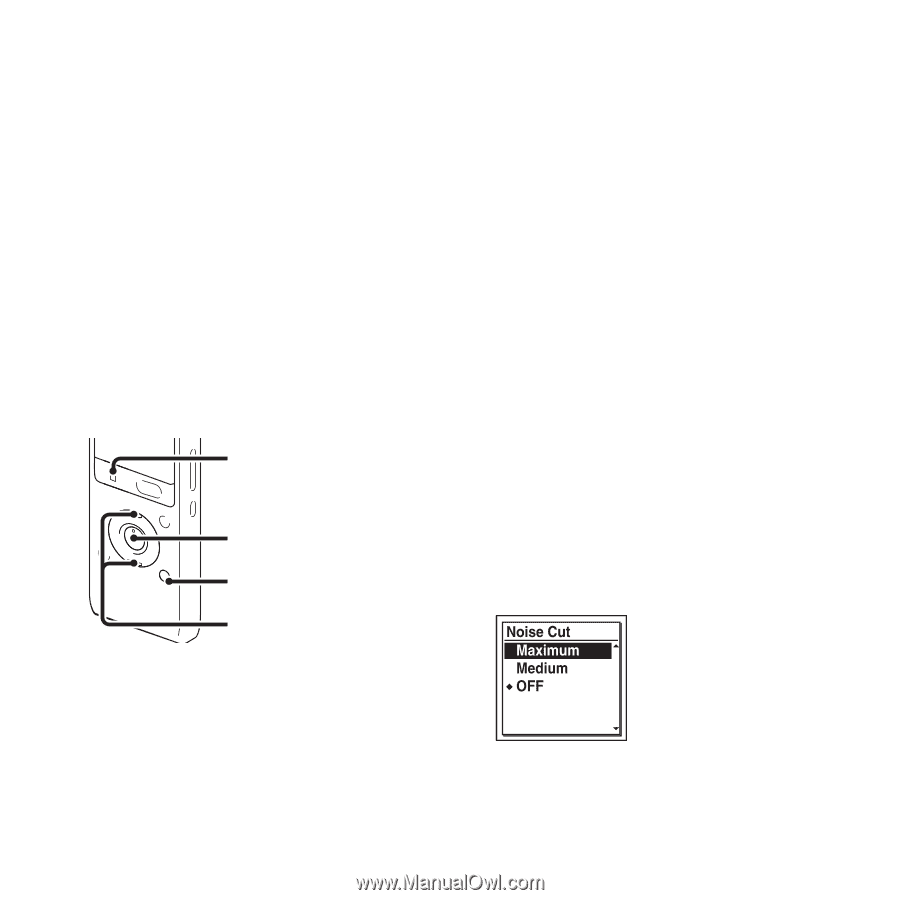
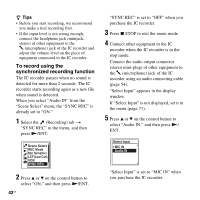
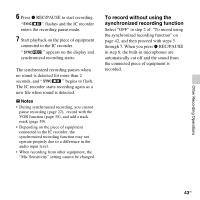
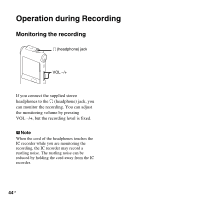
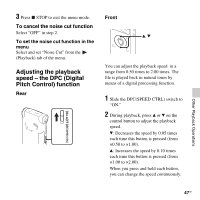
• If the last file is long and you wish to start playback at a later part of the file, press and hold > on the control button to go to the end of the file, and then press . on the control button while "FILE END" is lit to go back to the desired point. • For files other than the last one, go to the beginning of the next file and play backward to the desired point. Reducing noise in the playback sound and making the human voice clearer - the noise cut function x STOP N/ENT MENU/NOISE CUT v, V P Notes • The effect of the noise cut function may be different depending on the condition of the recorded voice. • When you are using the built-in speaker, the noise cut function does not work. • When the noise cut function is effective, the effect function does not work. • When you are listening an AAC-LC and WMA file, the noise cut function does not work. 1 Press and hold MENU/NOISE CUT for approximately 2 seconds or longer when the IC recorder is in the stop or playback mode. The "Noise Cut" setting window will be displayed. 2 Press v or V on the control button to select "Maximum" or "Medium," and then press N/ENT. When the noise cut function is effective in the playback mode, ambient noise other than the human voice is reduced. A file is played back with clear sound quality because the noise of all frequency bands including a human voice is reduced. 46 GB "Noise Cut" is set to "OFF" when you purchase the IC recorder.
-
 1
1 -
2
-
3
-
4
-
5
-
6
-
7
-
8
-
9
-
10
-
11
-
12
-
13
-
14
-
15
-
16
-
17
-
18
-
19
-
20
-
21
-
22
-
23
-
24
-
25
-
26
-
27
-
28
-
29
-
30
-
31
-
32
-
33
-
34
-
35
-
36
-
37
-
38
-
39
-
40
-
 41
41 -
 42
42 -
 43
43 -
 44
44 -
 45
45 -
 46
46 -
 47
47 -
 48
48 -
 49
49 -
 50
50 -
 51
51 -
52
-
53
-
54
-
55
-
56
-
57
-
58
-
59
-
60
-
61
-
62
-
63
-
64
-
65
-
66
-
67
-
68
-
69
-
70
-
71
-
72
-
73
-
74
-
75
-
76
-
77
-
78
-
79
-
80
-
81
-
82
-
83
-
84
-
85
-
86
-
87
-
88
-
89
-
90
-
91
-
92
-
93
-
94
-
95
-
96
-
97
-
98
-
99
-
100
-
101
-
102
-
103
-
104
-
105
-
106
-
107
-
108
-
109
-
110
-
111
-
112
-
113
-
114
-
115
-
116
-
117
-
118
-
119
-
120
-
121
-
122
-
123
-
124
-
125
-
126
-
127
-
128
 |
 |