Sony ICDBM1 Operating Instructions
Sony ICDBM1 - Memory Stick Media Digital Voice Recorder Manual
 |
UPC - 027242626423
View all Sony ICDBM1 manuals
Add to My Manuals
Save this manual to your list of manuals |
Sony ICDBM1 manual content summary:
- Sony ICDBM1 | Operating Instructions - Page 1
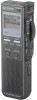
-13 (1) IC Recorder Operating Instructions Owner's Record The model number and the serial number are located on the back of the unit. Record the serial number in the space provided below. Refer to these numbers whenever you call upon your Sony dealer regarding this product. Model No. ICD-BM1/BM1PRO - Sony ICDBM1 | Operating Instructions - Page 2
product, you may call: Sony Customer Information Services Center (800)-222-7669 or write to: Sony Customer Information Services Center 12451 Gateway Blvd. Fort Myers, FL 33913 Declaration of Conformity Trade Name: SONY Model No.: ICD-BM1 Responsible Party: Sony Electronics Inc. Address: 680 - Sony ICDBM1 | Operating Instructions - Page 3
manual or the information contained herein at any time without notice. The software described herein may also be governed by the terms of a separate user license agreement. • This software is for Windows and cannot be used for Macintosh. • The supplied connecting cable is for the IC recorder ICD-BM1 - Sony ICDBM1 | Operating Instructions - Page 4
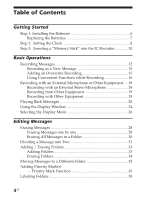
7 Step 2: Setting the Clock 8 Step 3: Inserting a "Memory Stick" into the IC Recorder 10 Basic Operations Recording Messages 12 Recording as a New Message 15 Adding an Overwrite Recording 15 Using Convenient Functions while Recording 16 Recording with an External Microphone or Other Equipment - Sony ICDBM1 | Operating Instructions - Page 5
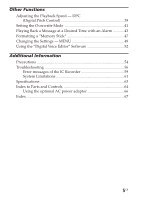
Time with an Alarm 43 Formatting a "Memory Stick 47 Changing the Settings - MENU 49 Using the "Digital Voice Editor" Software 52 Additional Information Precautions 54 Troubleshooting 56 Error messages of the IC Recorder 59 System Limitations 61 Specifications 63 Index to Parts and Controls - Sony ICDBM1 | Operating Instructions - Page 6
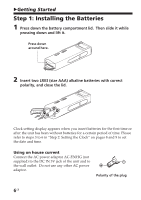
BGetting Started Step 1: Installing the Batteries 1 Press down the battery compartment lid. Then slide it while pressing down and lift it. Press down around here. 2 Insert two LR03 (size AAA) alkaline batteries with correct polarity, and close the lid. Clock setting display appears when you insert - Sony ICDBM1 | Operating Instructions - Page 7
Replacing the Batteries The battery indicator on the display window shows the battery condition. Notes • Do not use the unit will stop operation. Battery life (Using Sony alkaline batteries LR03 (SG)) (Recording mode:) ST SP LP In continuous recording: Approx. 11 hours Approx. 14 hours Approx. - Sony ICDBM1 | Operating Instructions - Page 8
of time. In this case, proceed from step 4. MENU ENTER CANCEL POWER Jog lever Press up (>). Press down (.). 1 Slide POWER to ON. The IC recorder is turned on. 2 Press MENU. The menu mode will be displayed in the display window. 3 Press the jog lever up or down (>/ .) to select "DATE&TIME". 8GB - Sony ICDBM1 | Operating Instructions - Page 9
window will return to the normal display. To cancel the operation Press CANCEL to return to the previous step of the operations. To display the current time Press ENTER while the unit is in the stop mode (page 27). The current time will be displayed for three seconds. Note When no "Memory Stick - Sony ICDBM1 | Operating Instructions - Page 10
3: Inserting a "Memory Stick" into the IC Recorder Notes • Make sure to insert or remove the "Memory Stick" while the unit is turned off. • Never remove the "Memory Stick" while the unit is accessing the "Memory Stick". (The OPR indicator flashes in orange.) 1 Slide and open the "Memory Stick" slot - Sony ICDBM1 | Operating Instructions - Page 11
"Memory Stick" you can use with this IC Recorder You can also use the following "Memory Stick" of a 4 MB to 128 MB capacity instead of the supplied "Memory Stick". The maximum recording time varies depending on the capacity of the "Memory Stick". • "Memory Stick" • "Memory Stick (with memory select - Sony ICDBM1 | Operating Instructions - Page 12
, and FOLDER03) folder. The maximum number of recordable messages differs depending on the "Memory Stick" capacity. You can record messages using the following three functions: • Add a recording to a previously recorded message (next page) • Add a recording as a new message (page 15) • Add an - Sony ICDBM1 | Operating Instructions - Page 13
Operations 2 Select the folder. Jog lever 1 Press FOLDER. 2 Press the jog lever up or down (>/ .) to display the folder in which you wish to record messages. FOLDER ENTER Selected folder 3 Press ENTER to select the folder. To cancel the selection, press CANCEL. To add a new folder, see page 33 - Sony ICDBM1 | Operating Instructions - Page 14
) appears. Notes • While the OPR indicator flashes or when it turns orange, do not remove the "Memory Stick", the batteries or the AC adaptor (not supplied). Doing so may damage the data. • Noise may be recorded if an object, such as your finger, etc., accidentally rubs or scratches the unit during - Sony ICDBM1 | Operating Instructions - Page 15
the folder. Basic Operations Adding an Overwrite Recording When you start recording at a point in the middle of a recorded message, you add an overwrite recording after the selected point. Start recording at a point in the middle of a recorded message Message 2 Message 3 Message 4 The deleted - Sony ICDBM1 | Operating Instructions - Page 16
to the sound - Advanced VOR function Slide the VOR (voice operated recording) switch to ON during stop or recording mode. Set the control key to REC. Recording starts when the unit detects sound, and "VOR" appears in the display window. The recording pauses when no sound is detected, and "VOR PAUSE - Sony ICDBM1 | Operating Instructions - Page 17
time indication flashes. When the memory is full, recording automatically stops and "NO MEMORY SPACE" will be displayed with an alarm sound. Please slide the control key to STOP. To continue recording, erase some of the messages (page 28) or replace the "Memory Stick". Note When you set the BEEP - Sony ICDBM1 | Operating Instructions - Page 18
of an external microphone or other equipment (tape recorder, MiniDisc player, or etc.) with the IC recorder. Depending on the device you use, connect the IC recorder as follows. For available accessories, consult with your nearest Sony dealer. Recording with an External Stereo Microphone Connect an - Sony ICDBM1 | Operating Instructions - Page 19
level is small, do not use a registered audio connecting cable. Recording with Other Equipment To record the sound of the IC recorder with other equipment, connect the i (headphones) jack of the IC recorder to the audio input connector (minijack, stereo) of other equipment. mini-plug (stereo - Sony ICDBM1 | Operating Instructions - Page 20
message, start from Step 1. When playing back a message you have just finished recording, start from Step 3. 1 Select the folder. 1 Press FOLDER. 2 Press the jog lever up or down (>/ .) to display the folder containing the message you want to - Sony ICDBM1 | Operating Instructions - Page 21
listen from an external speaker Connect an active or passive speaker (not supplied) to the i (headphones) jack. Note Playback after the overwrite recording starts from the beginning of the message. Playback after a stop starts from the point where you stopped playback. 4 Stop playback. Slide the - Sony ICDBM1 | Operating Instructions - Page 22
. Playing back a message rapidly or slowly in natural tone - DPC (Digital Pitch Control) When you adjust the playback speed with the DPC in the can change the setting during playback. Searching forward/backward during playback (Cue/Review) • To search forward: Keep pressing the jog lever up (>) - Sony ICDBM1 | Operating Instructions - Page 23
down (.) once, or advance approximately 10 seconds by pressing the jog lever up (>) once. This function is useful when locating a desired point in a long recording. Playing back a message repeatedly - Repeat Play When REPEAT is set to ON in the menu (page 50), you can play back a message repeatedly - Sony ICDBM1 | Operating Instructions - Page 24
Display Window Parts in the display window 1 VOR (voice operated recording) indicator (16) 2 "Memory Stick" indicator 3 Folder indication (13, 20) Displays the current folder. 4 Priority marks (36) 5 Selected message number / Total message number in the folder (14, 20) 6 Remaining memory indicator - Sony ICDBM1 | Operating Instructions - Page 25
recording or playback mode, the message number, recording mode and microphone sensitivity of the message being recorded or played back, and playback counter are displayed in the window. Display examples A message is being recorded indications When the battery or memory runs out, the remain - Sony ICDBM1 | Operating Instructions - Page 26
DISPLAY repeatedly to display the desired display mode. The display mode changes according to the following order: ELAPSE TIME (counter) Elapsed playback/recording time of one message. x REMAIN TIME (remaining time) In the playback mode: The remaining time indication of the message. In the stop - Sony ICDBM1 | Operating Instructions - Page 27
Basic Operations MSG.NAME (message name) The message name will be displayed in the display window. If the message has no name, only the message icon ( ) will be displayed. 1 On Sleep display mode If the unit is left unused for more - Sony ICDBM1 | Operating Instructions - Page 28
messages one by one or all messages in a folder at a time. Note Once a recording has been erased, you cannot retrieve it. FOLDER ENTER CANCEL ERASE Jog lever (>/.) Erasing Messages one by one Be sure to erase unnecessary messages only. - Sony ICDBM1 | Operating Instructions - Page 29
Editing Messages 1 Press ERASE while playing back the message you want to erase or press ERASE for more than 1 second during stop mode. "ERASE?" will flash while the first and last 5 seconds of the message are played back 10 times. 2 Press ENTER while the message is being played back and "ERASE" is - Sony ICDBM1 | Operating Instructions - Page 30
in a folder "ERASE FOLDER?" will flash and you can erase the folder itself (see page 34). 3 While "ERASE ALL?" is flashing, press ENTER. All the recorded messages contained in the folder are erased. The folder itself will not be deleted. For how to erase a folder, see page 34. To cancel erasing - Sony ICDBM1 | Operating Instructions - Page 31
to play back when you make a long recording such as a meeting. You can divide a message until the total number of messages in a folder becomes 999 or the total number of messages in a "Memory Stick" becomes 963 with the supplied 16 MB "Memory Stick". Editing Messages DIVIDE Control key (PLAY/STOP - Sony ICDBM1 | Operating Instructions - Page 32
or down (>/.) to display the message number as the divided messages have message numbers. Notes • You need a certain amount of space in the memory to divide a message. For more information, see "System Limitations" on page 61. • If you divide a message with priority mark(s), priority mark(s) will be - Sony ICDBM1 | Operating Instructions - Page 33
you can add varies depending on the using conditions. "FOLDER FULL" is displayed in the display window when you cannot add any folder because of the system limitations of the IC recorder (page 61). MENU FOLDER ENTER CANCEL ERASE Jog lever (>/.) Editing Messages Adding Folders 1 Press MENU. The - Sony ICDBM1 | Operating Instructions - Page 34
the menu mode. The window will return to the , see step 2 of "Recording Messages" on page 13. Note You cannot erase a folder that has some recorded messages. First, erase all Notes • You cannot delete the last folder left in a "Memory Stick". • After deleting a folder, the name of other folders are - Sony ICDBM1 | Operating Instructions - Page 35
Messages to a Different Folder You can move the recorded messages to another folder during playback. Editing Messages MENU The message is moved in the destination folder. Messages are sorted in order of the recorded date and time or the number of the priority marks in the folder. The folder with - Sony ICDBM1 | Operating Instructions - Page 36
(s) - Priority Mark Function Usually the recorded messages are lined up in the order of recording. By adding priority marks (v) to the message you want to mark. 2 Press PRIORITY. "PRIORITY" will flash on the display window. 3 Press the jog lever up or down (>/ .) to select the number of priority - Sony ICDBM1 | Operating Instructions - Page 37
a folder, these messages are sorted by the recorded date and time (The oldest one comes first). e.g. When there are 3 messages in a folder Message 1 Message 2 Message 3 Note You can also add priority mark(s) using the supplied "Digital Voice Editor" software. But messages are not sorted in order - Sony ICDBM1 | Operating Instructions - Page 38
folders. 1 Tip You can also label folder or messages using the supplied "Digital Voice Editor" software. For more information, see online help. MENU FOLDER ENTER CANCEL Jog lever exit the menu mode. The window will return to the normal display. To cancel labeling Press CANCEL before step 3. 38GB - Sony ICDBM1 | Operating Instructions - Page 39
playback between twice the normal speed (+100%) and half the normal speed (-50%). The message is played back in natural tone thanks to the digital processing function. Other Functions MENU ENTER CANCEL Jog lever (>/.) DPC Playing back a message rapidly or slowly Slide DPC to ON. "FAST PLAY" or - Sony ICDBM1 | Operating Instructions - Page 40
Adjusting the Playback Speed - DPC (Digital Pitch Control) (continued) 2 Press the jog lever up or down (>/ .) to select "DPC". The current playback speed setting is displayed in percentage with the standard - Sony ICDBM1 | Operating Instructions - Page 41
), then press ENTER. The overwrite mode selection window is displayed. • OVER: The portion left after the overwrite recording will remain in the message. Stopping point for the overwrite recording Starting point of the overwrite recording The remaining portion in Message 2 Message 1 Message - Sony ICDBM1 | Operating Instructions - Page 42
select "OVER" or "CUT", then press ENTER. 4 Press MENU to exit the menu mode. The normal display appears. When you add an overwrite recording (page 15), the recording will be added in the selected overwrite mode. To cancel setting Press CANCEL. The window returns to that of the previous step. 42GB - Sony ICDBM1 | Operating Instructions - Page 43
Note When the clock is not set or no messages are recorded, you cannot set the alarm. Other Functions MENU ENTER CANCEL Jog lever alarm setting mode. 1 Press MENU. The menu mode will be displayed in the display window. 2 Press the jog lever up or down (>/ .) to select "ALARM OFF". If - Sony ICDBM1 | Operating Instructions - Page 44
already been selected, follow the next steps. 5 Press ENTER. "DATE" will be displayed in the display window. 3 Set the alarm date and time. To play back on a desired date 1 Press ENTER while "DATE" is displayed. The year digits will flash. 2 Press the jog lever up or down (>/ .) to select the year - Sony ICDBM1 | Operating Instructions - Page 45
to select the hour digits, and press ENTER. The minute digit will flash. 2 Press the jog lever up or down (>/ .) to select the minute digits, and press ENTER. will sound). During alarm playback, "ALARM" will flash in the display window. 1To listen to the same message again Slide the control key to - Sony ICDBM1 | Operating Instructions - Page 46
will be played back. • If the alarm time comes during recording, the alarm will sound after the recording is finished. ","will flash when the alarm time comes. • If more than one alarm time comes during recording, only the first message will be played back. • When the - Sony ICDBM1 | Operating Instructions - Page 47
Formatting a "Memory Stick" You can format a "Memory Stick" using the Memory Stick IC Recorder. Formatting will delete all data recorded in the "Memory Stick" including images and other data. Before formatting, check the data in the "Memory Stick". Because a commercially available "Memory Stick" has - Sony ICDBM1 | Operating Instructions - Page 48
in the step 4 or press CANCEL while "OK ?" is displayed in step 5. Notes • You cannot format when the write-protect switch on the "Memory Stick" is set to "LOCK". • Do not format a "Memory Stick" on your computer. When formatting a "Memory Stick", use the formatting function of the IC recorder. 48GB - Sony ICDBM1 | Operating Instructions - Page 49
to change the IC recorder settings. You cannot use the menu during recording. During playback or during stop mode without a "Memory Stick" inserted, the setting will be changed. 5 Press MENU to exit the menu mode. The window will return to the normal display. To go back to the previous step Press - Sony ICDBM1 | Operating Instructions - Page 50
/OK/OK OVER WT Displays the window to set the overwrite recording mode (OVER*/ CUT). See page 41. -/OK/- **Displays whether you can change the setting in each operation mode: NO-MS: stop mode with no "Memory Stick" inserted. Stop: stop mode with the "Memory Stick" inserted. Play: playback mode - Sony ICDBM1 | Operating Instructions - Page 51
sound to indicate that operation has been accepted. No beep sound will be heard except for the alarm. OK/OK/- ALARM Displays the window to set the alarm (ON/OFF*). See page 43. -/OK/- FORMAT Displays the window to format a "Memory Stick" (YES/NO*). See page 47. -/OK/- Other Functions 51GB - Sony ICDBM1 | Operating Instructions - Page 52
the supplied "Digital Voice Editor 2" software operating instructions. Connection When you connect your IC recorder to the computer, "PC CONNECT" is displayed on the display window. The IC recorder enters into PC operation mode. Proceed with the operations with your computer. To USB connector of - Sony ICDBM1 | Operating Instructions - Page 53
(You cannot use this software with Windows® 95 or Windows® NT.) Notes • You cannot use the software with a Macintosh machine. • A handmade computer, a computer whose operating system is installed or upgraded by the user, or a computer with multi-boot operating environment are not supported. 53GB - Sony ICDBM1 | Operating Instructions - Page 54
, benzine or thinner. If you have any questions or problems concerning your unit, please consult your nearest Sony dealer. Backup recommendations To avoid potential risk of data loss caused by accidental operation or malfunction of the IC recorder, we recommend that you save a backup copy of your - Sony ICDBM1 | Operating Instructions - Page 55
- Very humid or subject to corrosive gases • When you carry or store a "Memory Stick", put it in its case. About write-protect of a "Memory Stick" Write-protect switch You cannot record or erase data when the write-protect switch on the "Memory Stick" is set to "LOCK". 55GB Additional Information - Sony ICDBM1 | Operating Instructions - Page 56
" is full. Erase some of the messages (page 28). •There is no "Memory Stick" inserted. •The write-protect switch on the inserted "Memory Stick is set to "LOCK" (page 55). •999 messages have been recorded in the selected file. Select another file or erase some of the messages (page 28). •The write - Sony ICDBM1 | Operating Instructions - Page 57
, etc.) etc., and is not suitable for music recording. Recording is interrupted (when recording from an external device). •If you use an audio connecting cable without register to connect the sound source to the IC recorder, sound may be recorded interrupted. Make sure to use a registered audio - Sony ICDBM1 | Operating Instructions - Page 58
items which are not displayed because a "Memory Stick" is not inserted (page 50). A character in a •The unit cannot support and display some folder or message characters which are entered using the name is displayed as supplied "Digital Voice Editor" software. "s". Messages are not •Unless you - Sony ICDBM1 | Operating Instructions - Page 59
the IC Recorder Error message "ACCESS ERROR" "ALREADY SET" "BACK DATE" "CLOSE MS SLOT COVER" "FILE PROTECTED" "FOLDER ERASE PROHIBITED" "FOLDER FULL" "FOLDER PROTECTED" "FORMAT ERROR" Cause/Remedy •Remove and insert the "Memory Stick" again. If this is displayed again, the inserted "Memory Stick - Sony ICDBM1 | Operating Instructions - Page 60
adaptor that is not compatible with the IC recorder is connected. Make sure to use the AC power adaptor for the IC recorder. "MEMORY STICK ERROR" •Insert the "Memory Stick" again. After inserting, For the error messages of the "Digital Voice Editor", please refer to the online Help files. 60GB - Sony ICDBM1 | Operating Instructions - Page 61
•There may be other formatted data (for example, images) in the inserted "Memory Stick". •Due to the minimum recording unit, if the length of each message cannot be divided by the minimum recording unit, the remaining recording time may decrease by more than the total length of the messages. •The - Sony ICDBM1 | Operating Instructions - Page 62
the information about division and the number of folders. Therefore, as the number of messages or folders increases, the amount of memory in the "Memory Stick" decreases. The maximum recording time and the number of messages or folders varies depending on this. However, only in the case that you - Sony ICDBM1 | Operating Instructions - Page 63
(not incl. projecting parts and controls) 98 g (3.5 oz) (incl. batteries and a "Memory Stick") "Memory Stick"(ICD-BM1: 16MB x 1/ICD-BM1PRO: 16MB x 3) "Digital Voice Editor" (CD-ROM) x 1 Ear receiver x 1 USB connecting cable x 1 Carrying case x 1 Clamp filter x 1 Stereo ear receiver MDR-EX71/Active - Sony ICDBM1 | Operating Instructions - Page 64
i (headphones) jack (16, 19, 21) 3 ERASE button (29, 34) 4 Display window (24) 5 MENU button (49) 6 DISPLAY button (26) 7 FOLDER button (13, (operation) indicator (14, 21) qg Jog lever .(review/fast backward)/> (cue/fast forward) qh Control key REC (record) / STOP/PLAY/B.SPACE qj DPC switch (22, 39 - Sony ICDBM1 | Operating Instructions - Page 65
Rear Additional Information wz Memory Stick slot cover (10) ws MIC SENS (microphone sensitivity) switch (17) CONF(H) (conference, high)/DICT(L) (dictation, low) wd VOR (voice operated recording) ON/OFF switch (16) wf DC IN 3V jack (6) wg USB connector (52) wh Battery compartment (6) 65GB - Sony ICDBM1 | Operating Instructions - Page 66
. (You must affix the ferrite cores to comply with the applicable standards.) 1 Open the clamp filter. 2 Wind the cable into the clamp filter as show below. Attach the clamp filter on one end of the cable. As close to the plug as possible that is connected to DC IN jack. Wind the - Sony ICDBM1 | Operating Instructions - Page 67
display 27 D Digital Voice Editor 52 Display mode 26 Display window 24 Dividing a message 31 DPC (Digital Pitch Control) ........ recording time .. 12, 62 "Memory Stick", format 47 "Memory Stick", inserting ....... 10 "Memory Stick", notes on use ... 55 "Memory Stick", types 11 "Memory Stick - Sony ICDBM1 | Operating Instructions - Page 68
memory 17 Remaining time display 26 Repeat playback 23, 50 Review 16, 22 S Searching forward/backward . 22 Setting the clock 8 SP mode 7, 12, 50 Specifications 63 ST mode 7, 12, 50 System limitations 61 System requirements 53 T Troubleshooting 56 Turning on power 8, 13 U USB cable
-
 1
1 -
 2
2 -
 3
3 -
 4
4 -
 5
5 -
 6
6 -
 7
7 -
8
-
9
-
10
-
11
-
12
-
13
-
14
-
15
-
16
-
17
-
18
-
19
-
20
-
21
-
22
-
23
-
24
-
25
-
26
-
27
-
28
-
29
-
30
-
31
-
32
-
33
-
34
-
35
-
36
-
37
-
38
-
39
-
40
-
41
-
42
-
43
-
44
-
45
-
46
-
47
-
48
-
49
-
50
-
51
-
52
-
53
-
54
-
55
-
56
-
57
-
58
-
59
-
60
-
61
-
62
-
63
-
64
-
65
-
66
-
67
-
68
 |
 |
3-258-853-
13
(1)
IC Recorder
©2003 Sony Corporation
ICD-BM1/BM1PRO
Operating Instructions
Owner’s Record
The model number and the serial number are located
on the back of the unit.
Record the serial number in the space provided below.
Refer to these numbers whenever you call upon your
Sony dealer regarding this product.
Model No. ICD-BM1/BM1PRO
Serial No.