Sony ICF-SW7600GR Operating Instructions - Page 35
Using the optional external, antennas - an lp1
 |
UPC - 027242580084
View all Sony ICF-SW7600GR manuals
Add to My Manuals
Save this manual to your list of manuals |
Page 35 highlights
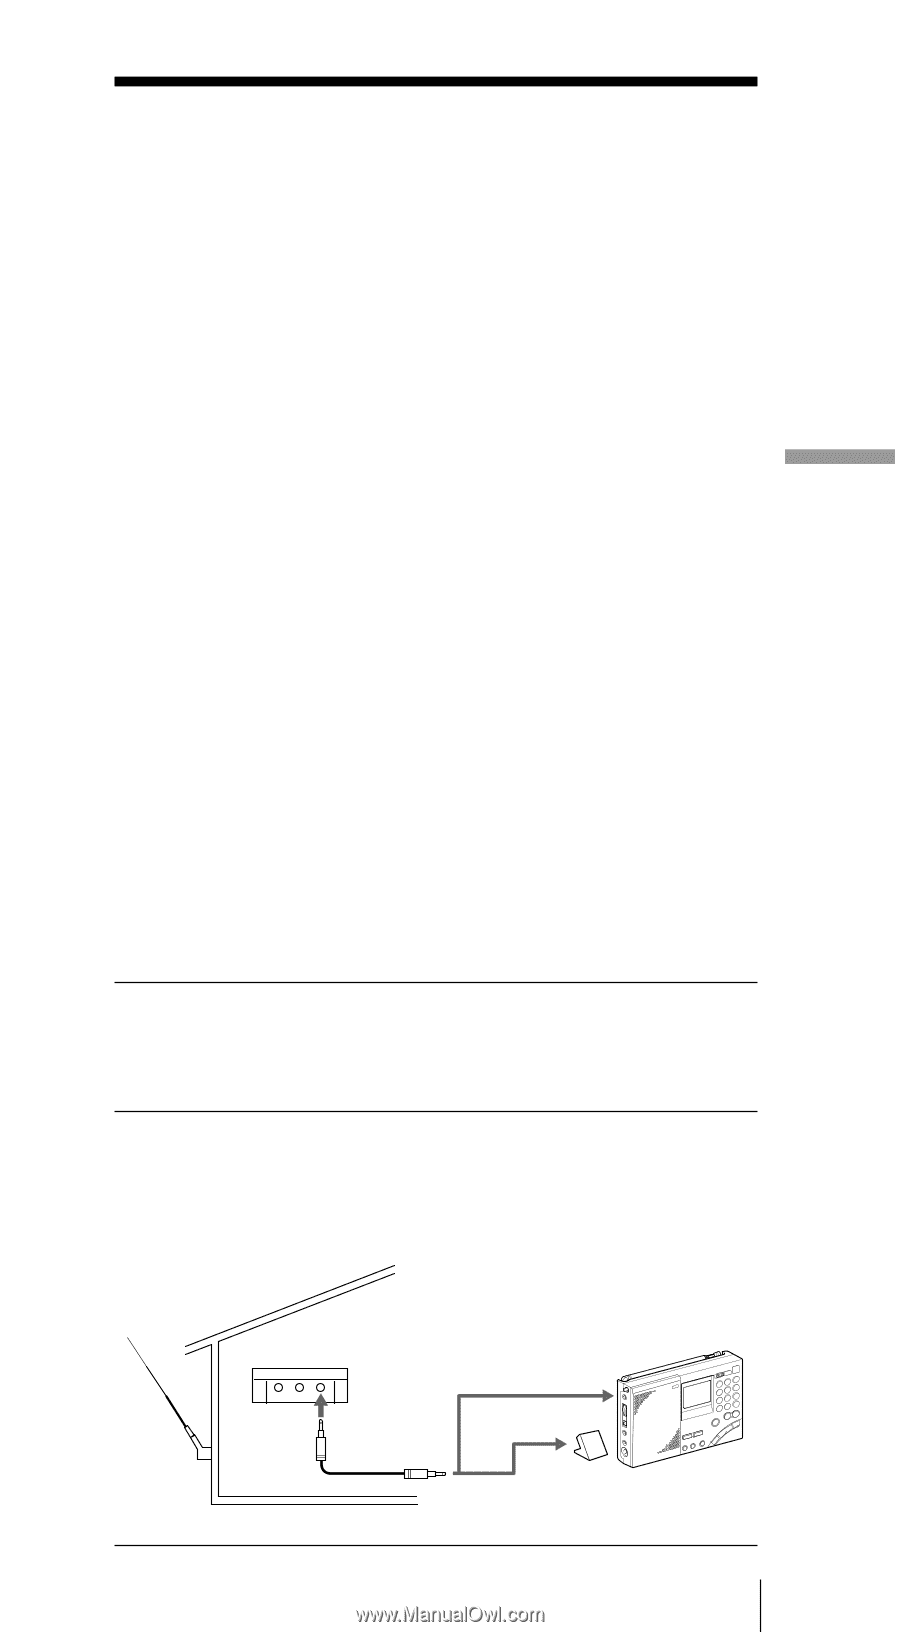
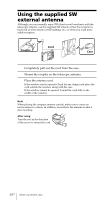
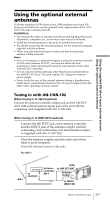
Using the supplied SW (short wave) external antenna Using the optional external antennas Using the optional external antennas For better reception of SW (short wave), MW (medium wave) and LW (long wave) broadcasts, use the optional wide range antenna AN-1, AN102 or SW active antenna AN-LP1. Installation • Do not place the radio or antenna near fluorescent lighting, televisions, telephones, computers, etc., as this may cause noises to be heard. • Install the external antenna as far away as possible from roads. • For details concerning the external antenna, see the instruction manual supplied with the antenna. • When using the external antenna, make sure that the telescopic antenna is fully retracted. Notes • Since it is necessary to select the frequency using the antenna controller for SW active antenna AN-LP1, you may not obtain the best performance when operating the memory scan function of the radio with AN-LP1 connected. • Do not connect external antennas other than those recommended to the AM EXT ANT jack. This jack outputs DC voltage for antenna power supply. • Never touch the wire of the external antenna during a thunderstorm. Furthermore, immediately disconnect the AC power adaptor from the radio when operating on house current. Tuning in with AN-1/AN-102 When tuning in to SW broadcasts Connect the antenna controller output jack and the AM EXT ANT (AM external antenna input) jack of the unit with the connecting cord (supplied with AN-1/AN-102). When tuning in to MW/LW broadcasts 1 Connect the OUTPUT jack of the antenna controller and the INPUT jack of the antenna coupler with the connecting cord (connecting cord and antenna coupler is supplied with AN-1/AN-102). 2 Place the antenna coupler near the radio and where there is good reception. Retract the telescopic antenna of the radio. For AN-1: AN-1 to OUTPUT Antenna controller AN-1 (SW) to AM EXT ANT Antenna coupler to INPUT (MW/LW) Other convenient uses 35GB
-
 1
1 -
2
-
3
-
4
-
5
-
6
-
7
-
8
-
9
-
10
-
11
-
12
-
13
-
14
-
15
-
16
-
17
-
18
-
19
-
20
-
21
-
22
-
23
-
24
-
25
-
26
-
27
-
28
-
29
-
 30
30 -
 31
31 -
 32
32 -
 33
33 -
 34
34 -
 35
35 -
 36
36 -
 37
37 -
 38
38 -
 39
39 -
 40
40 -
41
-
42
-
43
-
44
-
45
-
46
-
47
-
48
-
49
-
50
-
51
-
52
-
53
-
54
-
55
-
56
-
57
-
58
-
59
-
60
-
61
-
62
-
63
-
64
-
65
-
66
-
67
-
68
-
69
-
70
-
71
-
72
-
73
-
74
-
75
-
76
-
77
-
78
-
79
-
80
-
81
-
82
-
83
-
84
-
85
-
86
-
87
-
88
-
89
-
90
-
91
-
92
-
93
-
94
-
95
-
96
-
97
-
98
-
99
-
100
-
101
-
102
-
103
-
104
-
105
-
106
-
107
-
108
-
109
-
110
-
111
-
112
-
113
-
114
-
115
-
116
-
117
-
118
-
119
-
120
-
121
-
122
-
123
-
124
-
125
-
126
-
127
-
128
-
129
-
130
-
131
-
132
-
133
-
134
-
135
-
136
-
137
-
138
-
139
-
140
-
141
-
142
-
143
-
144
-
145
-
146
-
147
-
148
-
149
-
150
-
151
-
152
-
153
-
154
-
155
-
156
-
157
-
158
-
159
-
160
-
161
-
162
-
163
-
164
-
165
-
166
-
167
-
168
-
169
-
170
-
171
-
172
-
173
-
174
-
175
-
176
-
177
-
178
-
179
-
180
-
181
-
182
-
183
-
184
-
185
-
186
-
187
-
188
-
189
-
190
-
191
-
192
-
193
-
194
-
195
-
196
-
197
-
198
-
199
-
200
-
201
-
202
-
203
-
204
-
205
-
206
-
207
-
208
-
209
-
210
-
211
-
212
-
213
-
214
-
215
-
216
-
217
-
218
-
219
-
220
-
221
-
222
-
223
-
224
-
225
-
226
-
227
-
228
-
229
-
230
-
231
-
232
-
233
-
234
-
235
-
236
-
237
-
238
-
239
-
240
-
241
-
242
 |
 |