Sony KDF-E42A11E Operating Instructions - Page 21
Picture Adjustment menu
 |
View all Sony KDF-E42A11E manuals
Add to My Manuals
Save this manual to your list of manuals |
Page 21 highlights
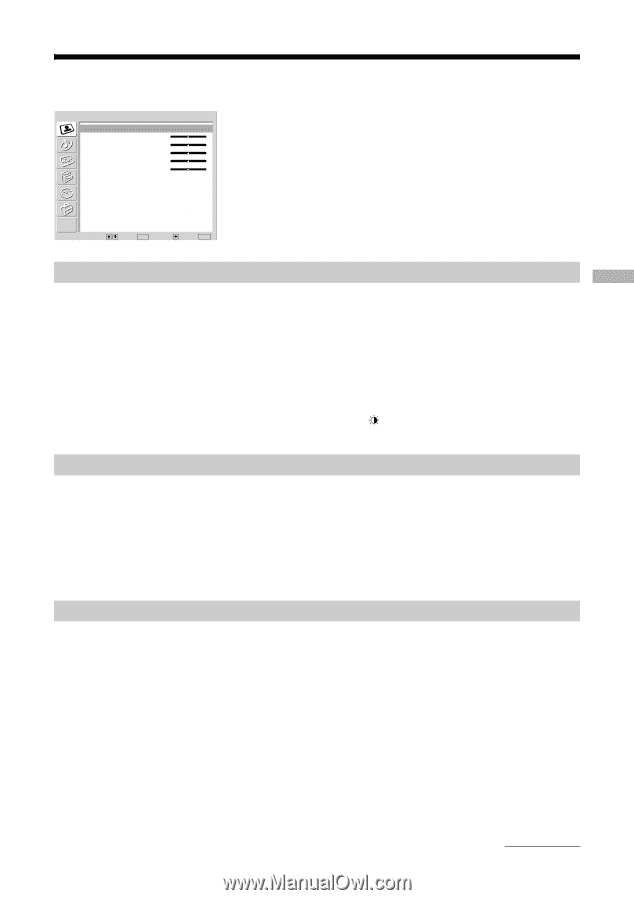
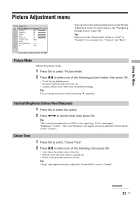
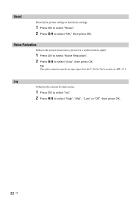
Using the Menu Picture Adjustment menu Picture Adjustment Picture Mode Contrast Brightness Colour Hue Sharpness Colour Tone Reset Noise Reduction Iris Custom Max 50 50 0 15 Warm Auto High You can select the options listed below on the Picture Adjustment menu. To select options, see "Navigating through menus" (page 19). Tip When you set the "Picture Mode" option to "Vivid" or "Standard," you can adjust only "Contrast," and "Reset." Select: Set: OK Back: End: MENU Picture Mode Selects the picture mode. 1 Press OK to select "Picture Mode". 2 Press m/M to select one of the following picture modes, then press OK. • Vivid: For big lighted spaces. • Standard: Optimal picture for home use. • Custom: Allows you to store your own prefered settings. Tip You can change the picture mode by pressing repeatedly. Contrast/Brightness/Colour/Hue/Sharpness 1 Press OK to select the option. 2 Press
-
 1
1 -
2
-
3
-
4
-
5
-
6
-
7
-
8
-
9
-
10
-
11
-
12
-
13
-
14
-
15
-
 16
16 -
 17
17 -
 18
18 -
 19
19 -
 20
20 -
 21
21 -
 22
22 -
 23
23 -
 24
24 -
 25
25 -
 26
26 -
27
-
28
-
29
-
30
-
31
-
32
-
33
-
34
-
35
-
36
-
37
-
38
-
39
-
40
-
41
-
42
-
43
-
44
-
45
-
46
-
47
-
48
-
49
-
50
-
51
-
52
-
53
-
54
-
55
-
56
-
57
-
58
-
59
-
60
-
61
-
62
-
63
-
64
-
65
-
66
-
67
-
68
-
69
-
70
-
71
-
72
-
73
-
74
-
75
-
76
-
77
-
78
-
79
-
80
-
81
-
82
-
83
-
84
-
85
-
86
-
87
-
88
-
89
-
90
-
91
-
92
-
93
-
94
-
95
-
96
-
97
-
98
-
99
-
100
-
101
-
102
-
103
-
104
-
105
-
106
-
107
-
108
-
109
-
110
-
111
-
112
-
113
-
114
-
115
-
116
-
117
-
118
-
119
-
120
-
121
-
122
-
123
-
124
-
125
-
126
-
127
-
128
-
129
-
130
-
131
-
132
-
133
-
134
-
135
-
136
-
137
-
138
-
139
-
140
-
141
-
142
-
143
-
144
-
145
-
146
-
147
-
148
-
149
-
150
-
151
-
152
-
153
-
154
-
155
-
156
-
157
-
158
-
159
-
160
-
161
-
162
-
163
-
164
-
165
-
166
-
167
-
168
-
169
-
170
-
171
-
172
-
173
-
174
-
175
-
176
-
177
-
178
-
179
-
180
-
181
-
182
-
183
-
184
-
185
-
186
-
187
-
188
-
189
 |
 |