Sony KDL-32XBR950 Instructions (SU-LW1 Wall-Mount Bracket)
Sony KDL-32XBR950 - 32" Flat Panel Lcd Wega™ Xbr Television Manual
 |
View all Sony KDL-32XBR950 manuals
Add to My Manuals
Save this manual to your list of manuals |
Sony KDL-32XBR950 manual content summary:
- Sony KDL-32XBR950 | Instructions (SU-LW1 Wall-Mount Bracket) - Page 1
4-100-573-11 (1) Wall-Mount Bracket Instructions US Mode d'emploi FR Instrucciones ES SU-LW1 © 2003 Sony Corporation - Sony KDL-32XBR950 | Instructions (SU-LW1 Wall-Mount Bracket) - Page 2
to read this instruction manual thoroughly to do the installation work safely. We are not liable for any damage or injury caused by mishandling or improper installation. After installation, please hand this installation manual to the customers. This Wall-Mount Bracket is designed by Sony for use - Sony KDL-32XBR950 | Instructions (SU-LW1 Wall-Mount Bracket) - Page 3
or a fracture during an earthquake. • If the wall on which the Wall-Mount Bracket is installed is unstable, uneven, or not perpendicular to the floor, the unit may fall and cause injury or property damage. The wall should be capable of supporting a weight of at least four (4) times the Display - Sony KDL-32XBR950 | Instructions (SU-LW1 Wall-Mount Bracket) - Page 4
the like, the Display Unit may become overheated and this may cause a fire. Do not apply any load other than the Display Unit on the Wall-Mount Bracket. If you do so, the Display Unit may fall and cause injury or property damage. Do not lean on or hang from the Display Unit - Sony KDL-32XBR950 | Instructions (SU-LW1 Wall-Mount Bracket) - Page 5
is a possibility of injury or property damage. Do not install the Wall-Mount Bracket on wall surfaces where the corners or the sides of Display Unit would protrude away from the wall surface. Do not install the Wall-Mount Bracket on wall surfaces such as a pillar, where the corners or the sides of - Sony KDL-32XBR950 | Instructions (SU-LW1 Wall-Mount Bracket) - Page 6
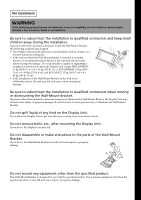
are for Sony Dealers only. Be sure to read the following safety precautions and pay adequate attention to safety during the installation, maintenance and checking of this product. Be sure to install the Wall-Mount Bracket securely to the wall following the instructions in this instruction manual. If - Sony KDL-32XBR950 | Instructions (SU-LW1 Wall-Mount Bracket) - Page 7
your hands or fingers when installing the Wall-Mount Bracket or the Display Unit. The screws needed to secure the Wall-Mount Bracket to the wall are not supplied. Use the appropriate screws for the wall material and structure when mounting the Wall-Mount Bracket. Step 1: Check to see that you have - Sony KDL-32XBR950 | Instructions (SU-LW1 Wall-Mount Bracket) - Page 8
the display. At least the amount of space shown in the diagram should be left between the display and a ceiling or raised portions of the wall. Tip 100 Refer to the table (9 (US)) for the display installation (3 15⁄16) dimensions. 100 (3 15⁄16) 8 (US) - Sony KDL-32XBR950 | Instructions (SU-LW1 Wall-Mount Bracket) - Page 9
(31 3/32) Display Dimensions Unit: mm (inches) Length for each mounting angle Unit: mm (inches) Weight B C D E Mounting angle (α °) F G H (×4)* 0° 147 188 336 (5 25/ 12 17/32) * The wall must be strong enough to support at least four times the weight of the display that you are installing. - Sony KDL-32XBR950 | Instructions (SU-LW1 Wall-Mount Bracket) - Page 10
φ60 (2 3/8) Hole for cable routing 12-φ7 (φ9/32) Refer to the diagram above for wall installation requirements (when reinforcing the wall or routing cables in the wall). WARNING The wall must be strong enough to support at least four times the weight of the display that you are installing (9 (US - Sony KDL-32XBR950 | Instructions (SU-LW1 Wall-Mount Bracket) - Page 11
M6 or equivalent 1 screws (not supplied). 1Tighten the screws firmly so that the Plate Unit can support the weight of the display. 2Tighten the screw used in 1. WARNING The wall must be strong enough to support at least four times the weight of the display that you installing (9 (US)). Make sure - Sony KDL-32XBR950 | Instructions (SU-LW1 Wall-Mount Bracket) - Page 12
3 Arm 1 Tilt adjuster Arm bases A and B 2 Adjust the tilt of the arms. If you want to install the display vertically, flush with the wall (0°), skip 1 and 2 below. Check that the arms are securely attached to the Plate Unit. 1Remove all four tilt adjusters. 2Put them into the screw holes - Sony KDL-32XBR950 | Instructions (SU-LW1 Wall-Mount Bracket) - Page 13
Step 5: Detach the display from the Tabletop Stand The procedure differs depending on the display model. Apply the procedure appropriate for the display you are installing. KLV-26HG2 1Pull the lower corner (either right or left ) of the rear cover. Then pull the 1 other lower corner. 2Hold - Sony KDL-32XBR950 | Instructions (SU-LW1 Wall-Mount Bracket) - Page 14
KLV30XBR900 1Remove the two screws from the Tabletop Stand. Note Do not lay the display down when carrying out the procedure. 2Holding down the base of the Stand, lift up the display slightly, then move it away from the Stand. The display will separate from the Stand. At least two persons must hold - Sony KDL-32XBR950 | Instructions (SU-LW1 Wall-Mount Bracket) - Page 15
KDL32XBR950 1Remove the two screws from the Tabletop Stand. Note Do not lay the display down when carrying out the procedure. 2Holding down the base of the Stand, lift up the display slightly, then move it away from the Stand. The display will separate from the Stand. At least two persons must hold - Sony KDL-32XBR950 | Instructions (SU-LW1 Wall-Mount Bracket) - Page 16
Plate Unit WARNING Do not connect the power cord to a wall outlet before the installation is completed. If the power cord Rear of the display The supplied screws (+PSW5 × L16) Mounting Hook Units Soft cloth Align the holes on the Mounting Hook Units with the corresponding holes on the rear of the - Sony KDL-32XBR950 | Instructions (SU-LW1 Wall-Mount Bracket) - Page 17
jacks on the rear of the display. For details on the cable connection, see the Operating Instructions for your display. When routing cables in a wall, pass the cables through a hole made in the wall for cable routing (10 (US)). Notes • You cannot connect the cables to the display after installing - Sony KDL-32XBR950 | Instructions (SU-LW1 Wall-Mount Bracket) - Page 18
, supplied) in the holes on the arm bases B from the outside. 2Hang the upper hooks of the Mounting Hook Units on the upper shafts of the arms. 3Place the lower hooks of the Mounting Hook Units on the lower shafts of the arms. 4Pushing the display towards the Plate Unit, lift it - Sony KDL-32XBR950 | Instructions (SU-LW1 Wall-Mount Bracket) - Page 19
Check to make sure all the procedures have been properly completed Check the following. • All eight hooks are securely hung on the corresponding shafts. • The cables are neither twisted nor pinched. • The two securing screws are securely tightened. WARNING If not properly installed, the unit may - Sony KDL-32XBR950 | Instructions (SU-LW1 Wall-Mount Bracket) - Page 20
To dismount the display 1 For Sony Dealers Unplug the power cord from the wall outlet. 2 Remove the two securing screws. 3 Two or more persons should lift up the display and dismount it from the Plate Unit. WARNING • At least - Sony KDL-32XBR950 | Instructions (SU-LW1 Wall-Mount Bracket) - Page 21
210 (8 9⁄32) 245 (9 21⁄32) 270 (10 5⁄8) Specifications Unit: mm (inches) Mass: 3.4 kg (7 lb 8 oz) 500 (19 11⁄16) Design and specifications are subject to change without notice. 40 (1 9⁄16) 21 (US) - Sony KDL-32XBR950 | Instructions (SU-LW1 Wall-Mount Bracket) - Page 22
incorrecte. Une fois l'installation effectuée, remettez ce manuel d'installation aux clients. Ce support de fixation mural est conçu par Sony pour être utilisé avec le produit spécifié. N'utilisez pas ce support avec un autre appareil que le produit suivant. Produits spécifiés : LCD Color - Sony KDL-32XBR950 | Instructions (SU-LW1 Wall-Mount Bracket) - Page 23
vous blesser ou de provoquer des dommages matériels. Le mur doit pouvoir supporter un poids équivalent à quatre (4) fois le poids de l'écran ( 7 oz) × 4 = 48 kg (105 lb 13 oz)). • Si l'installation du support de fixation mural n'est pas assez solide, l'appareil risque de tomber et de vous blesser - Sony KDL-32XBR950 | Instructions (SU-LW1 Wall-Mount Bracket) - Page 24
l'écran avec un tissu ou autre, l'écran peut surchauffer et ceci risque de provoquer un incendie. N'appliquez aucune charge autre que l'écran sur le support de fixation mural. Dans le cas contraire, l'écran risque de tomber et de vous blesser ou de provoquer des dommages matériels. Ne vous appuyez - Sony KDL-32XBR950 | Instructions (SU-LW1 Wall-Mount Bracket) - Page 25
de l'écran. Précautions • Si vous utilisez l'écran fixé au support de fixation mural pendant une longue période, le mur situé derrière riau du mur. Les trous des vis restent apparents si vous démontez le support de fixation mural après son installation. • Si vous avez fait passer des - Sony KDL-32XBR950 | Instructions (SU-LW1 Wall-Mount Bracket) - Page 26
Les instructions suivantes concernent les revendeurs Sony uniquement. Lisez attentivement les consignes de sécurité décrites ci-dessus et accordez une attention particulière à la sécurité lors de l'installation, de l'entretien et de la vérification de ce produit. Veillez à installer le support de - Sony KDL-32XBR950 | Instructions (SU-LW1 Wall-Mount Bracket) - Page 27
mural au mur ne sont pas fournies. Utilisez les vis appropriées selon le matériau et la structure du mur lors du montage du support de fixation mural. Etape 1 : Vérification des pièces requises pour l'installation 1 Préparez au moins cinq vis M6 ou équivalentes, non fournies, ainsi qu'un - Sony KDL-32XBR950 | Instructions (SU-LW1 Wall-Mount Bracket) - Page 28
Etape 2 : Réglage de la position de l'embase du bras (pour le KLV-26HG2 uniquement) 1 Embase B Si vous avez l'intention d'installer un KDL32XBR950 ou un KLV30XBR900, sautez l'Etape 2 et passez directement à Bras 2 l'Etape 3. Embase A 2 1 Embase A Embase B 3 Bras Embase B 1 Limiteur d' - Sony KDL-32XBR950 | Instructions (SU-LW1 Wall-Mount Bracket) - Page 29
oz)) (9 19/32) (4 13/16) (12 7/32) 20° 266 113 318 (10 15/32) (4 7/16) (12 17/32) * Le mur doit être suffisamment solide pour supporter au moins quatre fois le poids de l'écran que vous installez. 9 (FR) - Sony KDL-32XBR950 | Instructions (SU-LW1 Wall-Mount Bracket) - Page 30
de l'installation murale (en cas de renforcement du mur ou de passage des câbles dans le mur). AVERTISSEMENT Le mur doit être suffisamment solide pour supporter au moins quatre fois le poids de l'écran que vous installez (9 (FR)). Vérifiez que le mur peut - Sony KDL-32XBR950 | Instructions (SU-LW1 Wall-Mount Bracket) - Page 31
fixation au mur à l'aide d'au moins quatre vis M6 ou 1 équivalentes (non fournies). 1Serrez les vis à fond de sorte que la plaque de fixation puisse supporter le poids de l'écran. 2Serrez la vis utilisée en 1. AVERTISSEMENT Le mur doit être suffisamment solide pour - Sony KDL-32XBR950 | Instructions (SU-LW1 Wall-Mount Bracket) - Page 32
3 Bras 1 Limiteur d'inclinaison Embases A et B 2 Ajustez l'inclinaison des bras. Si vous souhaitez installer l'écran à la verticale, collé contre le mur (0°), sautez les points 1 et 2 cidessous. Vérifiez que les bras sont solidement fixés à la plaque de fixation. 1Retirez les quatre limiteurs d' - Sony KDL-32XBR950 | Instructions (SU-LW1 Wall-Mount Bracket) - Page 33
• Couchez l'écran, face orientée vers le sol, sur une surface plane et stable, en laissant la base du support dépasser. Le fait de placer la face de l'écran et la base du support sur la même surface plane entraîne une inclinaison de l'écran, ce qui le rend instable et donc dangereux - Sony KDL-32XBR950 | Instructions (SU-LW1 Wall-Mount Bracket) - Page 34
et porter l'écran. Remarques • Lors de cette procédure, au moins deux personnes doivent travailler ensemble. • Lorsque vous soulevez l'écran, retenez l'embase du support afin de ne pas le soulever en même temps que l'écran. 3Retirez les quatre crochets situés sur le couvercle arrière de l'écran - Sony KDL-32XBR950 | Instructions (SU-LW1 Wall-Mount Bracket) - Page 35
tenir et porter l'écran. Remarques • Lors de cette procédure, au moins deux personnes doivent travailler ensemble. • Lorsque vous soulevez l'écran, retenez l'embase du support afin de ne pas le soulever en même temps que l'écran. 3Retirez les deux crochets situés sur le couvercle arrière de l'écran - Sony KDL-32XBR950 | Instructions (SU-LW1 Wall-Mount Bracket) - Page 36
Etape 6 : Installation de l'écran sur la plaque de fixation AVERTISSEMENT Ne branchez pas le cordon d'alimentation sur une prise de courant avant la fin de la procédure d'installation. Si le cordon d'alimentation est coincé, cela risque de provoquer un court-circuit susceptible de causer un choc é - Sony KDL-32XBR950 | Instructions (SU-LW1 Wall-Mount Bracket) - Page 37
2 Trou réservé au passage des câbles Raccordement du cordon d'alimentation et des câbles fournis. Raccordez le cordon d'alimentation et les câbles aux prises correspondantes à l'arrière de l'écran. Pour obtenir davantage de détails sur le raccordement des câbles, reportez-vous au mode d'emploi de - Sony KDL-32XBR950 | Instructions (SU-LW1 Wall-Mount Bracket) - Page 38
3 1 2 4 3 N'enfoncez pas les vis trop loin. Montage de l'écran sur la plaque de fixation. 1Pour verrouiller temporairement les bras, placez depuis l'extérieur les deux vis de fixation (+B5 × L12, fournies) dans les trous situés dans les embases B. 2Suspendez les crochets supérieurs de fixation aux - Sony KDL-32XBR950 | Instructions (SU-LW1 Wall-Mount Bracket) - Page 39
Vérifiez que toutes les procédures de montage ont été réalisées correctement Vérifiez les points suivants. • Les huit crochets sont bien suspendus aux axes correspondants. • Les câbles de ne sont pas tordus ni pincés. • Les deux vis de fixation sont serrées à fond. AVERTISSEMENT Si l'écran n'est pas - Sony KDL-32XBR950 | Instructions (SU-LW1 Wall-Mount Bracket) - Page 40
Dépose de l'écran 1 2 3 A l'attention des revendeurs Sony Débranchez le cordon d'alimentation de la prise secteur. Retirez les deux vis de fixation. Deux personnes au moins doivent soulever l'écran et le retirer de - Sony KDL-32XBR950 | Instructions (SU-LW1 Wall-Mount Bracket) - Page 41
210 (8 9⁄32) 245 (9 21⁄32) 270 (10 5⁄8) Spécifications Unité : mm (pouces) Poids : 3,4 kg (7 lb 8 oz) 500 (19 11⁄16) 40 (1 9⁄16) La conception et les spécifications sont sujettes à modifications sans préavis. 21 (FR) - Sony KDL-32XBR950 | Instructions (SU-LW1 Wall-Mount Bracket) - Page 42
inadecuada. Una vez terminada la instalación, entregue el manual de instrucciones al cliente. Sony ha diseñado este soporte de montaje mural para utilizarlo TV (KDL32XBR950/KLV30XBR900/KLV-26HG2) Seguridad Los productos Sony se diseñan para garantizar su uso seguro. Sin embargo, si se utilizan de - Sony KDL-32XBR950 | Instructions (SU-LW1 Wall-Mount Bracket) - Page 43
Para clientes ADVERTENCIA Si no se respetan las precauciones siguientes, se pueden producir incendios, descargas eléctricas o explosiones que podrían provocar heridas graves o fatales. Asegúrese de contratar la instalación a contratistas cualificados y procure que los niños pequeños se mantengan - Sony KDL-32XBR950 | Instructions (SU-LW1 Wall-Mount Bracket) - Page 44
No obstruya los orificios de ventilación del monitor. Si cubre la parte superior del monitor con un paño o similar y obstruye los orificios de ventilación del mismo, éste puede sobrecalentarse y provocar un incendio. No aplique ningún peso que no sea el del propio monitor al soporte de montaje mural - Sony KDL-32XBR950 | Instructions (SU-LW1 Wall-Mount Bracket) - Page 45
de las esquinas o partes salientes del monitor, podrían provocarse daños personales o materiales. No manipule el producto con excesiva fuerza durante su limpieza o mantenimiento. No aplique demasiada fuerza en la parte superior del monitor. Si lo hace, éste podría caerse y provocar daños personales - Sony KDL-32XBR950 | Instructions (SU-LW1 Wall-Mount Bracket) - Page 46
Sony. Procure leer las instrucciones de seguridad descritas anteriormente y poner especial atención a la seguridad durante la instalación, mantenimiento y comprobación del producto. Asegúrese de fijar el soporte de montaje mural firmemente en la pared siguiendo las instrucciones de este manual en su - Sony KDL-32XBR950 | Instructions (SU-LW1 Wall-Mount Bracket) - Page 47
Procure instalar el monitor en una pared perpendicular y plana. De lo contrario, el monitor podría caerse y provocar daños personales. Una vez instalado correctamente el monitor, sujete los cables adecuadamente. Si alguna persona u objeto queda enredado con los cables, podrían provocarse daños o - Sony KDL-32XBR950 | Instructions (SU-LW1 Wall-Mount Bracket) - Page 48
Paso 2: Ajuste la posición de las bases de la abrazadera (sólo para KLV-26HG2) 1 Base de abrazadera B Si va a instalar un televisor KDL32XBR950 o KLV30XBR900, omita el paso 2 y vaya directamente al paso 3. Abrazadera 2 1Retire los cuatro ajustadores de inclinación (dos para cada base de Base - Sony KDL-32XBR950 | Instructions (SU-LW1 Wall-Mount Bracket) - Page 49
210 (8 9/32) 14 (9/16) Tabla de las dimensiones de instalación de la pantalla A 500 (19 11/16) F C G D B B H E Modelo de pantalla KLV30XBR900 KDL32XBR950 KLV-26HG2 Dimensiones de la pantalla Unidad: mm (pulgadas) Longitud de cada ángulo de montaje Unidad: mm (pulgadas) Peso A B C D E Á - Sony KDL-32XBR950 | Instructions (SU-LW1 Wall-Mount Bracket) - Page 50
Diagrama de instalación en la pared 500 (19 11/16) 454 (17 7/8) 430 (16 15/16) 215 (8 15/32) 9-7×40 (9/32 × 1 9/16) Orificio elíptico Unidad: mm (pulgadas) 14 (9/16) 91 (3 19/32) 148 (5 13/16) 25 25 25 (31/32) (31/32) (31/32) 210 (8 9/32) 25 25 25 (31/32) (31/32) (31/32) φ60 (2 3/8) Orificio - Sony KDL-32XBR950 | Instructions (SU-LW1 Wall-Mount Bracket) - Page 51
Paso 4: Instale la placa en la pared 1 Alinee la placa. Orificio utilizado para fijar temporalmente la placa Placa Fije temporalmente la placa a la pared por medio de un tornillo. Alinee la placa para que quede nivelada con el suelo. ADVERTENCIA • El tornillo utilizado en este procedimiento no - Sony KDL-32XBR950 | Instructions (SU-LW1 Wall-Mount Bracket) - Page 52
3 Abrazadera 1 Ajustador de inclinación Bases de abrazadera A y B 2 Ajuste la inclinación de las abrazaderas. Si desea instalar la pantalla en sentido vertical, a ras de pared (0°), omita los pasos 1 y 2 siguientes. Compruebe que las abrazaderas estén firmemente fijadas a la placa. 1Retire los - Sony KDL-32XBR950 | Instructions (SU-LW1 Wall-Mount Bracket) - Page 53
Paso 5: Separe la pantalla del soporte de escritorio El procedimiento varía en función del modelo de pantalla. Aplique el procedimiento adecuado para la pantalla que está instalando. KLV-26HG2 1Tire de la esquina inferior (derecha o izquierda) de la cubierta posterior. 1 Luego tire de la otra - Sony KDL-32XBR950 | Instructions (SU-LW1 Wall-Mount Bracket) - Page 54
KLV30XBR900 1Retire los dos tornillos del soporte de escritorio. Nota No coloque la pantalla cara abajo mientras realiza el procedimiento. 2Aguantando la base del soporte, levante ligeramente la pantalla y apártela del soporte. La pantalla se separará del soporte. Son necesarias como mínimo dos - Sony KDL-32XBR950 | Instructions (SU-LW1 Wall-Mount Bracket) - Page 55
KDL32XBR950 1Retire los dos tornillos del soporte de escritorio. Nota No coloque la pantalla cara abajo mientras realiza el procedimiento. 2Aguantando la base del soporte, levante ligeramente la pantalla y apártela del soporte. La pantalla se separará del soporte. Son necesarias como mínimo dos - Sony KDL-32XBR950 | Instructions (SU-LW1 Wall-Mount Bracket) - Page 56
Paso 6: Instale la pantalla en la placa ADVERTENCIA No conecte el cable de alimentación a la toma de corriente hasta que haya finalizado la instalación. Si el cable de alimentación queda atrapado, podría producirse un cortocircuito, ocasionando una descarga eléctrica. Procure no tropezar con los - Sony KDL-32XBR950 | Instructions (SU-LW1 Wall-Mount Bracket) - Page 57
resto de cables a las tomas correspondientes de la parte posterior de la pantalla. Para obtener más información sobre la conexión de los cables, consulte el manual de instrucciones de la pantalla. Al cablear en una pared, pase los cables por un orificio realizado en la pared con esta finalidad (10 - Sony KDL-32XBR950 | Instructions (SU-LW1 Wall-Mount Bracket) - Page 58
3 1 2 4 3 No apriete demasiado los tornillos. Monte la pantalla en la placa. 1Para bloquear las abrazaderas temporalmente, coloque los dos tornillos de fijación (+B5 × L12, suministrados) en los orificios de las bases de la abrazadera B desde la parte exterior. 2Cuelgue los ganchos superiores de - Sony KDL-32XBR950 | Instructions (SU-LW1 Wall-Mount Bracket) - Page 59
o daños en la misma unidad. Si los cables no se pasan correctamente, podría producirse un cortocircuito y originarse un incendio o una descarga eléctrica. Para su seguridad, compruebe que todos los procedimientos se han realizado correctamente. 19 (ES) - Sony KDL-32XBR950 | Instructions (SU-LW1 Wall-Mount Bracket) - Page 60
Cómo retirar la pantalla 1 Para distribuidores Sony Desconecte el cable de alimentación de la toma de pared. 2 Retire los dos tornillos de fijación. 3 Son necesarias dos o más personas para levantar la pantalla y separarla - Sony KDL-32XBR950 | Instructions (SU-LW1 Wall-Mount Bracket) - Page 61
210 (8 9⁄32) 245 (9 21⁄32) 270 (10 5⁄8) Especificaciones Unidad: mm (pulgadas) Peso: 3,4 kg (7 lb 8 oz) 500 (19 11⁄16) 40 (1 9⁄16) El diseño y las especificaciones están sujetos a cambios sin previo aviso. 21 (ES) - Sony KDL-32XBR950 | Instructions (SU-LW1 Wall-Mount Bracket) - Page 62
- Sony KDL-32XBR950 | Instructions (SU-LW1 Wall-Mount Bracket) - Page 63
- Sony KDL-32XBR950 | Instructions (SU-LW1 Wall-Mount Bracket) - Page 64
Printed on 100% recycled paper using VOC (Volatile Organic Compound)-free vegetable oil based ink. Printed in Japan
-
 1
1 -
 2
2 -
 3
3 -
 4
4 -
 5
5 -
 6
6 -
 7
7 -
8
-
9
-
10
-
11
-
12
-
13
-
14
-
15
-
16
-
17
-
18
-
19
-
20
-
21
-
22
-
23
-
24
-
25
-
26
-
27
-
28
-
29
-
30
-
31
-
32
-
33
-
34
-
35
-
36
-
37
-
38
-
39
-
40
-
41
-
42
-
43
-
44
-
45
-
46
-
47
-
48
-
49
-
50
-
51
-
52
-
53
-
54
-
55
-
56
-
57
-
58
-
59
-
60
-
61
-
62
-
63
-
64
 |
 |

© 2003 Sony Corporation
4-100-573-
11
(1)
Wall-Mount Bracket
Instructions
Mode d’emploi
Instrucciones
SU-LW1
US
FR
ES