Sony KDL-46EX400 Operating Instructions - Page 8
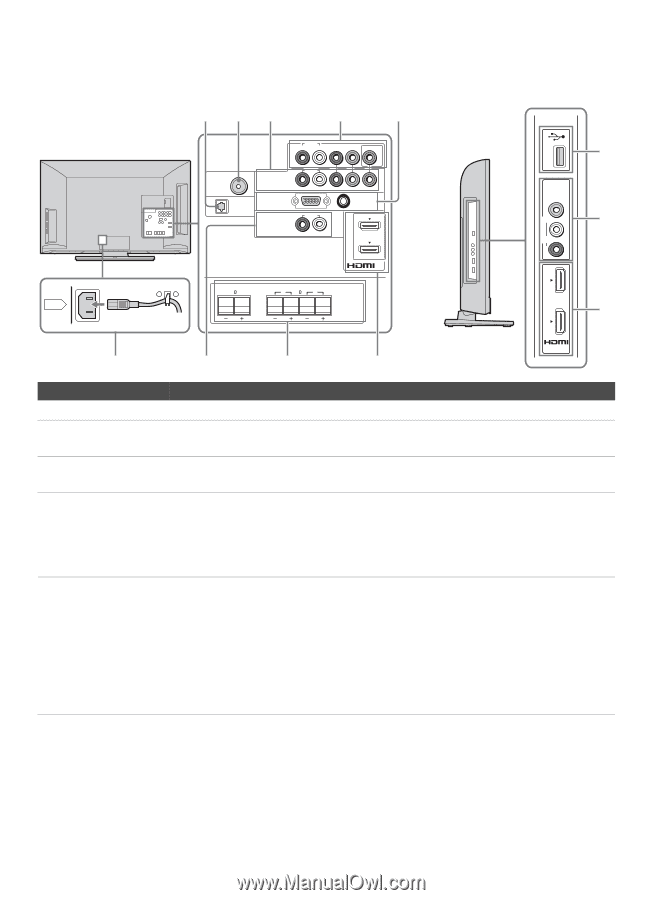
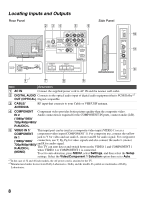
Locating Inputs and Outputs, AC IN, DIGITAL AUDIO, OUT OPTICAL, CABLE, ANTENNA, COMPONENT, 1080p/1080i
 |
UPC - 027242785045
View all Sony KDL-46EX400 manuals
Add to My Manuals
Save this manual to your list of manuals |
Page 8 highlights
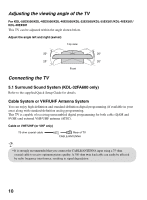
Locating Inputs and Outputs Rear Panel 2 34 5 Side Panel 6 AC IN AUDIO R L (MONO) 1 AUDIO PR CABLE/ ANTENNA COMPONENT IN (1080p/1080i/ 720p/480p/480i) 2 R L RGB DIGITAL PC IN AUDIO OUT (OPTICAL) AUDIO AUDIO OUT (FIX) R L VIDEO IN 1 PB Y AUDIO PC/HDMI 1 AUDIO IN 1 4 SUBWOOFER (8 ) IN SATELLITE R (8 ) L SPEAKERS VIDEO IN 2 VIDEO L (MONO) AUDIO R 2 3 0 qa 9 1*1 7 8 9 IN Item Description 1 AC IN Connect the supplied power cord to AC IN and the nearest wall outlet. 2 DIGITAL AUDIO Connects to the optical audio input of digital audio equipment that is PCM/Dolby*2 OUT (OPTICAL) Digital compatible. 3 CABLE/ ANTENNA RF input that connects to your Cable or VHF/UHF antenna. 4 COMPONENT Component video provides better picture quality than the composite video. IN 2 Audio connection is required for the COMPONENT IN ports, connect audio (L/R). (1080p/1080i/ 720p/480p/480i)/ R-AUDIO-L 5 VIDEO IN 1/ This input port can be used as a composite video input (VIDEO 1) or as a COMPONENT component video input (COMPONENT 1). For composite use, connect the yellow IN 1 jack to Y for video and use audio L (mono) and R for audio signal. For component (1080p/1080i/ connection, use Y, PB, PR for video signals and also connect the audio L (mono) 720p/480p/480i)/ and R for audio signal. R-AUDIO-L (MONO) This TV can auto detect and switch between the VIDEO 1 and COMPONENT 1 when VIDEO 1 or COMPONENT 1 is connected. To set to auto detection, press MENU, select Settings, and then select the Setup settings. Select the Video/Component 1 Selection option then set to Auto. *1 In the case of 32 and 40 inch models, the AC power cord is attached to the TV. *2 Manufactured under license from Dolby Laboratories. Dolby and the double-D symbol are trademarks of Dolby Laboratories. 8
-
 1
1 -
2
-
 3
3 -
 4
4 -
 5
5 -
 6
6 -
 7
7 -
 8
8 -
 9
9 -
 10
10 -
 11
11 -
 12
12 -
 13
13 -
14
-
15
-
16
-
17
-
18
-
19
-
20
-
21
-
22
-
23
-
24
-
25
-
26
-
27
-
28
-
29
-
30
-
31
-
32
-
33
-
34
-
35
-
36
-
37
-
38
-
39
-
40
-
41
-
42
-
43
-
44
-
45
-
46
-
47
-
48
-
49
-
50
-
51
-
52
-
53
-
54
-
55
-
56
-
57
-
58
-
59
 |
 |