Sony KP-46WT520 Operating Instructions - Page 27
VCR and Cable Box, TV's A/V input jacks.
 |
View all Sony KP-46WT520 manuals
Add to My Manuals
Save this manual to your list of manuals |
Page 27 highlights
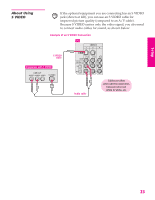
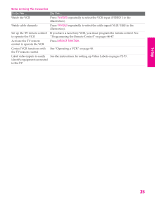
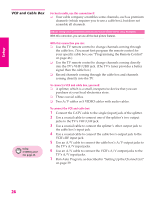
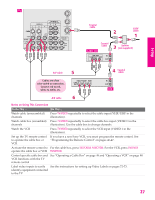
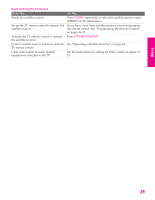
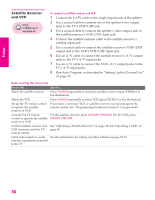
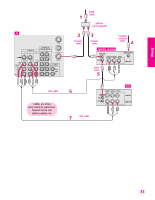
SETUP Setup SETUP VCR and Cable Box Using S VIDEO jacks? See page 23. For best results, use this connection if: ❑ Your cable company scrambles some channels, such as premium channels (which requires you to use a cable box), but does not scramble all channels. About Using This Connection with Dual Picture (Twin View, etc.) Features With this connection, you can use all the dual picture features. With this connection you can: ❑ Use the TV remote control to change channels coming through the cable box. (You must first program the remote control for your specific cable box; see "Programming the Remote Control" on page 46.) ❑ Use the TV remote control to change channels coming directly into the TV's VHF/UHF jack. (The TV's tuner provides a better signal than the cable box.) ❑ Record channels coming through the cable box and channels coming directly into the TV. To connect a VCR and cable box, you need: ❑ A splitter, which is a small, inexpensive device that you can purchase at your local electronics store. ❑ Three coaxial cables. ❑ Two A/V cables or S VIDEO cables with audio cables. To connect the VCR and cable box 1 Connect the CATV cable to the single (input) jack of the splitter. 2 Use a coaxial cable to connect one of the splitter's two output jacks to the TV's VHF/UHF jack. 3 Use a coaxial cable to connect the splitter's other output jack to the cable box's input jack. 4 Use a coaxial cable to connect the cable box's output jack to the VCR's RF input jack. 5 Use an A/V cable to connect the cable box's A/V output jacks to the TV's A/V input jacks. 6 Use an A/V cable to connect the VCR's A/V output jacks to the TV's A/V input jacks. 7 Run Auto Program, as described in "Setting Up the Channel List" on page 39. SETUP SETUP SETUP 26
-
 1
1 -
2
-
3
-
4
-
5
-
6
-
7
-
8
-
9
-
10
-
11
-
12
-
13
-
14
-
15
-
16
-
17
-
18
-
19
-
20
-
21
-
 22
22 -
 23
23 -
 24
24 -
 25
25 -
 26
26 -
 27
27 -
 28
28 -
 29
29 -
 30
30 -
 31
31 -
 32
32 -
33
-
34
-
35
-
36
-
37
-
38
-
39
-
40
-
41
-
42
-
43
-
44
-
45
-
46
-
47
-
48
-
49
-
50
-
51
-
52
-
53
-
54
-
55
-
56
-
57
-
58
-
59
-
60
-
61
-
62
-
63
-
64
-
65
-
66
-
67
-
68
-
69
-
70
-
71
-
72
-
73
-
74
-
75
-
76
-
77
-
78
-
79
-
80
-
81
-
82
-
83
-
84
-
85
 |
 |