Sony KP-46WT520 Operating Instructions - Page 63
Using the Video Menu, Selecting Video Options, SETUP, Menus
 |
View all Sony KP-46WT520 manuals
Add to My Manuals
Save this manual to your list of manuals |
Page 63 highlights
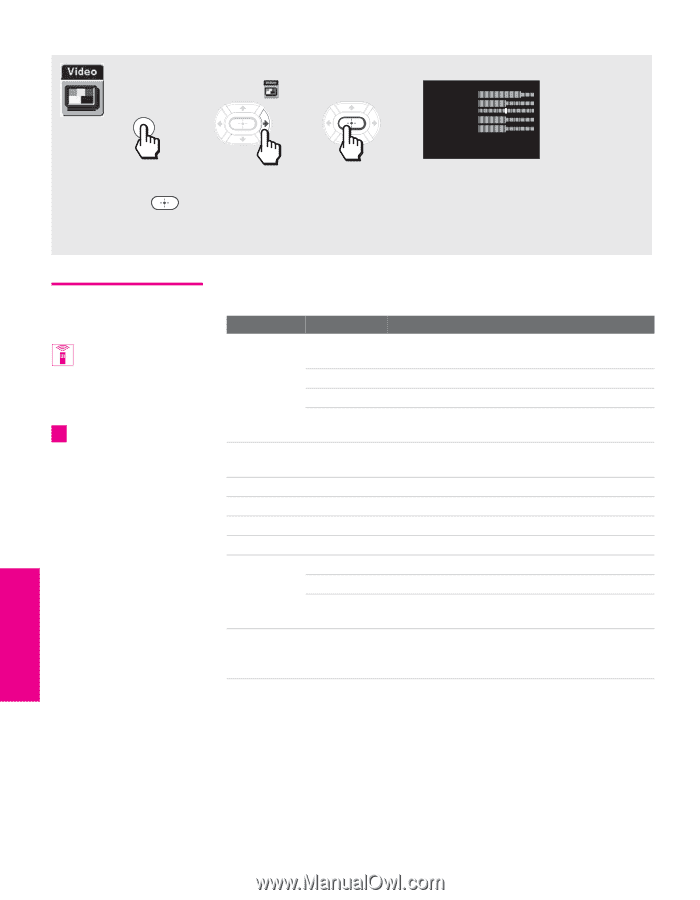
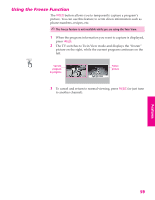
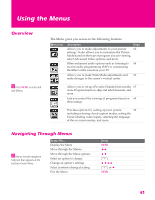
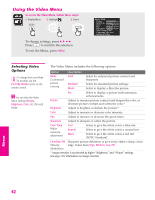
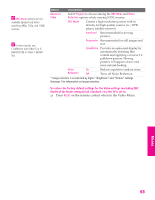
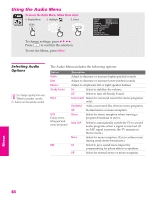
SETUP SETUP Menus Using the Video Menu To access the Video Menu, follow these steps: 1. Display Menu 2. Highlight 3. Select MENU To change settings, press V v B b. Press to confirm the selection. To exit the Menu, press MENU. Mode: Vivid Picture Brightness Color Hue Sharpness Color Temp.: Cool ClearEdge VM: High Advanced Video Selecting Video Options To change from one Mode to another, use the PICTURE MODE button on the remote control. z You can alter the Video Menu settings (Picture, Brightness, Color, etc.) for each Mode. The Video Menu includes the following options: Option Description Mode Customized picture viewing Vivid Standard Movie Select for enhanced picture contrast and sharpness. Select for standard picture settings. Select to display a film-like picture. Pro Select to display a picture with minimum enhancements. Picture Adjust to increase picture contrast and deepen the color, or decrease picture contrast and soften the color.* Brightness Adjust to brighten or darken the picture.* Color Adjust to increase or decrease color intensity. Hue Adjust to increase or decrease the green tones. Sharpness Adjust to sharpen or soften the picture. Color Temp. White intensity adjustment Cool Neutral Warm Select to give the white colors a blue tint. Select to give the white colors a neutral tint. Select to give the white colors a red tint (NTSC-Standard). ClearEdge VM Sharpens picture definition to give every object a sharp, clean Velocity edge. Select from High, Medium, Low, Off. Modulation * Image retention is accelerated by higher "Brightness" and "Picture" settings. See page 1 for information on image retention. SETUP Menus SETUP 62
-
 1
1 -
2
-
3
-
4
-
5
-
6
-
7
-
8
-
9
-
10
-
11
-
12
-
13
-
14
-
15
-
16
-
17
-
18
-
19
-
20
-
21
-
22
-
23
-
24
-
25
-
26
-
27
-
28
-
29
-
30
-
31
-
32
-
33
-
34
-
35
-
36
-
37
-
38
-
39
-
40
-
41
-
42
-
43
-
44
-
45
-
46
-
47
-
48
-
49
-
50
-
51
-
52
-
53
-
54
-
55
-
56
-
57
-
 58
58 -
 59
59 -
 60
60 -
 61
61 -
 62
62 -
 63
63 -
 64
64 -
 65
65 -
 66
66 -
 67
67 -
 68
68 -
69
-
70
-
71
-
72
-
73
-
74
-
75
-
76
-
77
-
78
-
79
-
80
-
81
-
82
-
83
-
84
-
85
 |
 |