Sony LBT-XGR6 Operating Instructions
Sony LBT-XGR6 - Compact Hi-fi Stereo System Manual
 |
View all Sony LBT-XGR6 manuals
Add to My Manuals
Save this manual to your list of manuals |
Sony LBT-XGR6 manual content summary:
- Sony LBT-XGR6 | Operating Instructions - Page 1
Instructions Owner's Record The model and serial numbers are located on the rear panel of the unit. Record the serial number in the space provided below. Refer to them whenever you call upon your Sony dealer regarding this product. Model No. Serial No. LBT-XGR80 LBT-XGR60 LBT-XGR6 © 2002 Sony - Sony LBT-XGR6 | Operating Instructions - Page 2
and maintenance (servicing) instructions in the designed to provide reasonable protection against harmful interference in manual could void your authority to operate this equipment. Note on CATV system installer: This reminder is provided to call the CATV system Sony Corporation has determined that this - Sony LBT-XGR6 | Operating Instructions - Page 3
up the system 6 Manually Power Saving Mode 23 Using the CD display 23 Optional Components Hooking up optional components ........ 24 Listening to audio from a connected component 26 Recording audio from a connected component 27 Recording on a connected component 27 Troubleshooting Problems - Sony LBT-XGR6 | Operating Instructions - Page 4
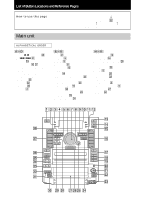
location of buttons and other parts of the system that are mentioned in the text. Illustration number r PLAY MODE es (9, 10) R R Name of 20) P FILE 5 (17) PHONES jack w; PLAY MODE es (9, 10) POWER SAVE/DEMO (STANDBY) 3 (23) Power stream indicator 6 PUSH OPEN wj (9) REPEAT es (10) 123 4 567890 - Sony LBT-XGR6 | Operating Instructions - Page 5
(16) SURROUND ek (18) TIMER SELECT qa (16, 19) TUNER/BAND 9 (11, 12) TUNER ENTER wf (11) TUNER MEMORY wf (11) TUNING MODE 8 (11, 12) TUNING -/+ 9 (11, 12) VOLUME control 7 (10) X-GROOVE wg (16) BUTTON DESCRIPTIONS @/1 1 c/CLOCK SET qs h/H qj eh x qj eh .m /M> qj eh X qk z REC qk - Sony LBT-XGR6 | Operating Instructions - Page 6
. Connect the speaker cords to the FRONT SPEAKER jacks for LBT-XGR60 and LBT-XGR6 or TWEETER & WOOFER jacks for LBT-XGR80 as below. Insert only the stripped portion. Red (3) Black (#) 2 Connect the speakers for biamplification system (LBT-XGR80 only) Connect the speaker cord to the SUPER WOOFER - Sony LBT-XGR6 | Operating Instructions - Page 7
. AM loop antenna CFMOAX75IAL AM When carrying this system Do the following to protect the CD mechanism. 1 Make sure that all power line voltage. VOLTAGE SELECTOR 120V 220V 230~240V 5 Connect the power cord to a wall outlet. The demonstration appears in the display. When you press ?/1, the system - Sony LBT-XGR6 | Operating Instructions - Page 8
When the remote no longer operates the system, replace both batteries with new ones. avoid possible damage from battery leakage. Setting the clock 1 Turn on the system. 2 Press c/CLOCK SET (or CLOCK/TIMER SET on the remote). power cord or if a power failure occurs. • You cannot set the clock in the - Sony LBT-XGR6 | Operating Instructions - Page 9
CD CD Loading the CD 1 Press PUSH OPEN. The front cover opens. 2 Place a CD with the label number Playing time 1 Press FUNCTION repeatedly until "CD" appears. 2 Press PLAY MODE repeatedly in stop mode until the mode you want appears. Select ALL DISCS 1 DISC ALL DISCS SHUFFLE 1 DISC SHUFFLE - Sony LBT-XGR6 | Operating Instructions - Page 10
To cancel playing repeatedly, press REPEAT until "REPEAT" or "REPEAT1" disappears. Press PUSH OPEN. Turn VOLUME (or press VOL +/- on the remote). * You cannot Turn . AMS > until the track you want appears. 5 Press PLAY MODE once. The track is programmed. First the programmed playing order and " - Sony LBT-XGR6 | Operating Instructions - Page 11
your area and then store them manually Manually tune and store Manual Tuning Preset the radio frequency of your MODE repeatedly until "AUTO" appears. 3 Press TUNING -/+. The frequency indication changes and the scanning stops when the system tunes in a station. "TUNED" and "STEREO" (for a FM stereo - Sony LBT-XGR6 | Operating Instructions - Page 12
until "MONO" appears. There will be no stereo effect, but the reception will improve. • Press TUNING MODE repeatedly until "AUTO" appears in step 2 above, then press TUNING -/+. The frequency indication changes and scanning stops when the system tunes in a station (Automatic Tuning). • To record - Sony LBT-XGR6 | Operating Instructions - Page 13
Press again to resume play. Press M> or .m (or press M or m on the remote) in stop mode. Press .m or M> (or press m or M on the remote) in stop mode. Press A EJECT Z (or Z B EJECT ) in stop mode. Tip The deck stops automatically after repeating the sequence five times. Searching for the beginning - Sony LBT-XGR6 | Operating Instructions - Page 14
(normal) tape. The recording level is adjusted automatically. Steps Recording from a CD (CD Synchro Recording) Recording from a tape (High-Speed Dubbing) Recording Manually 1 Insert a recordable tape into deck B. 2 Insert the CD you want to record. Insert the tape you want to record into deck - Sony LBT-XGR6 | Operating Instructions - Page 15
Select Edit). Notes • You cannot use Tape Select Edit for discs containing over 20 tracks. • You cannot use this function when Program Play mode has been set. After clearing the entire program, follow the above procedure. Timer-recording radio programs To timer-record, you must preset the radio - Sony LBT-XGR6 | Operating Instructions - Page 16
When you use the Sleep Timer, Timer recording will not turn on the system until the Sleep Timer turns it off. • Recording starts from the front the super woofer mode display changes as follows: MODE MOVIE y MODE MUSIC For a powerful sound (GROOVE) The volume switches to power mode and the equalizer - Sony LBT-XGR6 | Operating Instructions - Page 17
audio emphasis file -- Personal File You can create a personal file of audio patterns (surround effect and graphic equalizer) and store them in the system's memory. Later, you can call up an audio pattern when playing a favorite tape, CD, or radio program. Before operating, first select the basic - Sony LBT-XGR6 | Operating Instructions - Page 18
Y SURROUND OFF Timer Falling asleep to music - Sleep Timer You can have the system turn off at a preset time, so you can fall asleep to music. Press t 90 t 80 t 70 t ... t 10 t OFF t AUTO* ... * The power turns off when the current CD or tape finishes playback (for up to 100 minutes). To Press - Sony LBT-XGR6 | Operating Instructions - Page 19
and the music source appear, then the original display appears. 9 Turn off the system. To Check the setting Change the setting Cancel the timer operation Do this Press use the Sleep Timer, Daily Timer will not turn on the system until the Sleep Timer turns it off. • You cannot activate the Daily - Sony LBT-XGR6 | Operating Instructions - Page 20
PATTERN3 t PATTERN4 Singing along: Karaoke You can sing along with any stereo CD or tape by turning down the singer's voice. You need Press FUNCTION repeatedly to select the source you want to record and set it to pause mode. 3 Press z REC. 4 Press DIRECTION repeatedly to select g to record on one - Sony LBT-XGR6 | Operating Instructions - Page 21
KARAOKE" by pressing MIX GUITAR/KARAOKE, you can play along with any stereo CD or tape. You can select your preferred sound characteristics by adjusting GUITAR up. Once GUITAR DISTORTION is activated, it will remain active while the power is on even if the function is changed. To turn off GUITAR - Sony LBT-XGR6 | Operating Instructions - Page 22
• The indicator on the GAME MIXING button lights up when GAME MIXING is activated. • Once GAME MIXING is activated, it will remain active while the power is on even if the function is changed. Note If you start recording while GAME MIXING is activated, GAME MIXING is canceled. To record the - Sony LBT-XGR6 | Operating Instructions - Page 23
to minimize the amount of power consumed during standby (Power Saving Mode). Press POWER SAVE/DEMO (STANDBY) repeatedly while the system is off until the demonstration display disappears. To cancel Power Saving Mode Press POWER SAVE/DEMO (STANDBY) repeatedly while the system is off. Each time you - Sony LBT-XGR6 | Operating Instructions - Page 24
Optional Components Hooking up optional components To enhance your system, you can connect optional components. Refer to the operating instructions provided with each component. Optional TV To the video input of a TV Optional mixer Optional turntable To the inputs From the outputs of a mixer - Sony LBT-XGR6 | Operating Instructions - Page 25
component (such as a video game or camcorder, etc.) to this jack. You can then output video to the connected TV from that component through this system. Notes • Be sure to match the color of the plugs and the connectors. • Using a turntable at high volume may cause distortion or howling. This is - Sony LBT-XGR6 | Operating Instructions - Page 26
Start playing the connected component. Notes • Holding down FUNCTION, and then pressing `/1 while the power is off automatically turns the power on and selects "VIDEO" as the function. When the system is in power saving mode, this function does not work. • If the sound is distorted or too loud when - Sony LBT-XGR6 | Operating Instructions - Page 27
. See "Hooking up optional components" on page 24. 2 Start recording manually. See "Recording to a tape" on page 14. Making a digital recording " on page 24. 2 Start recording. Refer to the operating instructions provided with connected component. Making an analogue recording 1 Connect the - Sony LBT-XGR6 | Operating Instructions - Page 28
Troubleshooting Problems and remedies If you run into any problem using this unit, use the following check list. First, check that the power cord is connected firmly and the speakers are connected correctly and firmly. Should any problem persist, consult your nearest Sony dealer. General "--:--" - Sony LBT-XGR6 | Operating Instructions - Page 29
power, leave the system turned off for a while, then press ?/1 again to turn on the power. • Check the speaker cables in case "PROTECT" and "PUSH POWER" appear alternately again after you turn the system is in program or shuffle mode. Press PLAY MODE repeatedly until "PROGRAM," " Troubleshooting 29GB - Sony LBT-XGR6 | Operating Instructions - Page 30
stereo. • Press STEREO/MONO so that "STEREO" disappears. If other troubles not described above occur, reset the system as follows: 1 Press c/CLOCK SET, TUNER ENTER and ?/1 at the same time. 2 Unplug the power cord. 3 Plug the power The AC power cord must be changed only at the qualified service shop. - Sony LBT-XGR6 | Operating Instructions - Page 31
about an hour until the moisture evaporates. • When you move the unit, take out any discs. If you have any questions or problems concerning your unit, please consult your nearest Sony dealer. Notes on CDs • Before playing, clean the CD with a cleaning cloth. Wipe the CD from the center out. • Do not - Sony LBT-XGR6 | Operating Instructions - Page 32
30 hours of use with a separately sold demagnetizing cassette. For details, refer to the instructions of the demagnetizing cassette. Specifications AUDIO POWER SPECIFICATIONS (LBT-XGR6 USA models only) POWER OUTPUT AND TOTAL HARMONIC DISTORTION: With 6 ohm loads, both channels driven, from 120-10 - Sony LBT-XGR6 | Operating Instructions - Page 33
(phono jacks) PHONES: (stereo phone jack) MD (VIDEO) OUT: (phono jacks) FRONT SPEAKER: LBT-XGR80: LBT-XGR60/XGR6: sensitivity 250 mV, impedance Tape player section Recording system Frequency response Wow and flutter 4-track 2-channel stereo 40 - 13,000 Hz (±3 dB), using Sony TYPE I cassette ±0.15 - Sony LBT-XGR6 | Operating Instructions - Page 34
for LBT-XGR6 Speaker system 3-way BUILT IN SW, bass-reflex type Speaker units Super Woofer/Woofer: 17 cm/17 cm, cone type Tweeter: 2.5 cm, horn type Rated impedance 6 ohms Dimensions (w/h/d) Approx. 255 × 530 × 330 mm Mass Approx. 9.0 kg net per speaker Other models speaker SS-XGR60 - Sony LBT-XGR6 | Operating Instructions - Page 35
220 V or 230 - 240 V AC, 50/60 Hz Adjustable with voltage selector Power consumption U.S.A. models: LBT-XGR6 240 watts Other models: LBT-XGR80 LBT-XGR60 320 watts 180 watts Dimensions (w/h/d) Mass : LBT-XGR6 LBT-XGR80 LBT-XGR60 Approx. 355 × 425 × 451 mm Approx. 13.0 kg Approx. 16.4 kg Approx - Sony LBT-XGR6 | Operating Instructions - Page 36
36GBSony Corporation Printed in Indonesia
-
 1
1 -
 2
2 -
 3
3 -
 4
4 -
 5
5 -
 6
6 -
 7
7 -
8
-
9
-
10
-
11
-
12
-
13
-
14
-
15
-
16
-
17
-
18
-
19
-
20
-
21
-
22
-
23
-
24
-
25
-
26
-
27
-
28
-
29
-
30
-
31
-
32
-
33
-
34
-
35
-
36
 |
 |

Compact Hi-Fi
Stereo System
© 2002 Sony Corporation
Operating Instructions
4-238-809-
11
(4)
LBT-XGR80
LBT-XGR60
LBT-XGR6
Owner’s Record
The model and serial numbers are located on the rear panel of the unit.
Record the
serial number in the space provided below. Refer to them whenever you call upon your
Sony dealer regarding this product.
Model No.
Serial No.