Sony LBT-ZUX9 Operating Instructions - Page 25
USB Device, To remove the USB device, To erase an MP3 audio track or an - subs
 |
View all Sony LBT-ZUX9 manuals
Add to My Manuals
Save this manual to your list of manuals |
Page 25 highlights
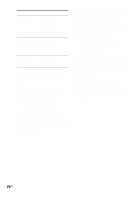
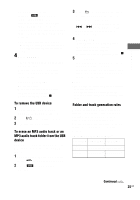
USB Device For REC1 Recording: Press CD- USB SYNC/REC 1. "USB" lights up and "REC" flashes in the display. The display cycles through "CD-USB REC1", "Push ENTER" and "xxxxxxByte Free Space" (remaining space on the USB device)*. * The display will only show an integer. For example, if the memory free space is 1.8 Gigabyte (Gb), it will only show as 1 Gb. 4 Press ENTER. For CD-USB Synchro Recording: Recording starts. When the recording is completed, the disc and the USB device stop automatically. For REC1 Recording: Recording starts. When the recording is completed, the disc continues to play back. To stop recording, press x. To remove the USB device 1 Check that the REC/ERASE indicator on the unit is light off. 2 Press "/1 to turn off the system. 3 Remove the USB device. To erase an MP3 audio track or an MP3 audio track folder from the USB device You can erase an MP3 audio track or an MP3 audio track folder from the USB device. 1 Connect a recordable USB device to the (USB) port on the unit. 2 Press USB (or USB on the remote). 3 Press +/- repeatedly to select the folder you want. To erase the folder, proceed to step 4. To erase an MP3 audio track, press . or > repeatedly to select the MP3 audio track you want, then proceed to step 4. 4 Press ERASE. "Track Erase ?" or "Folder Erase ?", and "Push ENTER" appear alternatively in the display. To cancel the erase operation, press x. 5 Press ENTER. The selected MP3 audio track or MP3 audio track folder is erased. The folder would only be deleted if the folder only contained MP3 audio tracks and there is no sub folder. Notes • The program list is cleared when you perform the erase operation. • You cannot erase MP3 audio tracks and folders in Shuffle Play mode or Program Play mode. Folder and track generation rules When recording to a USB device for the first time, a "MUSIC" folder is created directly below the "ROOT" folder. Folders and MP3 audio tracks are generated within this "MUSIC" folder as follows according to the recording method. CD-USB Synchro Recording1) Recording Folder name Track name source MP3 disc Same as the recording source2) AUDIO FLDRXXX3) TRACKXXX4) CD Continued l 25US
-
 1
1 -
2
-
3
-
4
-
5
-
6
-
7
-
8
-
9
-
10
-
11
-
12
-
13
-
14
-
15
-
16
-
17
-
18
-
19
-
 20
20 -
 21
21 -
 22
22 -
 23
23 -
 24
24 -
 25
25 -
 26
26 -
 27
27 -
 28
28 -
 29
29 -
 30
30 -
31
-
32
-
33
-
34
-
35
-
36
-
37
-
38
-
39
-
40
-
41
-
42
-
43
-
44
-
45
-
46
-
47
-
48
-
49
-
50
-
51
-
52
-
53
-
54
-
55
-
56
-
57
-
58
-
59
-
60
-
61
-
62
-
63
-
64
 |
 |