Sony LBT-ZUX9 Operating Instructions - Page 43
Other Operations, Using the timer
 |
View all Sony LBT-ZUX9 manuals
Add to My Manuals
Save this manual to your list of manuals |
Page 43 highlights
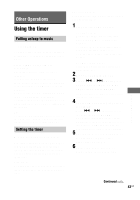
Other Operations Using the timer Falling asleep to music - Sleep Timer You can set the system to turn off after a certain time, so that you can fall asleep to music. Press SLEEP on the remote repeatedly. The minute display (turn-off time) changes. If you select "AUTO", the system automatically turns off after the playback of the disc, tape or USB stops or in 100 minutes. Do not select "AUTO" during CD-TAPE or CD-USB Synchro Recording. To cancel the Sleep Timer, press SLEEP repeatedly until "SLEEP OFF" appears in the display. Tip To check the remaining time, press SLEEP on the remote once. However, you cannot check the remaining time if you select "AUTO". Setting the timer - Play Timer/Recording Timer You cannot activate both the Play Timer and the Recording Timer at the same time. Make sure you have set the clock. Use the buttons on the remote for the operation. Play Timer: You can wake up to music from disc, tape, tuner or optional USB device at a preset time. Recording Timer: You can record from a preset radio station at a specified time. 1 Prepare the audio source. For Play Timer: Prepare the audio source and then press VOLUME +/- to adjust the volume. To start from a specific track, create your own program (page 22). To wake up to a tape, load a tape into Deck A. For Recording Timer: Tune in the preset radio station you want (page 31). 2 Press CLOCK/TIMER SET. 3 Press . or > repeatedly to select "PLAY SET?" or "REC SET?", then press ENTER. "ON" appears and the hour indication flashes in the display. 4 Set the time to start playback or recording. Press . or > repeatedly to set the hour, then press ENTER. The minute indication flashes in the display. Use the procedure above to set the minute. "OFF" appears and the hour indication flashes in the display. 5 Set the time to stop playback or recording using the same procedure as step 4. 6 Select the audio source or prepare the recordable tape. Continued l 43US Other Operations
-
 1
1 -
2
-
3
-
4
-
5
-
6
-
7
-
8
-
9
-
10
-
11
-
12
-
13
-
14
-
15
-
16
-
17
-
18
-
19
-
20
-
21
-
22
-
23
-
24
-
25
-
26
-
27
-
28
-
29
-
30
-
31
-
32
-
33
-
34
-
35
-
36
-
37
-
 38
38 -
 39
39 -
 40
40 -
 41
41 -
 42
42 -
 43
43 -
 44
44 -
 45
45 -
 46
46 -
 47
47 -
 48
48 -
49
-
50
-
51
-
52
-
53
-
54
-
55
-
56
-
57
-
58
-
59
-
60
-
61
-
62
-
63
-
64
 |
 |