Sony LBT-ZUX9 Operating Instructions - Page 47
Hooking up the optional components
 |
View all Sony LBT-ZUX9 manuals
Add to My Manuals
Save this manual to your list of manuals |
Page 47 highlights
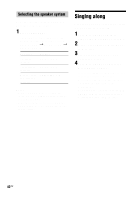
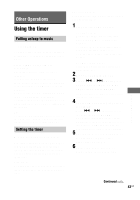
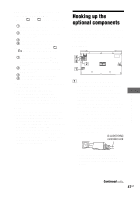
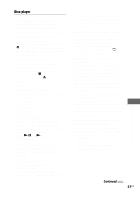
MP3 audio tracks with play mode other than "PROGRAM": • When " " or " SHUF" play mode is selected 1 Total number of tracks of the current folder and folder name 2 Memory free space of connected USB device3) 3 Clock display (for 8 seconds) 4 Effect name (for 8 seconds) • When play mode other than " ", " SHUF" or "PROGRAM" is selected 1 Total number of folders2) and volume label of the disc2)/USB device3) 2 Memory free space of connected USB device3) 3 Clock display (for 8 seconds) 4 Effect name (for 8 seconds) 1) "NO STEP" appears in the display if you have not program any track. 2) Appears during CD function only. 3) Appears during USB function only. The display will only show an integer. For example, if the memory free space is 1.8 Gigabyte (Gb), it will only show as 1 Gb. Notes • Some text characters may not be displayed. • If the title of MP3 audio track contains characters which cannot be displayed, these characters will be displayed as "_". • The elapsed playing time of MP3 audio tracks may not be displayed correctly. • ID3 tag information for MP3 audio tracks is displayed when the tracks have ID3 version 1 or ID3 version 2. If there are ID3 version 1 and version 2 tags, ID3 version 2 tag information has priority. Hooking up the optional components To enhance your system, you can connect optional components. Refer to the operating instructions supplied with each component. Rear panel 4 3 2 1 A D-LIGHT SYNC OUT jack (Except for Oceanian models) Connect the D-LIGHT SYNC controller. You need to connect the D-LIGHT SYNC controller to a lighting device* (not supplied). The lighting device will react according to the control signals transmitted by the D-LIGHT SYNC controller upon receiving audio source from the system. For details on the use of the D-LIGHT SYNC controller and lighting device, refer to the operating instructions supplied with the respective device. D-LIGHT SYNC controller cord * Refer to the operating instructions supplied with the D-LIGHT SYNC controller for the recommended lighting device. Other Operations Continued l 47US
-
 1
1 -
2
-
3
-
4
-
5
-
6
-
7
-
8
-
9
-
10
-
11
-
12
-
13
-
14
-
15
-
16
-
17
-
18
-
19
-
20
-
21
-
22
-
23
-
24
-
25
-
26
-
27
-
28
-
29
-
30
-
31
-
32
-
33
-
34
-
35
-
36
-
37
-
38
-
39
-
40
-
41
-
 42
42 -
 43
43 -
 44
44 -
 45
45 -
 46
46 -
 47
47 -
 48
48 -
 49
49 -
 50
50 -
 51
51 -
 52
52 -
53
-
54
-
55
-
56
-
57
-
58
-
59
-
60
-
61
-
62
-
63
-
64
 |
 |