Sony MDR-IF245RK Operating Instructions
Sony MDR-IF245RK Manual
 |
View all Sony MDR-IF245RK manuals
Add to My Manuals
Save this manual to your list of manuals |
Sony MDR-IF245RK manual content summary:
- Sony MDR-IF245RK | Operating Instructions - Page 1
the Sony MDR-IF245RK Cordless Stereo Headphone System. Before operating the unit, please read this manual thoroughly and retain it for future reference. Some features are: - Lightweight headphones for long time listening comfort. - Approx. 28 hours playback with supplied Ni-MH rechargeable battery - Sony MDR-IF245RK | Operating Instructions - Page 2
Cordless Stereo Headphone System Operating Instructions Manual de instrucciones MDR-IF245RK Español Sistema de auriculares estéreo inalámbricos Comprobación de los elementos incluidos Transmisor TMR-IF245R (1) Auriculares MDR-IF245R (1) Adaptador de CA (1) Cable de conexión (mini clavija esté
-
 1
1 -
 2
2
 |
 |
Cordless Stereo
Headphone System
Operating Instructions
Manual de instrucciones
©2012 Sony Corporation
Printed in China
4-429-158-
13
(1)
MDR-IF245RK
English
Cordless Stereo Headphone System
WARNING
To reduce the risk of fire or electric shock, do not expose this
apparatus to rain or moisture.
To reduce the risk of fire or electric shock, do not expose this
apparatus to dripping or splashing, and do not place objects
filled with liquids, such as vases, on the apparatus.
Do not expose the batteries (battery pack or batteries installed)
to excessive heat such as sunshine, fire or the like for a long time.
To avoid electrical shock, do not open the cabinet. Refer
servicing to qualified personnel only.
Do not install the appliance in a confined space, such as a
bookcase or built-in cabinet.
As the main plug of AC power adaptor is used to disconnect the
AC power adaptor from the mains, connect it to an easily
accessible AC outlet. Should you notice an abnormality in it,
disconnect it from the AC outlet immediately.
Excessive sound pressure from earphones and headphones can
cause hearing loss.
AC adaptor is not disconnected from the mains as long as it is
connected to the AC outlet, even if the unit itself has been
turned off.
The nameplate is located on the bottom exterior.
You are cautioned that any changes or modifications not
expressly approved in this manual could void your authority to
operate this equipment.
RECYCLING NICKEL METAL HYDRIDE
BATTERIES
Nickel Metal Hydride batteries are recyclable.
You can help preserve our environment by
returning your used rechargeable batteries
to the collection and recycling location
nearest you.
For more information regarding recycling of rechargeable
batteries, call toll free
1-800-822-8837, or visit http://www.rbrc.org/
Caution: Do not handle damaged or leaking Nickel Metal
Hydride batteries.
Note
This equipment has been tested and found to comply with the
limits for a Class B digital device, pursuant to Part 15 of the FCC
Rules. These limits are designed to provide reasonable
protection against harmful interference in a residential
installation. This equipment generates, uses and can radiate
radio frequency energy and, if not installed and used in
accordance with the instructions, may cause harmful
interference to radio communications.
However, there is no guarantee that interference will not occur
in a particular installation. If this equipment does cause harmful
interference to radio or television reception, which can be
determined by turning the equipment off and on, the user is
encouraged to try to correct the interference by one or more of
the following measures:
Reorient or relocate the receiving antenna.
Increase the separation between the equipment and receiver.
Connect the equipment into an outlet on a circuit different
from that to which the receiver is connected.
Consult the dealer or an experienced radio/ TV technician for
help.
–
–
–
–
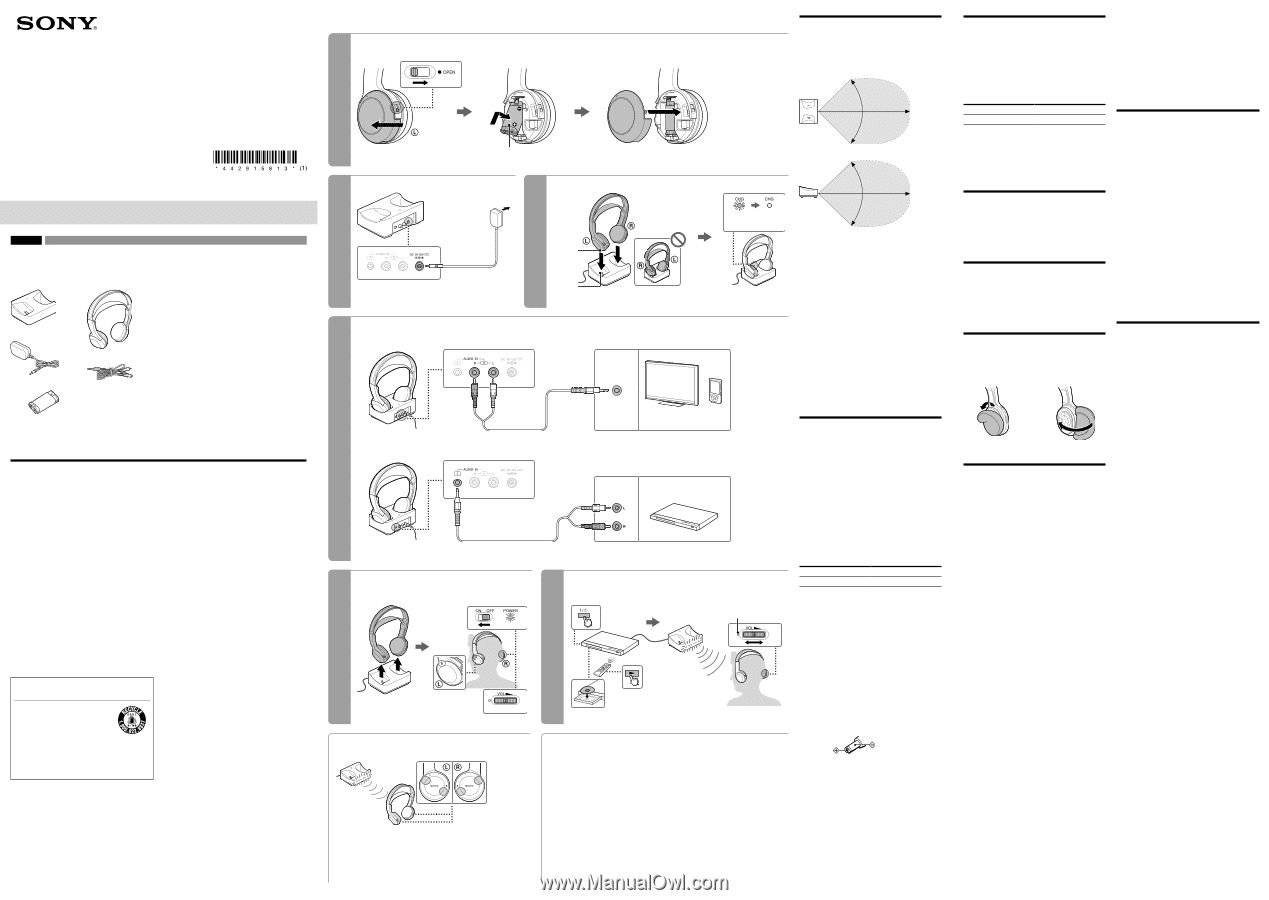
How to use
Effective area of the
transmitter
The illustration below shows the approximate area covered by
the infrared rays emitted from the transmitter when you wear
the headphones and face the transmitter.
Transmitter
Top view
Approx. 3 m (10 ft)
Approx. 8 m
(26 ft)
90°
90°
Side view
Approx. 3 m (10 ft)
Approx. 8 m
(26 ft)
Transmitter
If you use the headphones at too great a distance from the
transmitter, you may hear a hissing noise, and if there is an
object between the headphones and the transmitter, sound
may be interrupted. These phenomena are inherent in infrared
ray communication and not a malfunction.
Do not cover the infrared sensors with your hands or hair.
When you use the headphones inside the area in the
illustration above, the transmitter can be placed in front,
behind or by the side of you. However, depending on
circumstances, the area covered by the infrared rays may be
smaller than illustrated.
The noise you may hear through the headphones may vary
depending on the transmitter position and room conditions. It
is recommended that you place the transmitter in a location
that produces the clearest sound.
Do not use this system in areas exposed to direct sunlight or
other strong light. The sound may be interrupted.
Plasma displays may interfere with normal operation of this
system.
The brightness of the infrared emitters may not be uniform;
however, this is not a malfunction.
About muting function
If the infrared rays are obstructed, or the headphones are used
outside their effective range, noise will increase and sound will
become hard to hear. In such a case, this function mutes any
sound from the headphones to avoid potential ear damage as a
result of noise. Sound is automatically restored when you move
nearer the transmitter or remove the obstruction.
Tips for charging
Charge supplied battery first
The supplied rechargeable nickel-metal hydride battery is not
charged from the first time you use it. Be sure to charge them
before use.
About auto charge function
Placing the headphones on the transmitter automatically turns
them off, then charging starts. This eliminates the need for
turning on/off every time you wear and take off the headphones.
If CHG indicator is not lit
Check if the right and left headphones are rested on the
transmitter correctly. Take off the headphones and place them
on the transmitter again so that the headphones’ contact points
meet the transmitter’s contact pins.
Charging and usage time
Depending on the remaining battery status, it takes approx. 30
minutes to 7 hours to recharge.
Approx. charging time
Approx. usage time
1)
7 hours
2)
28 hours
3)
1) at 1 kHz, 0.1 mW + 0.1 mW output
2) hours required to fully charge an empty battery
3) Time may vary, depending on the temperature or conditions
of use.
To recharge supplied battery after use
Place the headphones on the transmitter after use. The CHG
indicator lights up, then charging starts.
When charging is complete, there is no need to remove the
headphones from the transmitter.
Remaining battery
To check the remaining battery charge of the headphones, turn
on the headphones, and check the POWER indicator. The battery
is still serviceable when the indicator lights up red.
Charge the headphones if the POWER indicator turns off, dims,
flashes, or the sound becomes distorted or noisy.
Notes
Insert the AC adaptor plug firmly.
Be sure to use the supplied AC adaptor. Using AC adaptors
with different plug polarity or other characteristics can cause
product failure.
Unified
polarity plug
The battery capacity may decrease if the headphones are
turned on and placed on the transmitter with the AC adaptor
disconnected.
The transmitter automatically turns off while charging the
battery.
This system is designed to charge only the supplied
rechargeable battery BP-HP550-11 for safety. Note that other
types of rechargeable battery cannot be charged with this
system.
If dry batteries are installed, they cannot be charged.
Do not attempt to use the supplied rechargeable battery BP-
HP550-11 for other components. It is for use with this system
only.
Charge in an environmental temperature of between 5 °C and
35 °C (between 41 °F and 95 °F).
When the battery life reduces to half, this may be the end of
battery lifetime. The supplied rechargeable battery BP-HP550-
11 is not commercially available. You can order the battery
from the store where you purchased this system, or at your
nearest Sony dealer.
–
–
–
–
–
–
–
–
–
–
–
–
–
–
–
–
Using the headphones
with separately-sold dry
batteries
Commercially available (size AAA) dry batteries can also be used
to power the headphones. Install two batteries in the same
manner as described in step 1 of “How to use.”
When dry batteries are installed, the battery charge function is
not activated.
Battery life
Battery
Approx. usage time
1)
Sony alkaline battery LR03
50 hours
2)
1) at 1 kHz, 0.1 mW + 0.1 mW output
2) Time may vary, depending on the temperature or conditions
of use.
Note
Do not carry a dry battery together with coins or other metallic
objects. It can generate heat if the positive and negative
terminals of the battery are accidentally come into contact with
metallic objects.
Tips for connection
Do not connect to the AUDIO IN 1 and AUDIO IN 2 jacks at the
same time. If you connect two A/V components to both jacks
at the same time, both of the audio signals may result in mixed
output.
When you connect the connecting cable directly to an
earphone jack (monaural mini jack), the audio signal may not
be output through the right channel.
Tips for volume setting
If you connect the transmitter to the headphone jack of the A/
V component, set the volume of the A/V component as high as
possible but not so high that the audio signal becomes
distorted.
When watching videos, be careful not to raise the volume too
high in quiet scenes. You may hurt your ears when a loud
scene is played.
Replacing the earpads
The earpads are replaceable. If the earpads become dirty or
worn out, replace them as illustrated below. The earpads are not
commercially available. You can order replacements from the
store where you purchased this system, or at your nearest Sony
dealer.
1
Remove the old earpad
by pulling it off.
2
Place the new earpad
around the housing.
Troubleshooting
If you run into any problems using this system, use the following
checklist. Should any problem persist, consult your nearest Sony
dealer.
No sound/Low sound
Turn on the headphones.
Check the connection of the A/V component or the AC
adaptor.
Check that the A/V component is turned on.
If you connect the transmitter to an A/V component using the
headphone jack, raise the volume level on the connected A/V
component within the range where the sound is not distorted.
Check that the infrared sensors of the headphones are not
covered with your hands or hair.
Check that there is no object between the transmitter and the
headphones.
Use the headphones near the transmitter, or change the
position of the transmitter.
Charge the supplied rechargeable battery, or replace dry
batteries with new ones. If the POWER indicator is still off after
charging, take the headphones to a Sony dealer.
Raise the headphone volume.
Distorted or intermittent sound
(sometimes with noise)
Use the headphones near the transmitter, or change the
position of the transmitter.
If you connect the transmitter to an A/V component using the
headphone jack, lower the volume level on the connected A/V
component within the range where the sound is not distorted.
Charge the supplied rechargeable battery, or replace dry
batteries with new ones. If the POWER indicator is still off after
charging, take the headphones to a Sony dealer.
Loud background noise
Use the headphones near the transmitter, or change the
position of the transmitter. (As you move away from the
transmitter, more noise is likely to be heard. This is inherent in
infrared ray communication and not a malfunction.)
Check that there is no object between the transmitter and the
headphones.
Check that the infrared sensors on the headphones are not
covered with your hands or hair.
If you use the headphones by a window where the sunlight is
too strong, draw the curtains/blinds to shut out the direct
sunlight, or use the headphones away from the sunlight.
If you connect the transmitter to an A/V component using the
headphone jack, raise the volume level on the connected A/V
component within the range where the sound is not distorted.
Charge the supplied rechargeable battery, or replace dry
batteries with new ones. If the POWER indicator is still off after
charging, take the headphones to a Sony dealer.
If you have another transmitter, check if more than one
transmitters are used at the same time. Turn off other
transmitter or move to a place outside the range of this
transmitter.
The sound cuts off
The transmitter turns off if no signal
or low signal is input for
10 minutes. If you connect the transmitter to an A/V
component using the headphone jack, raise the volume level
on the connected A/V component within the range where the
sound is not distorted.
–
–
–
–
–
–
–
–
–
–
–
–
–
–
–
–
–
–
–
–
–
–
–
–
Battery cannot be charged/CHG
indicator flashes, or does not light up
Check that the right/left of the headphones and transmitter
correspond, and put the headphones on the transmitter
correctly.
Install the supplied rechargeable nickel-metal hydride battery.
Dry batteries and rechargeable batteries other than the
supplied cannot be charged.
If the CHG indicator does not light up even though you put the
headphones on the transmitter and wait for a while, it may be
the end of battery lifetime. You can order the supplied
rechargeable battery BP-HP550-11 from the store where you
purchased this system, or at your nearest Sony dealer.
Precautions
When this system is not to be used for a long period of time,
disconnect the AC adaptor from the AC outlet holding the
plug, and remove the battery from the headphones to avoid
damage caused by battery leakage and subsequent corrosion.
Do not leave this system in a location subject to direct
sunlight, heat or moisture.
This system is guaranteed for use in the temperature range of
5 °C to 35 °C (41 °F to 95 °F).
You may hear some noise when you disconnect the AC
adaptor from the transmitter before taking off the
headphones.
Avoid exposure to temperature extremes, direct sunlight,
moisture, sand, dust or mechanical shock.
Notes on headphones
To reduce the risk of hearing damage
Avoid using headphones at high volume. Hearing experts advise
against continuous, loud and extended play. If you experience a
ringing in your ears, lower the volume or discontinue use.
Caring for others
Keep the volume at a moderate level. This will allow you to hear
outside sounds and to be considerate to the people around you.
If you have any questions or problems concerning the system
that are not covered in this manual, please consult your nearest
Sony dealer.
Be sure to bring the headphones and the transmitter to the Sony
dealer when requiring repair work.
Specifications
Transmitter (TMR-IF245R)
Modulation
FM stereo
Carrier frequency
Right 2.8 MHz
Left 2.3 MHz
Frequency response
10 Hz – 20,000 Hz
Audio inputs
Pin jacks (left/right)
Stereo mini jack
Power requirements
DC 12 V (from the supplied AC adaptor)
Dimensions
Approx. 140 mm × 60 mm × 105 mm
(5
1
/
2
in × 2
3
/
8
in × 4
1
/
7
in) (w/h/d)
Mass
Approx. 200 g (7.06 oz)
Headphones (MDR-IF245R)
Frequency response
10 Hz – 24,000 Hz
Power source
Supplied rechargeable nickel-metal hydride
battery BP-HP550-11, or commercially
available (size AAA) dry batteries
Mass
Approx. 200 g (7.06 oz) including battery
Included items
Transmitter TMR-IF245R
Headphones MDR-IF245R
AC adaptor (12 V) (1)
Connecting cable (stereo mini plug
pin plug × 2), 1 m
(39
3
/
8
in) (1)
Rechargeable nickel-metal hydride battery BP-HP550-11
(550 mAh min) (1)
Card warranty (1)
Operating Instructions (this manual) (1)
Design and specifications are subject to change without notice.
–
–
–
–
–
–
–
–
Transmitter TMR-IF245R (1)
AC adaptor (1)
Rechargeable nickel-metal
hydride battery
(BP-HP550-11) (1)
Headphones MDR-IF245R (1)
Connecting cable (stereo mini
plug
pin plug × 2), 1 m (1)
Checking the included
items
Features
Thank you for purchasing the Sony MDR-IF245RK Cordless Stereo
Headphone System. Before operating the unit, please read this
manual thoroughly and retain it for future reference.
Some features are:
Lightweight headphones for long time listening comfort.
Approx. 28 hours playback with supplied Ni-MH rechargeable
battery. AAA alkaline batteries (not supplied) can also be used
as alternative power.
Battery is automatically charged by placing the headphones
on the transmitter.
40 mm driver units for powerful, expressive sound.
Muting function reduces noise disturbance.
Self-adjusting headband mechanism eliminating the need for
headband adjustment.
Up to 8 meters (26 feet) reception range.
–
–
–
–
–
–
–
Connect the AC adaptor.
Charge the headphones.
To AC
outlet
(Red)
(Off)
Complete when
indicator turns off.
Connect the A/V component, following hookup
or
below.
Using the headphone jack of the A/V component
L (white)
R (red)
Stereo mini plug
Headphone jack
(Stereo mini jack)
TV, Digital music player, etc.
L (white)
R (red)
Stereo mini plug
Audio out
(L/R) jacks
Stereo system, Blu-ray Disc player,
DVD player, etc.
About the infrared sensors
The infrared sensors of the headphones are located as illustrated below.
Use the transmitter in a position facing the headphones.
If the infrared sensors of one housing are covered by your hands (when adjusting the
volume, etc.), the muting function may be activated to reduce noise caused by
obstruction of the infrared rays. To restore sound, move nearer the transmitter, or
orient the sensor of the uncovered housing toward the transmitter.
–
–
After use
Take off the headphones, then turn off the power.
If no signal or low signal is
input for about 10 minutes
When no signal is input for about 10 minutes, the
transmitter turns off automatically*. The infrared
emitters of the transmitter also turn off. The
transmitter restarts after receiving an audio signal
again.
The transmitter may also turn off if low signal is
input for about 10 minutes. In this case, raise the
volume of the connected A/V component within
the range where the sound is not distorted, then
lower the volume of the headphones.
* If signal noise is output from the connected A/V
component, the transmitter may not turn off,
even when no audio signal is input.
Start playback of the A/V component.
Wear the headphones.
Before listening
To reduce the risk of hearing damage, first lower the volume.
Using the audio out (L/R) jacks of the A/V component
Insert the supplied rechargeable battery BP-HP550-11 into the left housing of the headphones.
Observe the correct polarity when installing battery.
Contact
pins
Lower volume
Up
Tactile dot
Down
Rechargeable nickel-metal hydride
battery BP-HP550-11 (supplied)
Contact
points
Tactile dot
Insert the
end first.
4
2
5
6
1
3