Sony MFM-HT75W User Manual - Page 30
Option menu
 |
View all Sony MFM-HT75W manuals
Add to My Manuals
Save this manual to your list of manuals |
Page 30 highlights
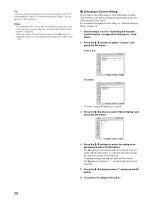
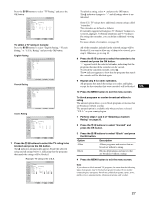
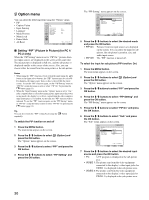
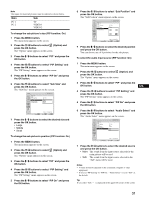
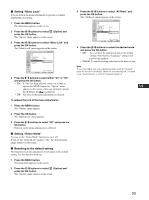
Option menu You can adjust the following items using the "Option" menu. • PIP • Caption Vision • Input Sensing • Language • Menu Position • Menu Lock Option PIP : Caption Vision : Input Sensing : Language : Menu Position Menu Lock : Demo Mode : All Reset DVI-D: PC 1 On English Off Off • Demo Mode • All Reset Select 1280 × 1024/60 Hz Set OK Exit MENU x Setting "PIP" (Picture In Picture) (for PC 1/ PC 2 only) When the "PIP Setting" menu is set to "PIP On," pictures from two input sources are displayed on the screen at the same time. The main picture is displayed in full size, and the sub picture is displayed smaller in the corner of the screen. Also, you can choose either the sound from the main picture or the sub picture. Notes • When using the "PIP" function, if you switch the input using the button or the input select buttons, the "PIP" function may be released. If it happens, the input source that you have selected fills the entire screen. To use the "PIP" function again, set the "PIP Setting" menu to "PIP On" using the menu system or select "PIP On" by pressing the button (page 15). • When the "Input Sensing" menu in the "Option" menu is set to "On," if the computer that is selected for main picture input enters the power saving mode, the display try to detect a signal from the other computer input and display it, if available. At this time, the "PIP" function will be released. To use the "PIP" function again, set the "PIP Setting" menu to "PIP On" using the menu system or select "PIP On" by pressing the button (page 15). Tip You can also switch the "PIP" setting by pressing the repeatedly. button To switch the PIP function on and off 1 Press the MENU button. The main menu appears on the screen. 2 Press the M/m buttons to select press the OK button. (Option) and The "Option" menu appears on the screen. 3 Press the M/m buttons to select "PIP" and press the OK button. 4 Press the M/m buttons to select "PIP Setting" and press the OK button. The "PIP Setting" menu appears on the screen. Option PIP PIP Setting : Sub : Sub Size : Sub Position Audio Select : DVI-D: PC 1 PIP On PIP Off Large Sub Select 1280 × 1024/60 Hz Set OK Exit MENU 5 Press the M/m buttons to select the desired mode and press the OK button. • PIP On: Pictures from two input sources are displayed on the screen. You can select the input for sub picture, the sub picture's position, size, and audio input source. • PIP Off: The "PIP" function is turned off. To select the input for sub picture (PIP function: On) 1 Press the MENU button. The main menu appears on the screen. 2 Press the M/m buttons to select press the OK button. (Option) and The "Option" menu appears on the screen. 3 Press the M/m buttons to select "PIP" and press the OK button. 4 Press the M/m buttons to select "PIP Setting" and press the OK button. The "PIP Setting" menu appears on the screen. 5 Press the M/m buttons to select "PIP On" and press the OK button. 6 Press the M/m buttons to select "Sub" and press the OK button. The "Sub" menu appears on the screen. Option PIP On PIP Setting : Sub : Sub Size : Sub Position Audio Select : DVI-D: PC 1 PIP On TV VIDEO1 VIDEO2 Sub Select 1280 × 1024/60 Hz Set OK Exit MENU 7 Press the M/m buttons to select the desired input source and press the OK button. • TV: A TV program is displayed in the sub-picture area. • VIDEO 1: The picture sent from the video equipment connected to the display's video input jacks for VIDEO 1 is displayed in the sub-picture area. • VIDEO 2: The picture sent from the video equipment connected to the display's video input jack for VIDEO 2 is displayed in the sub-picture area. 30
-
 1
1 -
2
-
3
-
4
-
5
-
6
-
7
-
8
-
9
-
10
-
11
-
12
-
13
-
14
-
15
-
16
-
17
-
18
-
19
-
20
-
21
-
22
-
23
-
24
-
 25
25 -
 26
26 -
 27
27 -
 28
28 -
 29
29 -
 30
30 -
 31
31 -
 32
32 -
 33
33 -
 34
34 -
 35
35 -
36
-
37
-
38
-
39
-
40
-
41
 |
 |