Sony MHC-NX3AV Operating Instructions (primary manual)
Sony MHC-NX3AV - Mini Hi-fi Component System Manual
 |
View all Sony MHC-NX3AV manuals
Add to My Manuals
Save this manual to your list of manuals |
Sony MHC-NX3AV manual content summary:
- Sony MHC-NX3AV | Operating Instructions (primary manual) - Page 1
Mini Hi-Fi Component System Operating Instructions Owner's Record The model and serial numbers are located on the rear panel. Record the serial number in the space provided below. Refer to them whenever you call upon your Sony dealer regarding this product. Model No. Serial No MHC-NX3AV - Sony MHC-NX3AV | Operating Instructions (primary manual) - Page 2
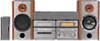
the user to the presence of important operating and maintenance (servicing) instructions in MHC-NX3AV consist of the following components: - A/V control amplifier STR-NX3 - CD player/Stereo cassette deck HTC-NX1 - Speaker system 2 • Front speaker SS-NX1 • Centre speaker SS-RC100 • Rear speaker - Sony MHC-NX3AV | Operating Instructions (primary manual) - Page 3
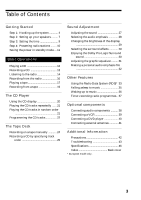
order 21 Programming the CD tracks 22 The Tape Deck Recording on a tape manually 24 Recording a CD by specifying track order 25 Sound Adjustment Adjusting the sound 27 Selecting the audio emphasis 28 Changing the brightness of the display 29 Selecting the surround effects 29 Enjoying the - Sony MHC-NX3AV | Operating Instructions (primary manual) - Page 4
If you set up the stereo system vertically Be sure to place the A/V control amplifier on top of the CD player/stereo cassette deck. FM antenna AM loop antenna Rear speaker (Right) 3 Centre speaker 4 Rear speaker (Left) 3 1 5 6 2 34 7 2 2 Front speaker (Right) Front speaker (Left) Note on - Sony MHC-NX3AV | Operating Instructions (primary manual) - Page 5
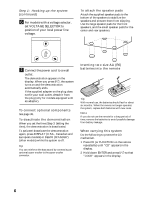
flat cord to the SYSTEM CONTROL connectors until it clicks. To disconnect 4 Connect the centre speaker. Connect the speaker cords to the CENTER SPEAKER jacks. Insert only the stripped portion. R L + 2 Connect the front speakers. Connect the speaker cords to the FRONT SPEAKER jacks as below. Insert - Sony MHC-NX3AV | Operating Instructions (primary manual) - Page 6
of time, remove the batteries to avoid possible damage from battery leakage. When carrying this system Do the following to protect the CD mechanism. 1 Press CD (or FUNCTION on the remote repeatedly) until "CD" appears in the display. 2 Hold down ENTER and press 1/u so that "LOCK" appears in the - Sony MHC-NX3AV | Operating Instructions (primary manual) - Page 7
Pro Logic Surround is a decoding system standardized in TV programmes and movies. Dolby Pro Logic Surround improves the sound image by using four separate channels. These channels manipulate the sound to be heard and enhance the action as it happens on the screen. Positioning the speakers Before - Sony MHC-NX3AV | Operating Instructions (primary manual) - Page 8
enjoy Dolby Pro Logic Surround sound, adjust the volume of each speaker. PRO LOGIC - + 0 ) ≠ + - + g 2,4 1 3 · ª· ª· =+ p 0 ) P V B b v · p n 1 Press PRO LOGIC. "PRO LOGIC ON" appears. 2 Press T. TONE on the remote. The test tone is heard from the speakers in the following - Sony MHC-NX3AV | Operating Instructions (primary manual) - Page 9
The clock is on a 24-hour system for the European model, and a 12-hour system for other models. The 24-hour system model is used for illustration purposes. you want to display the demo mode, press DISPLAY (U.S.A., Canadian and European models) or DEMO (STANDBY) (other models) when the power is off. - Sony MHC-NX3AV | Operating Instructions (primary manual) - Page 10
(Power) Jog dial 13 - + 0 ) ≠ + - + g 24 n n 1 Press TUNER BAND repeatedly until the band you want appears in the display. The system tunes in a station. "TUNED" and "STEREO" (for a stereo program) appear. TUNED STEREO MHz 3 Press TUNER MEMORY. A preset number flashes in the display - Sony MHC-NX3AV | Operating Instructions (primary manual) - Page 11
tune in the station manually. To set another power cord or if a power failure occurs. - + 0 ) ≠ + - + g POWER SAVE/DEMO (STANDBY) / Press POWER SAVE/DEMO (STANDBY) when the power is off. The system switches to the Power Saving Mode and the clock display disappears. The system is powering - Sony MHC-NX3AV | Operating Instructions (primary manual) - Page 12
button to close the disc tray. To insert other CDs, press § of other numbers to open the disc tray. 2 Press one of the DISC 1~5 buttons. The disc tray closes and play starts. If you press · (or CD · on the remote), play starts from the CD loaded on the tray whose button is lit green - Sony MHC-NX3AV | Operating Instructions (primary manual) - Page 13
Adjust the volume Turn VOLUME (or press VOLUME +/- on the remote). Tips • Pressing · when the power is off automatically turns the power on and starts CD playback if there is a CD in the tray (One Touch Play). When the system is in the Power Saving Mode, the One Touch Play function does not work - Sony MHC-NX3AV | Operating Instructions (primary manual) - Page 14
Preset radio stations in the tuner's memory first (see "Step 4: Presetting radio stations"). 1/u (Power) 2 1 STEREO/MONO 3 Press CD SYNC. Deck B stands by for recording and the CD player stands by for playback. · (for front side) lights up. - + 0 ) ≠ + - + 4 Press DIRECTION repeatedly - Sony MHC-NX3AV | Operating Instructions (primary manual) - Page 15
TUNED STEREO To Turn off the radio Adjust the volume Do this Press 1/u (power). Turn VOLUME (or press VOLUME +/- on the remote). To listen to non-preset radio stations Use manual or automatic tuning. For manual tuning, press - or + repeatedly. For automatic tuning, press and hold - or +. Tips - Sony MHC-NX3AV | Operating Instructions (primary manual) - Page 16
You can use TYPE I (normal) or TYPE II (CrO2) tapes. The recording level is automatically adjusted. 1/u (Power) 2 -/+ 1 - 0 ≠ g + ) + - · ∏ π + § 1 2 3 4 5 -preset stations, use - and + to tune in the desired station manually. • When you want to reduce the hiss noise in lowlevel high- - Sony MHC-NX3AV | Operating Instructions (primary manual) - Page 17
either deck A or B, press DECK A ª· or DECK B ª· (on the remote). 0/) * AMS (Automatic Music Sensor) 1/u (Power) VOLUME · ª· ª· =+ p 0 ) P V B b v · p p VOLUME +/- Basic Operations - 0 ≠ g + ) + - · ∏ π + § 1 2 3 4 5 ª· π ª· π § § 1 32 π 3 π 1 DOLBY NR 1 Press - Sony MHC-NX3AV | Operating Instructions (primary manual) - Page 18
the volume Turn VOLUME (or press VOLUME +/- on the remote). Tips • Pressing · or ª when the power is off automatically turns the power on and starts tape playback if there is a tape in the deck (One Touch Play). When the system is in the Power Saving Mode, the One Touch Play function does not work - Sony MHC-NX3AV | Operating Instructions (primary manual) - Page 19
Dubbing You can use TYPE I (normal) or TYPE II (CrO2) tapes. The recording level is automatically adjusted. 1/u (Power) - 0 ≠ g + ) + - · ∏ π + § 1 2 3 4 5 ª· π ª· π § § 1 3 π2 4π 1 DOLBY NR 1 Press § and insert a recorded tape in deck A and a recordable tape in deck B. With the side - Sony MHC-NX3AV | Operating Instructions (primary manual) - Page 20
stored on the disc, such as the disc titles or artist names. When the unit detects CD TEXT discs, the "CD TEXT" indication appears in the display. 1/u (Power) DISPLAY - + 0 ) ≠ + - + g / Press DISPLAY. Each time you press the button during normal playback or in the stop mode, the - Sony MHC-NX3AV | Operating Instructions (primary manual) - Page 21
tracks in random order -- Shuffle Play You can play all the tracks on one CD or all CDs in random order. 1/u (power) 21 - + 0 ) ≠ + - + g / Press REPEAT during playback until "REPEAT" appears in the display. Repeat Play starts. Do the following procedure to change the repeat mode. To - Sony MHC-NX3AV | Operating Instructions (primary manual) - Page 22
PLAY MODE repeatedly until "SHUFFLE" or "PROGRAM" disappears from the display. To select a desired CD Press DISC 1~5. Tips • You can start Shuffle Play during normal dial clockwise (or press + on the remote). Programming the CD tracks -- Programme Play You can make a programme of up to 32 tracks from - Sony MHC-NX3AV | Operating Instructions (primary manual) - Page 23
display. To Press Check the programme CHECK on the remote repeatedly. After the last track, "CHECK END" appears. Clear a track CLEAR on the remote in from the end stop mode. Clear a specific track CHECK on the remote The programme you made remains in the CD player even after it has been played - Sony MHC-NX3AV | Operating Instructions (primary manual) - Page 24
manually You can record from CD, tape, or radio as you like. For example, you can record just the songs you want or record from the middle of the tape. The recording level is adjusted automatically. 1/u (power /START in step 3. • When recording from a CD, you can use the jog dial to select tracks - Sony MHC-NX3AV | Operating Instructions (primary manual) - Page 25
the length of one side of the tape. 1/u (power) EDIT 5 32 6 1 Place a CD and insert a recordable tape into deck B. 2 Press CD. 3 Press PLAY MODE repeatedly until "PROGRAM" appears in the display. 4 Press one of the DISC 1~5 buttons to select a CD. 5 Turn the jog dial until the desired track - Sony MHC-NX3AV | Operating Instructions (primary manual) - Page 26
CD by specifying track order (continued) 8 Press ∏ (P on the remote) to insert a pause at the end of side A. "P" appears in the display and the total playing time resets to "0.00" in the display CD player. To check the order Press CHECK on the remote the currently selected CD appears, followed - Sony MHC-NX3AV | Operating Instructions (primary manual) - Page 27
display changes as follows: n DBFB NORMAL ( DBFB ) µ DBFB HIGH ( DBFB ) µ DBFB OFF (off) * DBFB = Dynamic Bass Feedback For a powerful sound (GROOVE) Press GROOVE. The volume switches to power to PHONES jack. No sound will come from the speakers. Note If you have connected a super woofer, please - Sony MHC-NX3AV | Operating Instructions (primary manual) - Page 28
the music menu 1 1/u (power) - + 0 ) ≠ + - + g 23 1 Press FILE SELECT. The last effect chosen appears in the display. 2 Use the jog dial on the remote repeatedly so that "EFFECT OFF" appears in the display. Music menu options " SUR " appears if you select an effect with surround effects. - Sony MHC-NX3AV | Operating Instructions (primary manual) - Page 29
listening to the music. · ª· ª· =+ p 0 ) P V B b v · p DIMMER Selecting the surround effects You can enjoy surround effect. 0 ) P V B b v · p DSP / Press DIMMER on the remote. Every time you press the button, the display changes as follows: DIMMER ON DIMMER OFF ˜ / Press - Sony MHC-NX3AV | Operating Instructions (primary manual) - Page 30
sound You can enjoy the Dolby Pro Logic Surround sound of videos that are Dolby Surround encoded (q). Complete the setup and adjustments first (see page 7). 1/u (power) To cancel the Dolby Pro Logic Surround sound Press PRO LOGIC again to turn off the indicator on the front panel's PRO LOGIC - Sony MHC-NX3AV | Operating Instructions (primary manual) - Page 31
Adjusting the graphic equalizer You can adjust the sound by raising or lowering the levels of specific frequency ranges. Before operation, first select the audio emphasis you want for your basic sound. Note If you choose another menu of audio emphasis (other - Sony MHC-NX3AV | Operating Instructions (primary manual) - Page 32
emphasis file - Personal file You can create a personal file of audio patterns (surround effect and graphic equalizer) and store them in the memory of the unit. Later call up an audio pattern to play a favorite tape, CD, or radio programme. Create up to five audio files. Before operation, first - Sony MHC-NX3AV | Operating Instructions (primary manual) - Page 33
System? Radio Data System (RDS) is a broadcasting service that allows radio stations to send additional information along with the regular programme signal. This tuner offers convenient RDS features like station name display . DISPLAY 1/u power 2,4 1 3,5 - 0 ≠ g + ) + - + § continued 33 - Sony MHC-NX3AV | Operating Instructions (primary manual) - Page 34
Using the Radio Data System (RDS) (continued) 1 Press EDIT/PTY while listening to the radio. selected programme type are shown alternately in the display). When the tuner receives a programme, the preset station number flashes. 4 Turn jog dial to display the preset station number you desire. 5 Press - Sony MHC-NX3AV | Operating Instructions (primary manual) - Page 35
let the system turn off display (the turn-off time) changes as follows: AUTO n 90min n 80min n 70min n ... n 10min n OFF n AUTO ... When you choose "AUTO" The power turns off when the current CD or tape finishes playback (for up to 100 minutes). To check the remaining time Press SLEEP on the remote - Sony MHC-NX3AV | Operating Instructions (primary manual) - Page 36
then press ENTER. "ON" appears and the hour digits flash in the display. 1 5 Set the time to start playback. CD: Insert a CD. To start from a specific track, make a programme (see "Programming the CD music source, then the original display appears. 9 Turn off the power. To check the setting Press - Sony MHC-NX3AV | Operating Instructions (primary manual) - Page 37
the radio station, then the original display appears. 3,4 6 Insert a recordable tape into deck B. 7 Turn off the power. When the recording starts, the and press V or v to select "TIMER OFF", then press ENTER. Note If the power is on at the preset time, the recording will not be made. 3 Press V - Sony MHC-NX3AV | Operating Instructions (primary manual) - Page 38
Refer to the instructions of each component. Connecting an MD deck for digital recording You can record from CD into the MD deck digitally by connecting an To the DIGITAL IN jack of the MD deck Tip When you connect a Sony MD deck, you can use the MD · and p buttons on this unit's remote to perform - Sony MHC-NX3AV | Operating Instructions (primary manual) - Page 39
connect an optional super woofer speaker. To super woofer Connecting a VCR Make sure to match the color of the plugs and the connectors. To listen to the sound of the connected VCR, press VIDEO/DVD repeatedly until "VIDEO" appears in the display. Refer to the instructions of each component. To the - Sony MHC-NX3AV | Operating Instructions (primary manual) - Page 40
the connected DVD player, press VIDEO/ DVD until "DVD" appears in the display. Notes • Each time you press DVD 5.1CH, the function changes as follows. DVD 5.1CH ˜ DVD (2 channel) • You cannot enjoy the 5.1 channel surround sound if you connect a DVD player which does not have the 5.1 channel - Sony MHC-NX3AV | Operating Instructions (primary manual) - Page 41
Connecting external antennas Connect the external antenna to improve the reception. Refer to the instructions of each component. FM antenna Connect the optional FM external antenna. You can also use the TV antenna instead. Jack type A IEC standard socket connector ( - Sony MHC-NX3AV | Operating Instructions (primary manual) - Page 42
take out any discs. If you have any questions or problems concerning your stereo system, please consult your nearest Sony dealer. Notes on CDs • Before playing, clean the CD with a cleaning cloth. Wipe the CD from the centre out. • Do not use solvents such as benzene, thinner, commercially available - Sony MHC-NX3AV | Operating Instructions (primary manual) - Page 43
. Troubleshooting If you run into any problem using this stereo system, use the following check list. First, check that the power cord is connected firmly and the speakers are connected correctly and firmly. Should any problem persist, consult your nearest Sony dealer. General The display starts - Sony MHC-NX3AV | Operating Instructions (primary manual) - Page 44
a TV screen persists. •Turn off the TV set once, then turn it on after 15 to 30 minutes. If the colour irregularity still persists, place the speaker farther away from TV set. "PROTECT" and "PUSH POWER" appear alternately. •A strong signal was input. Press 1/u to turn off the power, leave the system - Sony MHC-NX3AV | Operating Instructions (primary manual) - Page 45
in the display.) •Adjust the antenna. •The signal strength is too weak. Connect the external antenna. A stereo FM programme cannot be received in stereo. •Press STEREO/MONO so that "STEREO" appears. If other troubles not described above occur, reset the system as follows: 1 Unplug the power cord - Sony MHC-NX3AV | Operating Instructions (primary manual) - Page 46
model AUDIO POWER SPECIFICATIONS: POWER OUTPUT AND TOTAL HARMONIC DISTORTION: with 6 ohm loads both channels driven, from 70-20,000 Hz; rates 100 watts per channel minimum RMS power, with no more than 0.9% total harmonic distortion from 250 milliwatts to rated output. Center Speaker: Continuous RMS - Sony MHC-NX3AV | Operating Instructions (primary manual) - Page 47
accepts headphones of 8 ohms or more accepts impedance of 6 to 16 ohms accepts impedance of 8 to 16 ohms accepts impedance of 8 to 16 ohms Voltage 1 V, impedance 1 kilohms CD player section System Compact disc and digital audio system Laser Semiconductor laser (λ=780nm) Emission duration - Sony MHC-NX3AV | Operating Instructions (primary manual) - Page 48
Specifications (continued) Speaker Front Speaker (SS-NX1) Speaker system Speaker units Woofer: Tweeter: Nominal impedance speaker for connection to the REAR SPEAKER connector, the supplied SS-RC100 centre speaker for connection to the CENTER SPEAKER connector on the MHC-NX3AV. General Power - Sony MHC-NX3AV | Operating Instructions (primary manual) - Page 49
49 - Sony MHC-NX3AV | Operating Instructions (primary manual) - Page 50
50 - Sony MHC-NX3AV | Operating Instructions (primary manual) - Page 51
51 - Sony MHC-NX3AV | Operating Instructions (primary manual) - Page 52
36 DBFB 27 Display 20 Dolby Pro Logic Surround 30 E, F Edit 25 G GROOVE 27 H, I, J, K, L, M Hooking up optional components 38 the aerials 5, 41 the main unit 4 the power 6 the optional speakers 7 N Normal Play 12 O One Touch Play 13, 15, 18 P , Q Personal file 32 Playing a CD 12 a preset radio
-
 1
1 -
 2
2 -
 3
3 -
 4
4 -
 5
5 -
 6
6 -
 7
7 -
8
-
9
-
10
-
11
-
12
-
13
-
14
-
15
-
16
-
17
-
18
-
19
-
20
-
21
-
22
-
23
-
24
-
25
-
26
-
27
-
28
-
29
-
30
-
31
-
32
-
33
-
34
-
35
-
36
-
37
-
38
-
39
-
40
-
41
-
42
-
43
-
44
-
45
-
46
-
47
-
48
-
49
-
50
-
51
-
52
 |
 |

©1999 by Sony Corporation
Mini Hi-Fi
Component
System
Operating Instructions
3-867-107-
14
(1)
MHC-NX3AV
Owner’s Record
The model and serial numbers are located on the rear panel. Record the serial
number in the space provided below. Refer to them whenever you call upon your
Sony dealer regarding this product.
Model No.
_______________ Serial No. _______________