Sony MHS-PM5/L bloggie™ Handbook
Sony MHS-PM5/L - High Definition Mp4 Bloggie™ Camera Manual
 |
UPC - 027242788879
View all Sony MHS-PM5/L manuals
Add to My Manuals
Save this manual to your list of manuals |
Sony MHS-PM5/L manual content summary:
- Sony MHS-PM5/L | bloggie™ Handbook - Page 1
Mobile HD Snap Camera MHS-PM5/PM5K © 2010 Sony Corporation VCLICK! Table of contents Getting started Basic Operations Using with your computer Using functions for shooting Using functions for viewing Customizing the settings Enjoying the 360 Video (MHS-PM5K) Viewing images on a TV Troubleshooting - Sony MHS-PM5/L | bloggie™ Handbook - Page 2
camera. • "Memory Stick PRO Duo" media and "Memory Stick PRO-HG Duo" are collectively called "Memory Stick PRO Duo" media in this manual. • For recording movies, it is recommended that you use "Memory Stick PRO Duo" media of 1 GB or larger marked with: - * ("Memory Stick PRO Duo" media - Sony MHS-PM5/L | bloggie™ Handbook - Page 3
on devices that do not support "MP4 format". • This camera does not support "AVCHD format" and therefore is not compatible with the playback and recording of movies in "AVCHD format" like a Digital HD Video camera recorder. • Still images recorded by this camera are compressed/recorded in JPEG - Sony MHS-PM5/L | bloggie™ Handbook - Page 4
Notes on using your camera Warning on copyright • Television programs, films, videotapes, and other materials Handbook are reproduced images, and are not actual images shot using this camera. • Design and specifications of recording media and other accessories are subject to change without notice. 4 - Sony MHS-PM5/L | bloggie™ Handbook - Page 5
video camera, which uses highly efficient image compression encoding technology to record HD (high definition) images. Compared with the existing image compression encoding technology, MPEG-4 AVC/H.264 is able to compress images even more effectively. • In the MPEG-4 AVC/H.264, the camera supports - Sony MHS-PM5/L | bloggie™ Handbook - Page 6
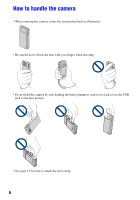
How to handle the camera • When carrying the camera, rotate the lens portion back as illustrated. • Be careful not to block the lens with your finger when shooting. • Do not hold the camera by only holding the battery/memory card cover, jack cover, the USB jack or the lens portion. • See page 15 for - Sony MHS-PM5/L | bloggie™ Handbook - Page 7
started Checking the accessories supplied 15 1 Preparing the battery pack 16 2 Inserting the memory card 19 3 Turning the camera on/setting with your computer 31 Connecting the camera to the computer 33 Uploading videos and still images to media services 35 Using the software 38 Using - Sony MHS-PM5/L | bloggie™ Handbook - Page 8
Display Color Language Setting Initialize Main Settings 2/2 49 LUN Settings Video Out Memory Card Tool 50 Format Copy Internal Memory Tool 51 Format Clock Settings 52 Clock Settings Enjoying the 360 Video (MHS-PM5K) Shooting 360 Video images 53 Viewing images on a TV Viewing images on - Sony MHS-PM5/L | bloggie™ Handbook - Page 9
Table of contents Troubleshooting Troubleshooting 58 Warning indicators and messages 64 Others On the "Memory Stick" media 66 On the battery 68 Precautions 69 Specifications 70 Index Index...71 9 - Sony MHS-PM5/L | bloggie™ Handbook - Page 10
Menu on: v/V/b/B (29) Menu off: v (Screen display)/ V (Self-timer) (26) L (Play) button (27) A Lens B Microphone C Hook for wrist strap (15) D Speaker E Battery/Memory card cover (19) F Battery slot G Memory card slot H Access lamp (20) I LCD screen (25) J MENU button (29) 10 M Power/Charge lamp - Sony MHS-PM5/L | bloggie™ Handbook - Page 11
to tripods having screws longer than 5.5 mm (7/32 inches), and may damage the camera. S USB jack slide lever T (USB) jack (33) • Used when connecting to a computer with a USB connection support cable. U A/V OUT jack (55) • Used when connecting to a TV, etc. with an A/V connecting cable. V Jack - Sony MHS-PM5/L | bloggie™ Handbook - Page 12
5 seconds with the default settings in effect when you purchased this camera. If you want to make indicators appear again, carry out any SteadyShot (42) Recording folder • This does not appear when using internal memory. Recording Media Face Detection (42) Zoom scaling Self-timer (26) Indication - Sony MHS-PM5/L | bloggie™ Handbook - Page 13
Indicators on the screen D Display Indication Image size (40) [00:00:05] E Display Remaining recordable time (40) Information on the movie settings appears near the (Movie) icon. Indication Image size (40) 01:23 Movie recording (red) Recording time (41) b Note • Indicators and their positions - Sony MHS-PM5/L | bloggie™ Handbook - Page 14
and adjust the volume with V. The guidance message is displayed alternately. Indication Playback folder • This does not appear when using internal memory. Image number/Number of images recorded in selected folder Playback Media b Note • Indicators and their positions are approximate and differ from - Sony MHS-PM5/L | bloggie™ Handbook - Page 15
Getting started Getting started Checking the accessories supplied • Rechargeable battery pack NP-BK1 (1) • 360 Video Lens VCL-BPP1 (1) (MHS-PM5K only) • Memory card ("Memory Stick PRO Duo" 4GB) (1) (MHS-PM5K only) • A/V connecting cable (1) • USB connection support cable (1) Attach the strap and - Sony MHS-PM5/L | bloggie™ Handbook - Page 16
1 Preparing the battery pack Power/Charge lamp USB connection support cable (supplied) USB jack slide lever USB jack cover AC Adaptor Power cord (Mains lead) 1 Open the battery/memory card cover and insert the battery pack into this camera, then close the cover. • Insert the battery pack as far - Sony MHS-PM5/L | bloggie™ Handbook - Page 17
the battery of the notebook computer may be depleted rapidly. Do not leave the camera connected to the computer for a long time. To remove the battery pack Slide . • When charging is finished, disconnect the USB connection support cable from the computer. Approximate recording/playback time (min.) - Sony MHS-PM5/L | bloggie™ Handbook - Page 18
pack To check the remaining battery time Rotate the lens portion or press the ON/OFF button to turn on under certain circumstances. • If the camera is running on battery power and you do not operate the camera for about five minutes, the camera turns off automatically to prevent wearing down - Sony MHS-PM5/L | bloggie™ Handbook - Page 19
it clicks with its notched corner directed downward as shown in the illustration. 3 Close the cover. When there is no memory card inserted The camera records/plays back images using the internal memory (approx. 26 MB). When the movie size is set to [1920 × 1080 30P] or [1280 × 720 60P], you cannot - Sony MHS-PM5/L | bloggie™ Handbook - Page 20
2 Inserting the memory card To remove the memory card Open the battery/memory card cover. Make sure that the access lamp is not lit, then push the memory card in once. • Never remove the memory card when the access lamp is lit. This may cause damage to data in the memory card. 20 - Sony MHS-PM5/L | bloggie™ Handbook - Page 21
• The Power/Charge lamp lights up in green. • Rotating the lens portion in the arrow direction turns on the camera. • You can also turn the power on by pressing the ON/OFF button. • The lens rotates within the range of 0 to 270 degrees. 2 Select the desired language with the multi-selector tilt to - Sony MHS-PM5/L | bloggie™ Handbook - Page 22
3 Turning the camera on/setting the language and clock 3 Set the clock with the multi- the power off by rotating the lens portion back while the camera is in the recording mode. • You cannot turn the power off, even if you rotate the lens portion back while the camera is in the playback mode. - Sony MHS-PM5/L | bloggie™ Handbook - Page 23
Basic Operations Basic Operations Shooting images Power/Charge lamp (Photo) button (Movie) button MENU button ON/OFF button Zoom lever Multi-selector 1 Rotate the lens portion to turn the power on. • The Power/Charge lamp lights up in green. • You can also turn the power on by pressing the ON/ - Sony MHS-PM5/L | bloggie™ Handbook - Page 24
frame appears. When multiple faces are detected, multiple frames appear. If you press and hold (Photo) button halfway down, a white frame becomes green and the image quality is optimized automatically. When shooting movies: Press (Movie) button. • Start shooting movies. To stop recording, press - Sony MHS-PM5/L | bloggie™ Handbook - Page 25
changes as follows. AUTO ON OFF • Indicators on the screen disappear after about 5 seconds with the default settings in effect when you purchased the camera. The default setting is set to AUTO. If you want to make indicators appear again, carry out either of the following operations. - Tilt the - Sony MHS-PM5/L | bloggie™ Handbook - Page 26
If you press (Photo) button and (Movie) button, countdown timer is displayed, and after rapid beep sounds are heard, the camera will shoot. Recording in mirror mode Rotate the lens portion to the same direction the LCD screen is facing. • A mirror-image of the subject appears on the LCD screen, but - Sony MHS-PM5/L | bloggie™ Handbook - Page 27
Basic Operations Viewing images Power/Charge lamp Zoom lever (Play) button MENU button Multi-selector 1 Press and hold (Play) button. • Index screen appears. 2 Select the image you want to playback with the multi-selector tilt to v/V/b/B. Still image: Press the multi-selector. • A still image - Sony MHS-PM5/L | bloggie™ Handbook - Page 28
Viewing images To return to the index screen Slide the zoom lever toward (Index) while displaying a still image or pausing the playback of a movie. To delete the images Allows you to select unwanted images for deletion. You can delete images from the MENU button (page 43). 28 - Sony MHS-PM5/L | bloggie™ Handbook - Page 29
Using the menu items MENU button Multi-selector 1 Press MENU to display the menu. • The menu will be displayed only during shooting and playback mode. • Different items will become visible depending on the selected mode. 2 Select the desired menu item with the multi-selector tilt to v/V. Basic - Sony MHS-PM5/L | bloggie™ Handbook - Page 30
Menu items The available menu items vary depending on the camera mode. The shooting menu is available only in the shooting mode, and the viewing menu is available only in the playback mode. Only the available - Sony MHS-PM5/L | bloggie™ Handbook - Page 31
camera. Duo 1.20 GHz or faster) Memory: 512 MB or more (For playing/editing the High Definition movies: 1 GB or more) Hard Disk: Disk space required for installation-approximately 500 MB Display: Screen resolution: 1,024 × 768 dots or more *1 64-bit editions and Starter (Edition) are not supported - Sony MHS-PM5/L | bloggie™ Handbook - Page 32
/H.264) To play back and editing movie files (MPEG-4 AVC/H.264) recorded by the camera, you need to install the software compatible with MPEG-4 AVC/H.264 or "PMB" on your computer. • Even under a PC environment where operations are guaranteed, sometimes images cannot be played back smoothly due to - Sony MHS-PM5/L | bloggie™ Handbook - Page 33
computer Connect the camera as illustrated below. 1 Turn the power on. USB connection support cable (supplied) Using images to the computer. Importing images to a computer (Macintosh) 1 Connect the camera to your Macintosh computer first. Double-click the newly recognized icon on the desktop - Sony MHS-PM5/L | bloggie™ Handbook - Page 34
Deleting the USB connection Perform the procedures from step 1 to 3 below before: • Removing a memory card. • Inserting a memory card into the camera after copying images from the internal memory. • Turning off the camera. 1 Double-click the disconnect icon on the task tray. Windows Vista Windows XP - Sony MHS-PM5/L | bloggie™ Handbook - Page 35
The application software "PMB Portable" is pre-installed on the camera. You can do the following using "PMB Portable". • You can easily upload videos and still images to media services, such as a blog. • You can upload your data via a computer connected to the Internet, even when you are away - Sony MHS-PM5/L | bloggie™ Handbook - Page 36
up. b Notes • Set [LUN Settings] to [Multi] in the menu setting on the camera. • Be sure to connect the computer to the network whenever you are using [PMB Portable]. • Depending on the service provider you use, when you upload videos and still images via the Internet, the cached data may be left on - Sony MHS-PM5/L | bloggie™ Handbook - Page 37
your computer Uploading videos and still images to media services • If we terminate the services provided by the Sony servers, we will notify you of the termination of the service on the Sony website in advance. • We may record the URLs to which you are redirected by the Sony servers, and utilize - Sony MHS-PM5/L | bloggie™ Handbook - Page 38
button ( t ) to accept the terms of the agreement, and then click [Next]. 5 Follow the instructions on the screen to complete the installation. • To continue the installation, connect the camera to the computer halfway through this step (page 33). • When the restarting confirmation message appears - Sony MHS-PM5/L | bloggie™ Handbook - Page 39
• "PMB" allows you to import images shot with the camera to a computer for display. Make a USB connection between the camera and your computer, and click [Import]. • You can save can upload images to media services. (An internet connection environment is required.) • For other details, see (PMB Help). - Sony MHS-PM5/L | bloggie™ Handbook - Page 40
may vary depending on the shooting conditions and the memory card. • When the number of remaining shootable images is greater than 9,999, the ">9999" indicator appears. • When images recorded using earlier Sony models are played back on this camera, the display may differ from the actual image size - Sony MHS-PM5/L | bloggie™ Handbook - Page 41
] or [1280 × 720 60P]. • The movies shot with this camera will be recorded in MPEG-4 AVC/H.264 Main Profile, approximately 30 or 60 frames per second, Progressive, AAC LC, "MP4 format". - MPEG: Movie Picture Experts Group - AVC: Advanced Video Codec • The larger the image size, the higher the image - Sony MHS-PM5/L | bloggie™ Handbook - Page 42
menu For details on the operation 1 page 29 Your camera uses the VBR (Variable Bit Rate) format to automatically adjust image quality to suit the recording scene. This technology causes fluctuations in the recording time of the memory card. Movies containing quickly moving and complex images are - Sony MHS-PM5/L | bloggie™ Handbook - Page 43
Using functions for viewing Viewing menu The function in viewing mode using MENU button are described below. For details on how to operate the menu, see page 29. When the mode has been set to shooting mode, switch it to playback with (Play) button. (Delete): Allows you to select and delete unwanted - Sony MHS-PM5/L | bloggie™ Handbook - Page 44
it. The indicator disappears, and the protection is released. (Rotate): Rotating a still image Rotates a still image. 1 Press (Play) button to set the camera to playback mode. 2 Select the still image to rotate with the multi-selector tilt to v/V/b/B, then press the multi- selector. 3 Press MENU - Sony MHS-PM5/L | bloggie™ Handbook - Page 45
. • You cannot rotate the following types of images. - Movies - Protected still images • You may not be able to rotate images shot with other cameras. • When viewing images on a computer, the image rotation information may not be reflected depending on the software. (Setup): Changing Setup items See - Sony MHS-PM5/L | bloggie™ Handbook - Page 46
Customizing the settings Using Setup items You can change the default settings using the Setup screen. MENU button Multi-selector 1 Press MENU to display the menu. 2 Tilt the multi-selector to v/V to select (Setup). 3 Tilt to v/V/b/B to select the item you want to set. The selected item is - Sony MHS-PM5/L | bloggie™ Handbook - Page 47
Shooting Setting For details on the operation 1 page 46 The default settings are marked with . Flicker Reduction Curbs the flicker generated by fluorescent by using the electro-shutter. On Use the Flicker Reduction. Off Does not use the Flicker Reduction. Customizing the settings 47 - Sony MHS-PM5/L | bloggie™ Handbook - Page 48
settings are marked with . Beep Selects the sound produced when you operate the camera. On Turns on the beep sound when you press the multi-selector, ( Even if you execute this function, the images stored in the internal memory are retained. 1 Select [Initialize] with the multi-selector tilt to - Sony MHS-PM5/L | bloggie™ Handbook - Page 49
neither the images on the memory card nor the images in the internal memory of the camera are displayed. b Note • Be sure to set [LUN Settings] to [Multi], while uploading videos and still images to media services using "PMB Portable". Video Out Sets the video signal output according to the TV - Sony MHS-PM5/L | bloggie™ Handbook - Page 50
This item appears only when the memory card is inserted in the camera. Format Formats the memory card. To ensure stable operation of the memory cards, we recommend that you format the memory card the first time you use it with this camera. However, if you format the memory card, all the data on the - Sony MHS-PM5/L | bloggie™ Handbook - Page 51
the operation 1 page 46 This item appears only when the memory card is not inserted in the camera. Format Formats data stored in the internal memory. • Note that formatting irrevocably erases all data in the internal memory, including even protected images. 1 Select [Format] with the multi-selector - Sony MHS-PM5/L | bloggie™ Handbook - Page 52
Clock Settings For details on the operation 1 page 46 Clock Settings Sets the date and time. 1 Select [Clock Settings] with the multi-selector tilt to v/V, then press the multi-selector or tilt to B. 2 Select the date display format with v/V, then press the multi-selector. 3 Select each item with - Sony MHS-PM5/L | bloggie™ Handbook - Page 53
the 360 Video (MHS-PM5K) Shooting 360 Video images By attaching the supplied 360 Video Lens to the camera, you can shoot 360-degree images of the area around the camera. Enjoying the 360 Video (MHS-PM5K) 1 Rotate the lens portion, then attach the 360 Video Lens to the camera. The camera shifts - Sony MHS-PM5/L | bloggie™ Handbook - Page 54
the following. - Zooming - MENU button • Do not hold the camera by only holding the 360 Video Lens. Viewing 360 Video images When you play back images recorded using the 360 Video Lens, a ring-shaped image is displayed. You can convert 360 Video images using the "PMB" software supplied with your - Sony MHS-PM5/L | bloggie™ Handbook - Page 55
SD (standard definition) image quality are played back with SD (standard definition) image quality. VIDEO AUDIO A/V OUT jack A/V connecting cable (supplied) Yellow/White/Red • During playback of a movie at HD (high definition) on SD (standard definition) TV, the movie is displayed with black - Sony MHS-PM5/L | bloggie™ Handbook - Page 56
you record movies in HD (high definition) image quality [1920 × 1080 30P], [1280 × 720 60P], or [1280 × 720 30P] while connecting the camera to high definition the yellow plug of the A/V connecting cable to the video input jack and connect the white (left channel) or red (right channel) plug to the - Sony MHS-PM5/L | bloggie™ Handbook - Page 57
Viewing images on a TV PAL system Australia, Austria, Belgium, China, Czech Republic, Denmark, Finland, Germany, Holland, Hong Kong, Hungary, Italy, Kuwait, Malaysia, New Zealand, Norway, Poland, Portugal, Singapore, Slovak Republic, Spain, Sweden, - Sony MHS-PM5/L | bloggie™ Handbook - Page 58
Troubleshooting Troubleshooting If you experience trouble with your camera, try the following solutions. 1 Check the items on pages 59 to 63. 2 Turn the power off, and turn it on again after about one minute. 3 Consult your Sony dealer or local authorized Sony service facility. When repairing the - Sony MHS-PM5/L | bloggie™ Handbook - Page 59
Troubleshooting Battery and power Cannot turn on the camera. • The remaining battery is low or depleted. - Connect the camera to a computer that is turned on, and charge the battery fully (page 16). - If you cannot turn on the camera, even after you have charged the battery, remove the battery once - Sony MHS-PM5/L | bloggie™ Handbook - Page 60
directly to the USB connector of the computer using the USB connection support cable (supplied). Shooting still images/movies Your camera cannot record images. • Check the free capacity of the internal memory or the memory card. If it is full, do one of the following: - Delete unnecessary images - Sony MHS-PM5/L | bloggie™ Handbook - Page 61
connection support cable is connected to the camera and the computer, disconnect it. You cannot view the image or hear the sound on the TV. • When you are using the component video plug, make sure the red and white plugs of the A/V connecting cable are connected (pages 55, 56). 61 Troubleshooting - Sony MHS-PM5/L | bloggie™ Handbook - Page 62
viewing an image recorded at HD (high definition) on a 4:3 TV. This is not a malfunction. The image recorded at HD (high definition) appears camera. • Disconnect the USB connection support cable from the computer and the camera, and restart the computer, then connect the computer and your camera - Sony MHS-PM5/L | bloggie™ Handbook - Page 63
the capacity. Cannot copy the data on the memory card or the computer to the internal memory. • Data on the memory card or a computer cannot be copied to the internal memory. Others The lens gets fogged. • Moisture condensation has occurred. Turn off the camera and leave it for about an hour before - Sony MHS-PM5/L | bloggie™ Handbook - Page 64
card • Format the media again (page 50). No memory space on internal memory • Delete unnecessary images or files (pages 28, 43). Read only memory card • Your camera cannot record or delete images on this "Memory Stick PRO Duo" media. Folder error • A folder with the same first three digit number - Sony MHS-PM5/L | bloggie™ Handbook - Page 65
off and on again • A problem with the lens caused an error. Camera overheating Allow it to cool • The camera temperature has risen. The power may go off automatically, or you may be unable to record movies. Leave the camera in a cool location until the temperature goes down. 65 Troubleshooting - Sony MHS-PM5/L | bloggie™ Handbook - Page 66
of "Memory Stick" media Recording/ Playback "Memory Stick Duo" media - (with MagicGate) "Memory Stick PRO Duo" a media "Memory Stick PRO-HG Duo" media a* * Your camera does not support an 8-bit parallel data transfer. A 4-bit parallel data transfer, as same as "Memory Stick PRO Duo" media - Sony MHS-PM5/L | bloggie™ Handbook - Page 67
"Memory Stick PRO Duo" media into the "Memory Stick Duo" media adaptor in the wrong direction, it may be damaged. • Do not insert a "Memory Stick Duo" media adaptor without "Memory Stick PRO Duo" media attached. Doing so may result in malfunctions of the camera. Notes on using "Memory Stick Micro - Sony MHS-PM5/L | bloggie™ Handbook - Page 68
or local authorized Sony service facility. • The battery life varies according to how it is stored and the operating conditions and environment. On disposing the battery • Contact the nearest Sony dealer when disposing the battery. On the internal rechargeable backup battery This camera has an - Sony MHS-PM5/L | bloggie™ Handbook - Page 69
with an LCD cleaning kit (sold separately) to remove fingerprints, dust, etc. Cleaning the lens Wipe the lens with a soft cloth to remove fingerprints, dust, etc. Cleaning the camera surface Clean the camera surface with a soft cloth slightly moistened with water, then wipe the surface with a dry - Sony MHS-PM5/L | bloggie™ Handbook - Page 70
to change without notice. Trademarks • "bloggie" is a trademark of Sony Corporation. • "Memory Stick", , "Memory Stick PRO", , "Memory Stick Duo", , "Memory Stick PRO Duo", , "Memory Stick Micro", "MagicGate", and are trademarks of Sony Corporation. • Microsoft, Windows, Windows Vista - Sony MHS-PM5/L | bloggie™ Handbook - Page 71
the camera ......6 I Identifying parts 10 Index screen 27 Indicator 12 Initialize 48 Install 38 Internal Memory Tool .......... 51 L Language Setting 48 LCD Backlight 48 LUN Settings 49 M Macintosh computer 31 Main Settings 48 Memory card 2 Memory Card Tool 50 "Memory Stick PRO Duo - Sony MHS-PM5/L | bloggie™ Handbook - Page 72
UNDER THE AVC PATENT PORTFOLIO LICENSE FOR THE PERSONAL AND NON-COMMERCIAL USE OF A CONSUMER TO (i) ENCODE VIDEO IN COMPLIANCE WITH THE AVC STANDARD ("AVC VIDEO") AND /OR (ii) DECODE AVC VIDEO THAT WAS ENCODED BY A CONSUMER ENGAGED IN A PERSONAL AND NON-COMMERCIAL ACTIVITY AND/OR WAS OBTAINED FROM - Sony MHS-PM5/L | bloggie™ Handbook - Page 73
Additional information on this product and answers to frequently asked questions can be found at our Customer Support Website.
-
 1
1 -
 2
2 -
 3
3 -
 4
4 -
 5
5 -
 6
6 -
 7
7 -
8
-
9
-
10
-
11
-
12
-
13
-
14
-
15
-
16
-
17
-
18
-
19
-
20
-
21
-
22
-
23
-
24
-
25
-
26
-
27
-
28
-
29
-
30
-
31
-
32
-
33
-
34
-
35
-
36
-
37
-
38
-
39
-
40
-
41
-
42
-
43
-
44
-
45
-
46
-
47
-
48
-
49
-
50
-
51
-
52
-
53
-
54
-
55
-
56
-
57
-
58
-
59
-
60
-
61
-
62
-
63
-
64
-
65
-
66
-
67
-
68
-
69
-
70
-
71
-
72
-
73
 |
 |
© 2010 Sony Corporation
4-167-123-
11
(1)
Handbook
Mobile HD Snap Camera
MHS-PM5/PM5K
Table of contents
Getting started
Basic Operations
Using with your
computer
Using functions for
shooting
Using functions for
viewing
Customizing the settings
Enjoying the 360 Video
(MHS-PM5K)
Viewing images on a TV
Troubleshooting
Others
Index
V
CLICK!
GB