Sony MVC-FD200 Operating Instructions - Page 43
Playback, To copy image data to your computer using ImageMixer, If you encounter a trouble
 |
UPC - 027242602335
View all Sony MVC-FD200 manuals
Add to My Manuals
Save this manual to your list of manuals |
Page 43 highlights
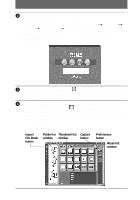
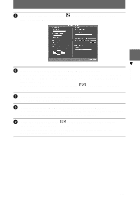
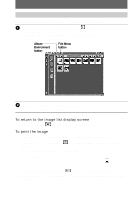
B Playback For Macintosh users Click the button of the language (such as English) of the version to be installed in the title screen and then install the software in accordance with the instructions displayed in the screen. 4 Remove the CD-ROM from the computer. To copy image data to your computer using "ImageMixer" Use the following procedure of "PIXELA ImageMixer" to copy a still image or moving image data recorded in your camera. The procedure below is explained using screens displayed by Windows. You can copy the image using a similar procedure for Macintosh also. For Mac OS X(v10.0/v10.1) users You can use only a "Memory Stick" with a computer running Mac OS X(v10.0/ v10.1). Even if you insert a floppy disk, Mac OS X(v10.0/v10.1) cannot recognize it. To use data saved on a floppy disk, copy it to a "Memory Stick" first (page 77). Cautions • Sometimes an displayed image may be interrupted when you view it on your computer using the USB cable. • The screen display of your camera is not copied to your computer. If you encounter a trouble Close "ImageMixer" and restart it to retry. 1 Prepare your camera and computer. 1 Turn on your computer. 2 Insert a floppy disk or a "Memory Stick" in your computer and set the MS/FD selector in accordance with the media you have inserted. 3 Connect the AC power adaptor to your camera and turn on your camera. 4 Connect your camera to your computer using the USB cable. "USB MODE" appears on the LCD screen of your camera. 43
-
 1
1 -
2
-
3
-
4
-
5
-
6
-
7
-
8
-
9
-
10
-
11
-
12
-
13
-
14
-
15
-
16
-
17
-
18
-
19
-
20
-
21
-
22
-
23
-
24
-
25
-
26
-
27
-
28
-
29
-
30
-
31
-
32
-
33
-
34
-
35
-
36
-
37
-
 38
38 -
 39
39 -
 40
40 -
 41
41 -
 42
42 -
 43
43 -
 44
44 -
 45
45 -
 46
46 -
 47
47 -
 48
48 -
49
-
50
-
51
-
52
-
53
-
54
-
55
-
56
-
57
-
58
-
59
-
60
-
61
-
62
-
63
-
64
-
65
-
66
-
67
-
68
-
69
-
70
-
71
-
72
-
73
-
74
-
75
-
76
-
77
-
78
-
79
-
80
-
81
-
82
-
83
-
84
-
85
-
86
-
87
-
88
-
89
-
90
-
91
-
92
-
93
-
94
-
95
-
96
-
97
-
98
-
99
-
100
 |
 |