Sony MVC-FD200 Operating Instructions - Page 71
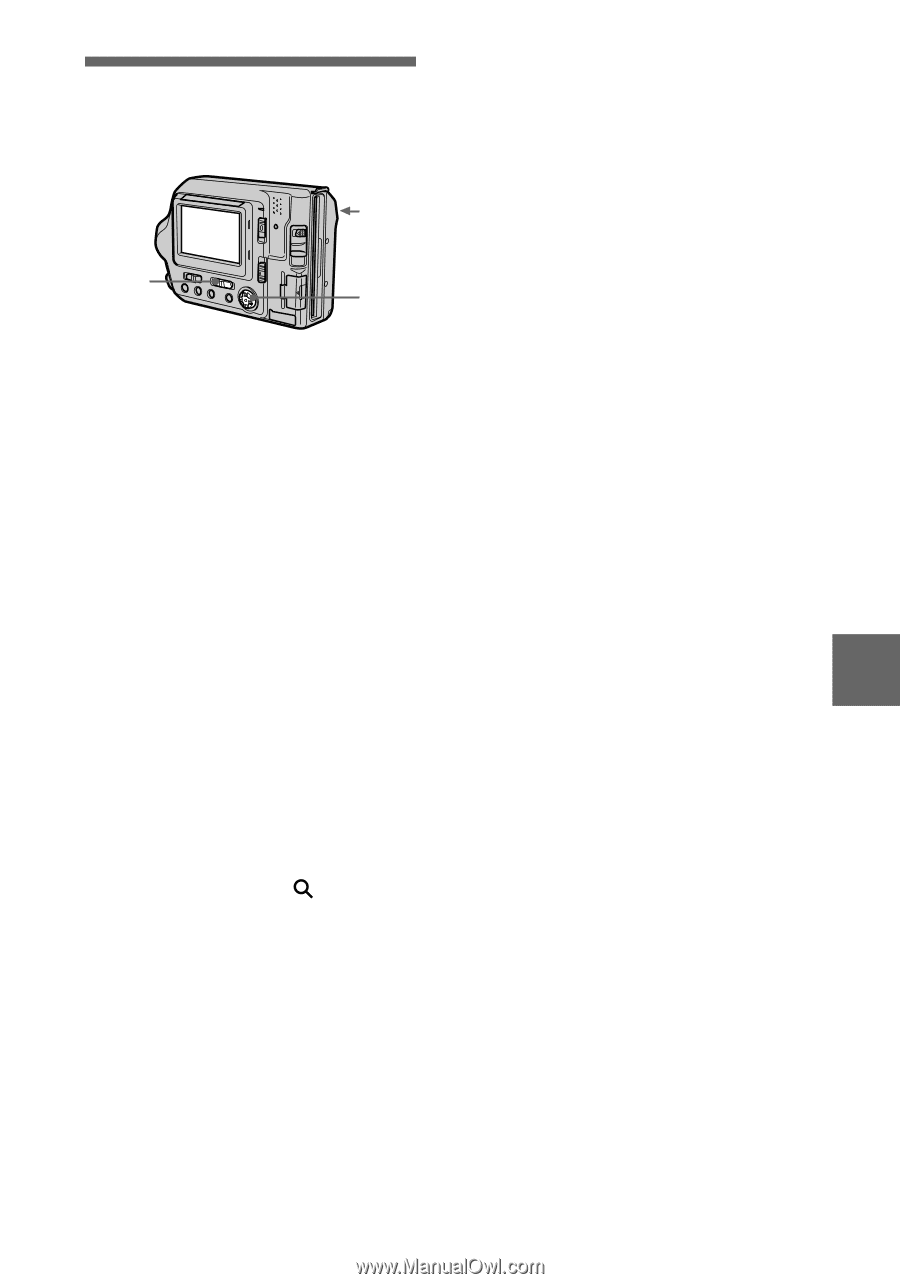
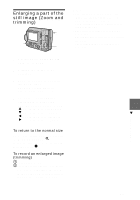
Enlarging a part of the still image (Zoom and trimming
 |
UPC - 027242602335
View all Sony MVC-FD200 manuals
Add to My Manuals
Save this manual to your list of manuals |
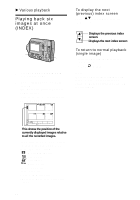
Page 71 highlights
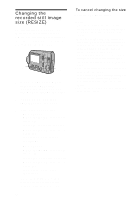
Enlarging a part of the still image (Zoom and trimming) 3 1 4 1 Set the PLAY/STILL/MOVIE selector to PLAY. 2 Display the image to be enlarged. 3 Zoom in/out the image with the zoom lever. The zoom scaling indicator appears on the LCD screen. 4 Press the control button repeatedly to select the desired portion of the image. v : The image moves downward V : The image moves upward b : The image moves rightward B : The image moves leftward To return to the normal size Zoom out with the zoom lever until the zoom scaling indicator ( ×1.1) disappears from the screen, or simply press the center z. To record an enlarged image (trimming) 1 Enlarge the image. 2 Press the shutter button. The image is recorded at 640×480 size and the image on the LCD screen returns to the normal size after recording. Notes • You cannot trim moving images, still images recorded in Clip Motion, TEXT mode, or uncompressed images. • Zoom scaling is up to 5× regardless of the original image size. • The quality of enlarged images may be deteriorated. • The original data is left even if you enlarge the image. • The enlarged image is recorded as the newest file. B Various playback 71
-
 1
1 -
2
-
3
-
4
-
5
-
6
-
7
-
8
-
9
-
10
-
11
-
12
-
13
-
14
-
15
-
16
-
17
-
18
-
19
-
20
-
21
-
22
-
23
-
24
-
25
-
26
-
27
-
28
-
29
-
30
-
31
-
32
-
33
-
34
-
35
-
36
-
37
-
38
-
39
-
40
-
41
-
42
-
43
-
44
-
45
-
46
-
47
-
48
-
49
-
50
-
51
-
52
-
53
-
54
-
55
-
56
-
57
-
58
-
59
-
60
-
61
-
62
-
63
-
64
-
65
-
 66
66 -
 67
67 -
 68
68 -
 69
69 -
 70
70 -
 71
71 -
 72
72 -
 73
73 -
 74
74 -
 75
75 -
 76
76 -
77
-
78
-
79
-
80
-
81
-
82
-
83
-
84
-
85
-
86
-
87
-
88
-
89
-
90
-
91
-
92
-
93
-
94
-
95
-
96
-
97
-
98
-
99
-
100
 |
 |