Sony MXD-D5C Operating Instructions
Sony MXD-D5C Manual
 |
View all Sony MXD-D5C manuals
Add to My Manuals
Save this manual to your list of manuals |
Sony MXD-D5C manual content summary:
- Sony MXD-D5C | Operating Instructions - Page 1
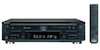
4-228-763-11(1) Compact Disc MiniDisc Deck Operating Instructions MXD-D5C 2000 by Sony Corporation - Sony MXD-D5C | Operating Instructions - Page 2
in the space provided below. Refer to them whenever you call upon your Sony dealer regarding this product. Model No. MXD-D5C Serial No ENERGY STAR® ia a U.S. registered mark. As an ENERGY STAR® Partner, Sony Corporation has determined that this product meets the ENERGY STAR® guidelines for energy - Sony MXD-D5C | Operating Instructions - Page 3
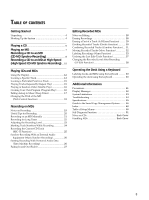
the Deck Using a Keyboard Labeling tracks and MDs using the keyboard 40 Operating the deck using the keyboard 40 Additional Information Precautions 41 Display Messages 42 System Limitations 43 Troubleshooting 44 Specifications 45 Guide to the Serial Copy Management System ......... 46 - Sony MXD-D5C | Operating Instructions - Page 4
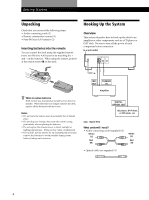
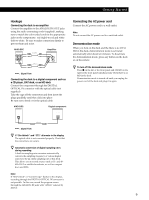
• Audio connecting cords (2) • Remote commander (remote) (1) • Sony R6 (size-AA) batteries (2) Inserting batteries into the remote You can from battery leakage and corrosion. REC OUT TAPE/MD IN Amplifier DIGITAL OPTICAL OUT CD player, DAT deck, or MD deck, etc. ç: Signal flow What cords will - Sony MXD-D5C | Operating Instructions - Page 5
jacks on the components: red (right) to red and white (left) to white. Be sure to make connections firmly to prevent hum and noise. MXD-D5C ANALOG IN OUT L R ç Ç Amplifier TAPE / MD OUT IN L R ç: Signal flow Connecting the deck to a digital component such as a CD player, DAT deck, or an - Sony MXD-D5C | Operating Instructions - Page 6
PHONES AMS REC-IT CLEAR PUSH ENTER PLAY MODE CD TIME DISPLAY CD SYNCHRO NORMAL HIGH MENU/ NO YES AMS CLEAR PUSH ENTER EJECT MD LP REC MODE MD PLAY MODE SLEEP REC TIME/CHAR INPUT Connect the headphones. Adjust the headphone volume. 43 When using the controls on the deck Use - Sony MXD-D5C | Operating Instructions - Page 7
PHONES AMS REC-IT CLEAR PUSH ENTER PLAY MODE CD TIME DISPLAY CD SYNCHRO NORMAL HIGH MENU/ NO YES AMS CLEAR PUSH ENTER EJECT MD LP REC MODE MD PLAY MODE SLEEP REC TIME/CHAR INPUT Connect the headphones. 4 Adjust the headphone volume. When using the controls on the deck Use the - Sony MXD-D5C | Operating Instructions - Page 8
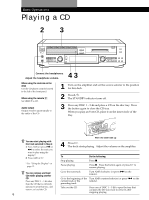
the playing mode of the CD (normal play or Program Play). 5 Press CD SYNCHRO NORMAL. "CD SYNCHRO" appears and "-Normal-" flashes in the display. The MD deck section stands by for recording, and the CD player section stands by for playing. 6 After "CD SYNCHRO" and "-Normal-" turn off, press · or P on - Sony MXD-D5C | Operating Instructions - Page 9
record over existing material. The deck automatically starts recording from the end of the existing material. • Make sure that the remaining recordable time on the MD is longer than the playing time of the CD, especially if you want to record all the tracks on the CD. • You cannot pause recording - Sony MXD-D5C | Operating Instructions - Page 10
just recorded. 1 Press 1/u. The STANDBY indicator turns off. 2 Insert a recordable MD. 3 Press any DISC 1 - 5 § and place a CD on the disc SYNCHRO HIGH. "CD SYNCHRO" appears and "-High-" flashes in the display. The MD deck section stands by for recording and the CD player section stands by for - Sony MXD-D5C | Operating Instructions - Page 11
record over existing material. The system automatically starts recording from the end of the exisiting material. • Make sure that the remaining recordable time on the MD is longer than the playing time of the CD, especially if you want to record all the tracks on the CD. • You cannot pause recording - Sony MXD-D5C | Operating Instructions - Page 12
the total track number, total playing time of the tracks, track number and remaining time of the current track, remaining recordable time of the MD, and disc name. AMS DISPLAY TIME AMS TIME/CHAR 1 / u SELECT z The display changes automatically Whenever you change the operation status of the deck - Sony MXD-D5C | Operating Instructions - Page 13
you press the button, the display changes as follows: When you insert an MD, the disc name, total number of tracks and total disc playing time appear time, and track number Each time you press TIME/CHAR while playing an MD, you can change the display as follows: Press Total remaining time of the - Sony MXD-D5C | Operating Instructions - Page 14
number buttons on the remote. When using the remote, set SELECT to CD or MD. z To pause playing at the beginning of a track Turn AMS (or press a 2-digit track number, and twice if it is a 3-digit track number (for MD only). To enter "0", press button 10/0. Examples: •To play track number 30 Press - Sony MXD-D5C | Operating Instructions - Page 15
If "- Over -" appears while you are pressing ) The disc has reached to its end. Turn AMS counterclockwise (or press =) or press 0 to go back. Notes • (MD only) If the disc reaches the end while you are pressing ) during sound monitoring, the deck stops. • Tracks that are only a few seconds long may - Sony MXD-D5C | Operating Instructions - Page 16
MODE · PLAY MODE 1 While the deck is stopped, press PLAY MODE repeatedly until "ALL DISCS SHUF" or "1DISC SHUF" ("SHUF" for MD) lights up in the display. "ALL DISCS SHUF" shuffles the tracks of all the CDs loaded in the deck. "1DISC SHUF" shuffles only the tracks - Sony MXD-D5C | Operating Instructions - Page 17
. Notes • The display shows instead of the total playing time when the total playing time of the program exceeds 99 minutes (999 minutes for MD). • "Step Full!" appears when you program over 25 tracks. Erase the unnecessary tracks to enter other tracks. • The program is erased when you disconnect - Sony MXD-D5C | Operating Instructions - Page 18
the step value, the playing sound drops out momentarily. • The step value returns to "0" (factory setting) when you turn off the deck or eject the MD. • When a dot (.) appears to the right of the step value in the pitch display, this indicates that you have performed fine adjustment (see this page - Sony MXD-D5C | Operating Instructions - Page 19
times using single-track repeat play. - When you consecutively record two or more tracks with the same track number but from different CDs or MDs. - When you record tracks less than 4 seconds long during stereo, monaural, or LP2 Stereo recording (less than 8 seconds long during LP4 Stereo recording - Sony MXD-D5C | Operating Instructions - Page 20
" appears in the display at this time. To stop monitoring the signal Press p. AMS REC r TIME/CHAR Checking the remaining recordable time on the MD Press TIME/CHAR. • When you press the button repeatedly while the deck is stopped, the display alternates between total disc playing time and remaining - Sony MXD-D5C | Operating Instructions - Page 21
the last setting (On or Off) of the Smart Space and Auto Cut Functions the next time you turn on the deck. Recording on an MD Manually You can start recording from the end of the existing material or record over the existing tracks just as you would on an analog cassette - Sony MXD-D5C | Operating Instructions - Page 22
Stereo) mode cannot be played back on a deck that does not support MDLP mode. In addition, you cannot use S.F Edit and some other MD edit functions for tracks recorded in MDLP mode. REC MODE 1 Do Steps 1 to 3 in "Recording on an MD Manually" on page 21. 2 Press REC MODE repeatedly to select the - Sony MXD-D5C | Operating Instructions - Page 23
when you try to play the MD on a deck that does not support MDLP mode. This convenient function lets you know at a glance that the MD cannot be played back. The . MENU/NO AMS 1 Do Steps 1 to 5 in "Recording on an MD Manually" on page 21. 2 Play the portion of the sound source with the strongest - Sony MXD-D5C | Operating Instructions - Page 24
7 Press MENU/NO. 8 Stop playing the sound source. 9 To start recording, do the procedure starting from Step 7 in "Recording on an MD Manually" on page 21. z You can also change the recording level by using the remote Z During recording pause, press REC LEVEL +/- repeatedly. Marking Track Numbers - Sony MXD-D5C | Operating Instructions - Page 25
during REC-IT Recording. The deck automatically starts recording from the end of the existing material. • Make sure that the remaining recordable time on the MD is longer than the playing time of the CD track. • The recording level specified in the Setup Menu (page 23) is not applied during REC - Sony MXD-D5C | Operating Instructions - Page 26
the track marking setting (see "Notes on Recording" on page 19). 1 / u SELECT MUSIC SYNC 1 Do Steps 1 to 4 in "Recording on an MD Manually" on page 21. 2 Set SELECT to MD. 3 Press MUSIC SYNC. The deck changes to recording pause. 4 Start playing the program source you want to record. The deck starts - Sony MXD-D5C | Operating Instructions - Page 27
Recording on MDs 2 Start playing the program source you want to record. The most recent 6 seconds of audio data is stored in the buffer memory. 3 Press AMS (or T. - Sony MXD-D5C | Operating Instructions - Page 28
(Track Erase Function) You can erase a track simply by specifying the respective track number. When you erase a track, the total number of tracks on the MD decreases by one and all tracks following the erased one are renumbered. Since erasing merely updates the TOC, there is no need to record over - Sony MXD-D5C | Operating Instructions - Page 29
. 3 Press AMS or YES. "All Erase??" appears in the display. 4 Press AMS or YES. When the disc name, all recorded tracks, and titles on the MD have been erased, "Complete!" appears for a few seconds. To cancel the All Erase Function Press MENU/NO or p to turn off the "All Erase??" indication - Sony MXD-D5C | Operating Instructions - Page 30
the Divide Function you can mark a track number at places that you want to randomly access afterwards. Use this function to add tracks to MDs recorded from an analog source (and therefore contain no track numbers), or to divide an existing track into multiple portions for locating positions in the - Sony MXD-D5C | Operating Instructions - Page 31
z You can divide a track while recording Mark the track numbers manually or use the Track Marking Function (see page 24). Combining Recorded MENU/NO YES Dividing a track after selecting the dividing point 1 While playing the MD, press AMS at the point where you want to create a new track. "- - Sony MXD-D5C | Operating Instructions - Page 32
, the tracks cannot be combined. This sometimes happens when you've edited the same track many times, and is due to a technical limitation of the MD system, not a mechanical error. Moving Recorded Tracks (Move Function) Use the Move Function to change the order of any track. After you move a track - Sony MXD-D5C | Operating Instructions - Page 33
Use the Undo Function immediately after you moved the track (see page 37). Labeling Recordings (Name Function) You can create titles for your recorded MDs and tracks. Titles - which may consist of uppercase and lowercase letters, numbers and symbols for a maximum of about 1,700 characters per disc - Sony MXD-D5C | Operating Instructions - Page 34
Editing Recorded MDs 5 Press AMS or YES. A flashing cursor appears in the display. The deck title. 10 Press YES. To cancel labeling Press MENU/NO or p. Note You cannot label a track or an MD while you are recording over an existing track. You can press TIME/CHAR to change the character type at any - Sony MXD-D5C | Operating Instructions - Page 35
sure that the deck is A track Playing, pausing, recording the track to be labeled, or stopped after locating the track to be labeled An MD Stopped with no track number appearing in the display 2 Press NAME EDIT/SELECT repeatedly to select the character type as follows: To select Press NAME - Sony MXD-D5C | Operating Instructions - Page 36
Editing Recorded MDs 3 Press an alphabet/number button to enter a character. If you selected uppercase or lowercase letters 1 Press the the new title. Do Steps 6 to 9 of "Labeling Recordings" on page 33, or Steps 2 to 4 of "Labeling tracks and MDs with the remote" on page 35. 4 Press YES. 36 - Sony MXD-D5C | Operating Instructions - Page 37
z You can erase all recorded tracks and titles See "Erasing all tracks on an MD" on page 29. Undoing the Last Edit (Undo Function) You can use the Undo Function to cancel the last edit and restore the contents of the MD to the condition that existed before editing was done. Note, however, that - Sony MXD-D5C | Operating Instructions - Page 38
in the display, depending on the type of editing to be undone: Editing done Message Erasing a single track Erasing all tracks on an MD "Erase Undo?" Erasing a part of a track Dividing a track "DivideUndo?" Combining tracks "CombinUndo?" Moving a track "Move Undo?" Labeling a track or an - Sony MXD-D5C | Operating Instructions - Page 39
the deck while recording is in progress. This may damage the recording data preventing recording from being performed properly. • Do not use an MD that is damaged or dirty. This may prevent recording data from being recorded properly. • Repeatedly changing the recording level results in poor sound - Sony MXD-D5C | Operating Instructions - Page 40
in one of the operating modes listed below, depending on what you want to label: To label Press while the deck is A track An MD Playing, paused, recording, or stopped with the track number displayed Stopped with total number of tracks displayed A flashing cursor appears in the display. 2 Enter - Sony MXD-D5C | Operating Instructions - Page 41
• AC power cord must be changed only at the qualified service shop. On condensation in the deck If the deck is brought cartridge • Do not open the shutter to expose the MD. • Do not place the cartridge where it will be problems concerning your deck, please consult your nearest Sony dealer. 41 - Sony MXD-D5C | Operating Instructions - Page 42
section. Wait a few seconds, and then try the operation again. Disc Full! The MD is full (see "System Limitations" on page 43). Edit NOW You pressed 1/u while in the recording level, so no change was made. No Disc There is no MD or CD in the deck. No Name The disc or track has not been - Sony MXD-D5C | Operating Instructions - Page 43
cannot be combined with others Track combination may become impossible when tracks are edited. The total recorded time and the remaining time on the MD may not total the maximum recording time Recording is done in minimum units of 2 seconds* each, no matter how short the material. The contents - Sony MXD-D5C | Operating Instructions - Page 44
troubleshooting guide to help you remedy the problem MD deck section The deck does not operate or operates poorly. / The MD may be damaged. Replace the MD the MD into / The MD is record- problems not described above occur, turn off the deck, then reinsert the plug into the power outlet. If the problem - Sony MXD-D5C | Operating Instructions - Page 45
surface on the Optical Pick-up Block with 7 mm aperture. 5 to 20,000 Hz ±0.5 dB More than 96 dB Below measurable limit MD deck section System Disc Laser Laser output Laser diode properties Revolutions (CLV) Error correction Sampling frequency Coding Modulation system Number of channels Frequency - Sony MXD-D5C | Operating Instructions - Page 46
Additional Information Guide to the Serial Copy Management System This MD deck uses the Serial Copy Management System, which output jack Digital input jack Recording DAT deck or MD deck DAT or MD First-generation DAT tape or MD recorded via digital-to-digital connection Playback Optical cable - Sony MXD-D5C | Operating Instructions - Page 47
digital connecting cable Digital output jack Digital input jack Recording DAT deck or MD deck DAT or MD First-generation DAT tape or MD recorded via digital-to-digital connection Playback DAT deck or MD deck Digital output jack Line (analog) output jacks Optical cable or coaxial digital - Sony MXD-D5C | Operating Instructions - Page 48
Input monitor 20 K Keyboard labeling tracks and MDs 40 operating the deck 40 L Labeling an MD 33 a track 33 copying a title within an MD 35 with the remote 35 Locating a particular point automatic track marking 24 manual track marking 24 Troubleshooting 44 U, V, W, X, Y, Z Undoing the last edit 37 - Sony MXD-D5C | Operating Instructions - Page 49
15 SCROLL 12 SLEEP 17 TIME(/CHAR) 12, 20, 33 T.REC 26 YES 29 · (play) 6 , 7, 14, 21 P (pause) 6, 7, 21 p (stop) 6, 7, 15, 20, 29 r (recording) 20 0/) (manual search) 15, 29 =/+ (AMS: Automatic Music Sensor) 6, 14 >10 14 Connector DIGITAL OPTICAL IN 5, 21, 45 Controls AMS 6, 7, 12, 20, 28 PHONE LEVEL - Sony MXD-D5C | Operating Instructions - Page 50
Additional Information Table of Setup Menus You can make various settings on this deck by using Setup Menus. Operation related to each menu were explained in the previous sections. The table below outlines each menu, including the various parameters and initial settings. Note The menus you can use - Sony MXD-D5C | Operating Instructions - Page 51
Should any problem persist, consult your nearest Sony dealer. Three-digit display/Message C11/Protected C12/Cannot Copy C13/Rec Error C13/Read Error C14/Toc Error C41/Cannot Copy C71/Din Unlock E0001/MEMORY NG E0101/LASER NG Cause/Remedy The inserted MD is record-protected. / Take out the MD, and - Sony MXD-D5C | Operating Instructions - Page 52
in the recording results, or even create unwanted tracks on the MD. If this happens, clean the CD as instructed on "On cleaning" above, and record material to the MD using normal-speed CDMD Synchro-Recording only. Handling MDs The MD is enclosed in a cartridge to protect the disc from debris or
-
 1
1 -
 2
2 -
 3
3 -
 4
4 -
 5
5 -
 6
6 -
 7
7 -
8
-
9
-
10
-
11
-
12
-
13
-
14
-
15
-
16
-
17
-
18
-
19
-
20
-
21
-
22
-
23
-
24
-
25
-
26
-
27
-
28
-
29
-
30
-
31
-
32
-
33
-
34
-
35
-
36
-
37
-
38
-
39
-
40
-
41
-
42
-
43
-
44
-
45
-
46
-
47
-
48
-
49
-
50
-
51
-
52
 |
 |

4-228-763-
11
(1)
Compact Disc
MiniDisc Deck
2000 by Sony Corporation
MXD-D5C
Operating Instructions