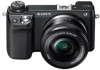
Sony NEX-6L Instruction Manual
Sony NEX-6L Manual
 |
View all Sony NEX-6L manuals
Add to My Manuals
Save this manual to your list of manuals |
Sony NEX-6L manual content summary:
- Sony NEX-6L | Instruction Manual - Page 1
be found at our Customer Support Website. Printed using VOC (Volatile Organic Compound)-free vegetable oil based ink. ©2012 Sony Corporation Printed in Thailand NEX-6 4-437-011-11(1) Interchangeable Lens Digital Camera Instruction Manual E-mount Preparing the camera Mastering the basic operation - Sony NEX-6L | Instruction Manual - Page 2
. Refer to these numbers whenever you call your Sony dealer regarding this product. Model No. NEX-6 Serial No Model No. AC-UB10/AC-UB10B . IMPORTANT SAFETY INSTRUCTIONS -SAVE THESE INSTRUCTIONS DANGER -TO REDUCE THE RISK OF FIRE OR ELECTRIC SHOCK, CAREFULLY FOLLOW THESE INSTRUCTIONS If the shape - Sony NEX-6L | Instruction Manual - Page 3
Replace only with the same or equivalent type recommended by Sony. • Dispose of used battery packs promptly as described in the instructions. [ AC Adaptor Use the nearby wall outlet (wall designed specifically for use with this camera only, and should not be used with other electrical equipment. GB 3 - Sony NEX-6L | Instruction Manual - Page 4
and Canada [ RECYCLING not handle damaged or leaking Lithium-Ion batteries. [ Battery pack and lens (If lens supplied) This device complies with Part 15 of the FCC Rules. (RF) Exposure rules. This equipment has very low levels of RF energy that are deemed to comply without testing of specific - Sony NEX-6L | Instruction Manual - Page 5
Declaration of Conformity Trade Name: SONY Model No.: NEX-6 Responsible Party: Sony Electronics Inc. Address: 16530 this manual could void your authority to operate this equipment. [ Note: This equipment has been tested and used in accordance with the instructions, may cause harmful interference to - Sony NEX-6L | Instruction Manual - Page 6
or guarantee matters please refer to the addresses given in separate service or guarantee documents. Hereby, Sony Corporation, declares that this NEX-6 Interchangeable Lens Digital Camera is in compliance with the essential requirements and other relevant provisions of the Directive 1999/5/EC - Sony NEX-6L | Instruction Manual - Page 7
The recycling of the materials will help to conserve natural resources. In case of products that for safety, performance or data integrity reasons require a permanent connection with an incorporated battery, If you GB should lose the fuse cover, please contact your nearest Sony service station. 7 - Sony NEX-6L | Instruction Manual - Page 8
for electronic communications networks and services) of the Code of electronic communications. Caution if using the camera in Norway Use of this All Wireless function designated for the NEX-6 Interchangeable Lens Digital Camera are applicable in the U.S.A., Canada, Mexico, France, Sweden, Russia - Sony NEX-6L | Instruction Manual - Page 9
Preparing the camera Checking the supplied items 11 Identifying parts 12 Charging the battery pack 16 Attaching/removing the lens 21 Inserting a memory card (sold separately 23 Adjusting the viewfinder (diopter adjustment 25 Attaching/removing the eyepiece cup 25 Setting the date and time - Sony NEX-6L | Instruction Manual - Page 10
the camera (α Handbook 82 Troubleshooting 83 Precautions 88 Specifications 93 Index 99 This manual covers several models supplied with different lenses. The model name varies depending on the supplied lens. The available model varies depending on the countries/regions. Model name NEX-6 NEX-6L - Sony NEX-6L | Instruction Manual - Page 11
(1) (Attached on the camera) • CD-ROM (1) - Application Software for α camera - α Handbook • Instruction Manual (This manual) (1) x NEX-6 • Body cap (1) (attached to the camera) • Micro USB cable (1) x NEX-6L • E16 - 50 mm zoom lens (1)/Front lens cap (1) (attached to the camera) • AC adaptor AC - Sony NEX-6L | Instruction Manual - Page 12
21) K Lens release button (22) L Mount M Image sensor4) N Lens contacts4) A Flash (48) B Shutter button (29) C Hook for shoulder strap Attach the shoulder strap to prevent damage caused by dropping the camera. 1) For details on compatible accessories of the Multi Interface Shoe, visit the Sony web - Sony NEX-6L | Instruction Manual - Page 13
sensor position mark B Viewfinder (25) C Eyepiece cup (25) • Not attached to the camera at the factory. D Eye sensor E Wi-Fi sensor (built-in) F Charge lamp G Micro USB terminal H HDMI terminal (53) I LCD screen You can adjust the LCD screen to an easily viewable angle and shoot from any position - Sony NEX-6L | Instruction Manual - Page 14
cover as shown below. x Lens See page 96 on the specifications of the lenses. E PZ 16 - 50 mm F3.5-5.6 OSS (supplied with NEX-6L/NEX-6Y) • Make sure that the cord is not pinched when you close the cover. A Zooming/Focusing ring B Zooming lever C Mounting index D Lens contacts1) 1) Do not touch - Sony NEX-6L | Instruction Manual - Page 15
Preparing the camera E55 - 210 mm F4.5-6.3 OSS (supplied with NEX-6Y) A Focusing ring B Zooming ring C Focal-length scale D Focal-length index E Lens contacts1) F Mounting index 1) Do not touch this part directly. GB 15 - Sony NEX-6L | Instruction Manual - Page 16
the battery pack When using the camera for the first time, be sure to charge the NP-FW50 "InfoLITHIUM" battery pack (supplied). The "InfoLITHIUM" battery pack can by sliding the lever. 3 Insert the battery pack completely, using the tip of the battery to press the lock lever. GB 16 Lock lever - Sony NEX-6L | Instruction Manual - Page 17
outlet (wall socket). Preparing the camera Power cord (Mains lead) The charge lamp lights orange, and charging starts. camera cannot charge the battery. • When the charge lamp flashes, remove and re-insert the battery pack. Charge lamp Lit: Charging Off: Charging finished Flashing: Charging error - Sony NEX-6L | Instruction Manual - Page 18
may flash quickly when the battery pack is used for the first time, or the battery pack has not been used for a long time. In such cases, performance of the battery pack. • When charging is finished, disconnect the AC Adaptor from the wall outlet (wall socket). • Be sure to use only genuine Sony - Sony NEX-6L | Instruction Manual - Page 19
/off or restart the computer, or wake the computer to resume from sleep mode when a USB connection has been established between the computer and the camera. The camera may cause a malfunction. Before turning on/off, or restarting the computer or waking the computer from sleep mode, disconnect the - Sony NEX-6L | Instruction Manual - Page 20
Preparing the camera x Checking the remaining battery level Check the level with the following indicators and percent figures displayed on the LCD screen. Battery level High "Battery exhausted." You cannot Low shoot any more image. Notes • The displayed battery power level may not be correct - Sony NEX-6L | Instruction Manual - Page 21
getting inside the camera. 2 Mount the lens by aligning the white index marks on the lens and the camera. • Hold the camera's face downward to prevent the dust from entering into the camera. Preparing the camera 3 While pushing the lens lightly toward the camera, turn the lens clockwise until it - Sony NEX-6L | Instruction Manual - Page 22
to use body caps or rear lens caps, please purchase ALC-B1EM (Body cap) or ALC-R1EM (Rear lens cap) (sold separately). • When you use a lens with a power zoom, set the power switch of the camera to OFF and confirm that the lens is completely retracted before switching lenses. If the lens has not - Sony NEX-6L | Instruction Manual - Page 23
Preparing the camera Inserting a memory card (sold separately) 1 Open the cover. 2 Insert a memory card. • Insert the memory card until it clicks as illustrated. 3 Close the cover. Check on the direction of the notched corner. GB 23 - Sony NEX-6L | Instruction Manual - Page 24
you can use You can use following types of memory cards with this camera. However, proper operation cannot be guaranteed for all types of the memory cards. Usable memory card Still image Movie Term in this manual "Memory Stick PRO Duo" media (Mark2) "Memory Stick PRO Duo" media "Memory Stick - Sony NEX-6L | Instruction Manual - Page 25
Preparing the camera Adjusting the viewfinder (diopter adjustment) Adjust the viewfinder so that you can see the screen displays clearly. 1 Turn the diopter-adjustment dial. Attaching/removing the - Sony NEX-6L | Instruction Manual - Page 26
time appears. 1 Set the power switch to ON to turn on the camera. The screen to set date and time appears. • To turn off the camera, set the power switch to OFF. 2 Press the center of the control wheel. 3 Select your area by pressing the right or left of the control - Sony NEX-6L | Instruction Manual - Page 27
save or print images with date. Refer to "PlayMemories Home Help Guide" for more details (page 67). x Resetting the date and time/Checking the current clock setting Select MENU t [Setup] t [Date/Time Setup] (page 60). x Maintaining the date and time setting This camera has an internal rechargeable - Sony NEX-6L | Instruction Manual - Page 28
When the camera recognizes the scene, the Scene Recognition icon and guide appear on the LCD screen: (Night Scene), (Tripod Night Scene), (Night Portrait), (Backlight), (Backlight Scene Recognition icon and guide Portrait), (Portrait), (Landscape), (Macro), (Spotlight), (Low Brightness), or - Sony NEX-6L | Instruction Manual - Page 29
4 Press the shutter button halfway down to focus. When the focus is confirmed, beeps sound and z lights up. Mastering the basic operation Focus indicator 5 Press the shutter button fully down. When the camera detects and shoots a face with [Auto Port. Framing] set to [Auto], the captured image is - Sony NEX-6L | Instruction Manual - Page 30
Internal temp. high. Allow it to cool." may appear. In such cases, turn the camera off and wait until the camera is ready to shoot again. Playing back images 1 Press the (Playback) button. The last recorded image is displayed on the LCD screen. • Press the center of the control wheel to enlarge the - Sony NEX-6L | Instruction Manual - Page 31
Mastering the basic operation x Playing back movies 1 Select MENU t [Playback] t [Still/Movie Select] t [Folder View(MP4)] or [AVCHD View]. • To return to still image playback, select [Folder View(Still)]. 2 Turn the control wheel to - Sony NEX-6L | Instruction Manual - Page 32
delete the image that is currently displayed. 1 Press (Delete). 2 Press the center of the control wheel. • Select to quit the operation. z Deleting several images Select MENU t [Playback] t [Delete] to select and delete several images at the same time. GB 32 - Sony NEX-6L | Instruction Manual - Page 33
allow you to use various functions of the camera. x Control wheel When shooting, DISP (Display Contents), (Exposure Comp.), (Drive Mode) and (ISO) control wheel. The arrow means you can turn the control wheel. When options are displayed on the screen, you can browse through them by turning or - Sony NEX-6L | Instruction Manual - Page 34
function shown at the center, press the center of the control wheel (soft key C). In this manual, the soft keys are indicated by the icon or the function shown on the screen. In this case, soft key A A works as the MENU (Menu) button, and C soft key B as the (View on Smartphone) B button. GB 34 - Sony NEX-6L | Instruction Manual - Page 35
for better shooting. Use these guides to make better use of the camera. x Help Guides The camera displays the Help Guides to explain the selected function, when you change the setting, etc. You can hide the Help Guides by selecting MENU t [Setup] t [Help Guide Display] t [Off]. x Shooting tips You - Sony NEX-6L | Instruction Manual - Page 36
the optical zoom of the lens and then the camera shifts automatically to the [Zoom] feature of the camera. When using a lens that is not equipped with a power zoom, follow the instruction below after magnifying using the optical zoom. 1 Select MENU t [Camera] t [Zoom] t desired value. z The [Zoom - Sony NEX-6L | Instruction Manual - Page 37
the function using [Photo Creativity] You can operate the camera intuitively using [Photo Creativity], since the [Photo Creativity] ): Adjusts the color. (Vividness): Adjusts the vividness. (Picture Effect): Selects the desired effect filter for shooting. 4 Select the desired setting by turning the - Sony NEX-6L | Instruction Manual - Page 38
Notes • [Photo Creativity] is only available when an E-mount lens is mounted. • [Photo Creativity] is only available when [Intelligent Auto] or effect may not be noticeable, depending on the distance from the subject or the lens used. z Tips for a better result of Background Defocus • Move closer to - Sony NEX-6L | Instruction Manual - Page 39
wheel. (Off): Disables the Picture Effect function. (Toy Camera): Creates the look of a Toy Camera photo with shaded corners and white. (High Contrast Mono.): Creates an image with high contrast in black and white. • You can use more picture effects. Select MENU t [Brightness/Color] t [Picture - Sony NEX-6L | Instruction Manual - Page 40
or the control dial to select the desired value, and press the center. • When the image is too bright, set [Exposure Comp.] toward -. • When the image is too dark, set [Exposure Comp.] toward +. Using the self-timer 1 Press (Drive Mode) on the control wheel. 2 Turn the control wheel to select - Sony NEX-6L | Instruction Manual - Page 41
when you want to include yourself in the picture. When you press the shutter button, the self-timer lamp flashes and beeps until the shutter operates. (Self-timer: 2 Sec): Sets the 2-second delay self-timer. You can prevent blur caused by camera-shake that occurs when the shutter button is - Sony NEX-6L | Instruction Manual - Page 42
only major items in a larger size. No Disp. Info.: Does not show recording information. Level: Displays an indicator guide showing the angle of inclination of the camera to the front, back, left or right side. Histogram: Displays the luminance distribution graphically. For viewfinder: Shows only - Sony NEX-6L | Instruction Manual - Page 43
the mode dial. (Intelligent Auto): The camera evaluates the subject and makes the proper settings. SCN (Scene Selection): Shoots with preset settings according to the subject or condition. (Sweep Panorama): Shoots with panoramic size. M (Manual Exposure): Adjusts the aperture and shutter speed - Sony NEX-6L | Instruction Manual - Page 44
and blur without using a tripod. A burst of shots are taken, and image processing is applied to reduce subject blur, camera-shake, and noise. (Anti Motion Blur): Allows you to shoot indoor shots without using the flash and reduces subject blur. The camera shoots - Sony NEX-6L | Instruction Manual - Page 45
at the edge of the subject, and then press the shutter button fully down. 5 Pan the camera to the end, following the guidance on the LCD screen. Guidance bar Notes • The camera shoots continuously during [Sweep Panorama] recording, and the shutter continues to click until shooting is finished. GB - Sony NEX-6L | Instruction Manual - Page 46
control wheel again to pause. • Panoramic images shot with other cameras may not be displayed or scrolled correctly. This indicator shows the the instant of the movement with high speed shutter, or as a trailing image with low speed shutter. 1 Select S (Shutter Priority) (page 43). 2 Turn the control - Sony NEX-6L | Instruction Manual - Page 47
camera shoots with higher quality than [Intelligent Auto] mode and perform composite shooting as necessary. In [Program Auto] mode, you can shoot after adjusting various functions, such as white balance to shoot with various functions other than the exposure (shutter speed and aperture) adjusted. ( - Sony NEX-6L | Instruction Manual - Page 48
. 2 Select MENU t [Camera] t [Flash Mode]. (flash pop-up) button 3 Turn the control wheel to select the desired mode, and press the center. (Flash Off): Does not fire even if the flash is raised. (Autoflash): Fires in dark environments or when shooting towards bright light. (Fill-flash): Fires - Sony NEX-6L | Instruction Manual - Page 49
Using the recording functions The flash range The range of the flash depends on the ISO sensitivity and aperture value. F2.8 F3.5 F5.6 ISO100 1 m - 2.1 m 1 m - 1.7 m 1 m (Autofocus Mode)/ (Autofocus Area)/ (White Balance)/ (Metering Mode)/ (Picture Effect) You can change the functions - Sony NEX-6L | Instruction Manual - Page 50
you want to set the exposure. 2 Press the AEL button. The exposure value is fixed and the (AE lock) lights up. AEL button 3 Holding the AEL button down, focus on your subject and shoot. z How to keep the AE locked after you have released the AEL button Select MENU t [Setup] t [Custom Key Settings - Sony NEX-6L | Instruction Manual - Page 51
The smaller the image size, the more images can be recorded. In the case of movies, the larger the bit-rate, the higher the image quality. 1 Select MENU t [Image Size] t [Image Size]. For movie recording, select MENU t [Image Size] t [Record Setting]. 2 Select the desired mode. Using the recording - Sony NEX-6L | Instruction Manual - Page 52
Using the playback functions Displaying the image list 1 Press the (Playback) button to enter playback mode. 2 Press (Image Index) on the control wheel. Six images are displayed at a time. (Playback) button 3 Turn the control wheel to select an image. • To return to the single-image screen, select - Sony NEX-6L | Instruction Manual - Page 53
terminal Notes • Use an HDMI mini connector on one end (for the camera), and a plug suitable for connecting your TV on the other end. z Using your camera abroad To view movies shot using this camera on a TV, the camera and TV must use the same color television system. Using the playback functions - Sony NEX-6L | Instruction Manual - Page 54
Menu list When you press MENU, the menu items [Camera], flash. (Flash Off/Autoflash/Fill-flash/Slow Sync./Rear Sync./Wireless) Selects auto focusing or manual focusing. (Autofocus/DMF/Manual the camera. Detects people's faces automatically, and adjusts focus and exposure to suit the faces. - Sony NEX-6L | Instruction Manual - Page 55
Effect Shooting Tip List LCD Display (DISP) Finder Display(DISP) DISP Button(Monitor) Registers or changes the person to be given priority in the focus. (New Registration/Order Exchanging/Delete/Delete All) Each time the camera detects a smile, the camera releases the shutter automatically. (Off - Sony NEX-6L | Instruction Manual - Page 56
settings such as white balance. Exposure Comp. ISO White Balance Metering Mode Flash Comp. DRO/Auto HDR Compensates for the brightness of the entire image. (-3.0EV to +3.0EV) Sets the ISO sensitivity. (ISO AUTO/100 - 25600) Adjusts the color tones according to the ambient light conditions. (Auto - Sony NEX-6L | Instruction Manual - Page 57
images to print, or makes printing settings. (DPOF Setup/Date Imprint) Selects the number of images to be displayed on the index screen. (6 Images/12 Images) Enlarges the image. Rotates images. Protects images, or cancels the protection. (Multiple Img./Cancel All Images/Cancel All Movies(MP4 - Sony NEX-6L | Instruction Manual - Page 58
camera settings. Shooting Settings AEL w/ shutter AF Illuminator Phase Detection AF Area Red Eye Reduction FINDER/LCD Setting Live View Display Auto Review Grid Line GB 58 Sets whether or not to fix the exposure (On/Off) Provides pre-flash before shooting when using the flash, to prevent eyes from - Sony NEX-6L | Instruction Manual - Page 59
Release w/o Lens Eye-Start AF Front Curtain Shutter Long Exposure NR High ISO NR Enhances the outline of in-focus ranges with a specific color. (High/Mid/Low/Off) Sets the color used for the peaking function. (White/Red/Yellow) Zooms an image with higher quality image when focusing manually. (On/ - Sony NEX-6L | Instruction Manual - Page 60
functions to the various keys. (Func. of AEL button/Soft key B Setting) Beep Selects the sound produced when you operate the camera. (On/Off) Language Selects the language used on the screen. Date/Time Setup Sets the date and time. Area Setting GB 60 Selects the area where you are using the - Sony NEX-6L | Instruction Manual - Page 61
) Sets the time to turn the camera to the power save mode. (30 Min/5 Min/1 Min/20 Sec/10 Sec) Sets the brightness of the LCD screen. (Manual/Sunny Weather) Sets the brightness of an Electronic Viewfinder. (Auto/Manual) Selects the color of the LCD screen. (Black/White/Blue/Pink) Selects a method to - Sony NEX-6L | Instruction Manual - Page 62
format in which the still image is stored. (Standard Form/Date Form) Select Shoot. Folder Selects the recording folder to which still access point manually. Edit Device Name You can change the device name under Wi-Fi Direct. Disp MAC Address Displays the MAC address of the camera. Reset View - Sony NEX-6L | Instruction Manual - Page 63
Comp. - - - Self-timer Cont. Shooting - Face Detection Picture Effect - - - - - - - - - - - - - - - - - - - - - - - - - - (Sweep Panorama) - - - - M (Manual - Exposure) S (Shutter Priority) A (Aperture Priority) P (Program Auto) (Superior - - Auto) Notes - Sony NEX-6L | Instruction Manual - Page 64
* The camera emits flash light in slow synchro mode if the flash is necessary. ** The [Wireless] setting cannot be used with the camera's internal flash. Notes • The flash modes may be limited also by conditions other than the shooting mode. • Even if you select a workable flash mode, the flash does - Sony NEX-6L | Instruction Manual - Page 65
RAW images. • If "PMB" (Picture Motion Browser) supplied with a camera that was purchased before 2011 has already recommended when using the supplied software and importing images via a 64-bit editions and Starter (Edition) are not supported. Windows Image Mastering API (IMAPI) Ver. 2.0 or later is - Sony NEX-6L | Instruction Manual - Page 66
If the installation menu does not appear, double-click [Computer] (For Windows XP: [My Computer]) t (PMHOME) t [Install.exe]. • If the AutoPlay screen appears, select "Run Install.exe" and follow the instructions that appear on the screen to proceed with the installation. 2 Connect the camera to the - Sony NEX-6L | Instruction Manual - Page 67
Home," refer to "PlayMemories Home Help Guide". Double-click the shortcut of (PlayMemories Home Help Guide) on the desktop, or click [Start] t [All Programs] t [PlayMemories Home] t [PlayMemories Home Help Guide]. "PlayMemories Home" support page (English only) http://www.sony.co.jp/pmh-se/ GB 67 - Sony NEX-6L | Instruction Manual - Page 68
quality, store your movies on a Blu-ray Disc. x "Image Data Converter" With "Image Data Converter," you can do the following: • You can play back and edit images recorded in RAW format with various corrections, such as tone curve and sharpness. • You can adjust images with white balance, exposure - Sony NEX-6L | Instruction Manual - Page 69
images to network services directly from the camera. Some applications may be fee-based. x Starting up downloading services 1 Access the application downloading website. http://www.sony.net/pmca • Use Internet Explorer 8 or 9 for Windows, and Safari 5 for Mac. 2 Follow the instructions on the screen - Sony NEX-6L | Instruction Manual - Page 70
directly using Wi-Fi function of the camera You can download applications using the Wi-Fi function without connecting to a computer. Select MENU t [Application] t (PlayMemories Camera Apps), then follow the instructions on the screen to download applications. Acquire a service account in - Sony NEX-6L | Instruction Manual - Page 71
to soft key B, select MENU t [Playback] t [View date range as the most recently shot or played back image to the Smartphone. All Images in The Device: Transfers all still images in the camera to the Smartphone. 2 If the camera is ready for the transfer, the information screen appears on the camera - Sony NEX-6L | Instruction Manual - Page 72
Mobile." Connecting to a network You can transfer images on the camera via Wi-Fi network and view them on other devices. The setting procedure differs than above. Use [Access Point Settings]. x WPS Push 1 Select MENU t [Setup] t [WPS Push]. 2 Press the WPS button on the access point you want - Sony NEX-6L | Instruction Manual - Page 73
. If the desired access point is not displayed on the screen: Select [Manual Setting] and set the access point following the instructions on the screen. • For details, refer to "α Handbook." Notes • When aboard an airplane, turn off the camera. Saving images to a computer You can save images on the - Sony NEX-6L | Instruction Manual - Page 74
the TV. 1 Select MENU t [Playback] t [View on TV]. 2 Select the device to be connected to the camera. 3 Press the center of the control wheel to play back images as a slideshow. • Press the right/left side of the control wheel to move to the next/ previous image. • Press OPTION - Sony NEX-6L | Instruction Manual - Page 75
be recorded on a memory card formatted with this camera. The values are defined using Sony standard memory cards for testing. The values may vary depending on the shooting conditions. Image size: L 16M Aspect ratio: 3:2* (Units: images) Capacity Quality Standard Fine RAW & JPEG RAW 2GB 410 290 - Sony NEX-6L | Instruction Manual - Page 76
2 h 25 m 4 h 55 m 10 h 20 h 5 m 40 h 15 m Notes • The recording time of movies varies because the camera uses VBR (Variable Bit Rate), an encoding method that automatically adjusts image quality according to the shooting situation. When you record a fast-moving subject, the image is clearer but the - Sony NEX-6L | Instruction Manual - Page 77
the conditions of use. When using an LCD screen When using the viewfinder Approx. (77 °F). - An E PZ 16-50 mm F3.5-5.6 OSS lens is attached. - [Quality] is set to [Fine]. - [ Sony "Memory Stick PRO Duo" media (sold separately). • The measurement method is based on the CIPA standard. (CIPA: Camera - Sony NEX-6L | Instruction Manual - Page 78
List of icons on the LCD screen Icons are displayed on the screen to indicate the camera status. You can change the screen display using DISP (Display Contents) on the control wheel. Shooting standby A Display Indication Shoot Mode P A S M Graphic display Movie recording - Sony NEX-6L | Instruction Manual - Page 79
full/ Database file error Zoom magnification B Display C Display ±0.0 Indication Smart Zoom Clear Image Zoom Digital Zoom View mode Playback folder - File number Protect Print order Wi-Fi wave being emitted Indication Soft keys Indication Flash Mode/Red Eye Reduction Flash compensation Drive Mode - Sony NEX-6L | Instruction Manual - Page 80
mode Face Detection White Balance 7500K A7 G7 Soft Skin Effect DRO/Auto HDR Auto Port. Framing Creative Style Smile Shutter Picture Effect GB 80 manual Exposure compensation ISO sensitivity AE lock Shutter speed indicator Aperture indicator Recording time of the movie (m:s) Recorded date - Sony NEX-6L | Instruction Manual - Page 81
Display 12/12 Indication Image number/ Number of images in the view mode Appears when HDR did not work on the image. Appears when [Picture Effect] did not work on the image. Histogram Others GB 81 - Sony NEX-6L | Instruction Manual - Page 82
Learning more about the camera (α Handbook) "α Handbook," which explains how to use the camera in detail, is included on the CD-ROM (supplied). Refer to "α Handbook" for in-depth instructions on the many functions of the camera. x For Windows users 1 Turn on your computer, and insert the CD-ROM ( - Sony NEX-6L | Instruction Manual - Page 83
Troubleshooting If you experience trouble with the camera, try the following solutions. 1 Check the items on pages Sony service facility. Battery pack and power The battery pack cannot be installed. • When you insert the battery pack, use the tip of the battery pack to push the lock lever (page 16). - Sony NEX-6L | Instruction Manual - Page 84
protect the camera. • If you do not operate the camera for given period of time, the camera turns to power saving mode. To cancel the power save, operate the camera by means such as pressing the shutter button halfway down. The charge lamp on the camera flashes charge lamp does not light) even if you - Sony NEX-6L | Instruction Manual - Page 85
minimum focal distance of the lens. • You are shooting in manual focus mode. Set [AF/MF Select] to [Autofocus]. • Ambient light is insufficient. • The subject may require special focusing. Use the [Flexible Spot] or manual focus function. The flash does not work. • Press the (flash pop-up) button to - Sony NEX-6L | Instruction Manual - Page 86
is whitish (Flare). Blurring of light appears on the image (Ghosting). • The picture was taken under backlit conditions, and excessive light has entered the lens. When using the zoom lens, attach a lens hood. The corners of the picture are too dark. • If any filter or hood is used, take it off and - Sony NEX-6L | Instruction Manual - Page 87
The picture was taken in a dark location without the flash, resulting in camera-shake. The use of a tripod or the flash is recommended (page 48). [Hand-held Twilight] and [Anti Motion Blur] in [Scene Selection] (page 44) are also effective in reducing blur. The exposure value is flashing on the LCD - Sony NEX-6L | Instruction Manual - Page 88
against the LCD screen. The monitor may be discolored and that may cause a malfunction. • Do not expose the camera to direct sunlight. If reflected sunlight is focused on a nearby object, it may cause a fire. When you must place the camera under direct sunlight, attach the front lens cap. GB 88 - Sony NEX-6L | Instruction Manual - Page 89
to let sand or dust get into the camera. This may cause the camera to malfunction, and in some cases this malfunction cannot be repaired. On storing Be sure to attach the front lens cap when not using the camera. On the temperature of the camera Your camera and battery may get hot due to continuous - Sony NEX-6L | Instruction Manual - Page 90
, you can still use the camera as long as you do not record the date and time. If the camera resets to the default settings each time you charge the battery, the internal rechargeable battery may be dead. Consult your Sony dealer or local authorized Sony service facility. Charging method of the - Sony NEX-6L | Instruction Manual - Page 91
the camera at the sun or other bright light. It may cause the malfunction of the camera. • Do not look at the sun or a strong light through a removed lens. This with this camera cannot be played by the following devices. - Other devices compatible with AVCHD format that does not support High Profile - Sony NEX-6L | Instruction Manual - Page 92
the copyright laws. The pictures used in this manual The photographs used as examples of pictures in this manual are reproduced images, and are not actual images shot using this camera. GB 92 On the data specifications described in this manual The data on performance and specifications are defined - Sony NEX-6L | Instruction Manual - Page 93
camera Lens: E-mount lens [Image sensor] Image sensor: APS-C format (23.5 mm × 15.6 mm) CMOS image sensor Total pixel number of image sensor: Approx. 16 700 000 pixels Effective pixel number of camera: Approx. 16 100 000 pixels [Anti-dust] System: Charge protection coating on Low-Pass Filter Flash - Sony NEX-6L | Instruction Manual - Page 94
pack: Rechargeable battery pack NP-FW50 [Power consumption] When using an E PZ 16-50 mm F3.55.6 OSS lens* When using the viewfinder: Approx. 3.3 W When using an LCD screen: Approx. 2.5 W * supplied with NEX-6L/6Y [Others] Exif Print: Compatible PRINT Image Matching III: Compatible DPOF: Compatible - Sony NEX-6L | Instruction Manual - Page 95
1/4 inches) (W/H/D) Mass: For the USA and Canada: Approx. 48 g (1.7 oz) For countries or regions other than the USA and Canada: Approx. 43 g (1.5 oz) Rechargeable battery Approx. 31.8 mm × 18.5 mm × 45 mm (1 5/16 inches × 3/4 inches × 1 13/16 inches) (W/H/D) Mass: Approx. 57 g (2.1 oz) GB 95 Others - Sony NEX-6L | Instruction Manual - Page 96
lens1) E55 - 210 mm zoom lens Camera NEX-6L/6Y NEX-6Y Equivalent 35 mm-format focal length2) (mm) 24 - 75 82.5 - 315 Lens groups- elements Angle of view2) 22 - f/32 Filter diameter 40.5 49 (mm) Dimensions (max. diameter × height) (Approx. mm (in.)) 64.7 × 29.9 (2 5/8 × 1 3/16) 63.8 × - Sony NEX-6L | Instruction Manual - Page 97
narrower than that of a 35 mm-format camera. You can find the approximate equivalent of the focal length of a 35 mm-format camera, and shoot with the same picture angle, by increasing the focal length of your lens by half. For example, by using a 50 mm lens, you can get the approximate equivalent of - Sony NEX-6L | Instruction Manual - Page 98
, trademarks or registered trademarks of their respective developers or manufacturers. However, the ™ or ® marks are not used in all cases in this manual. • Add further enjoyment with your PlayStation 3 by downloading the application for PlayStation 3 from PlayStation Store (where available). • The - Sony NEX-6L | Instruction Manual - Page 99
Review 58 Auto Slow Shutter 60 Autofocus Area 54 Autofocus Mode 54 B Background Defocus Control ...... 38 Battery pack 16 Beep 60 C Charging time 16 Enlarge Image 57 Exposure compensation 40 Eye-Fi 62 Eye-Start AF flash 48 Finder Display(DISP 55 FINDER/LCD Setting 58 Flash Comp 56 Flash - Sony NEX-6L | Instruction Manual - Page 100
44 Language 60 LCD Brightness 61 LCD Display (DISP 55 Lens 21 Lens Comp.: Chro. Aber 60 Lens Comp.: Distortion 60 Lens Comp.: Shading 60 Level 42 Live View Display 58 Long Exposure NR 59 M Mac 66 Macro 44 Manual Exposure 43 Memory card 23 Menu 54 Menu start 60 Metering - Sony NEX-6L | Instruction Manual - Page 101
Slide Show 57 Smile Shutter 55 Soft keys 34 Soft Skin Effect 55 Software 65 Spd Priority Cont 41 Specifications 93 Specify Printing 57 Sports Action 44 Bright 61 Volume Settings 57 W White Balance 56 Wide Image 61 Wi-Fi 72 Wind Noise Reduct 60 Windows 65 WPS Push 72 Z Zoom 54 - Sony NEX-6L | Instruction Manual - Page 102
GB 102 - Sony NEX-6L | Instruction Manual - Page 103
GB 103 Others
-
 1
1 -
 2
2 -
 3
3 -
 4
4 -
 5
5 -
 6
6 -
 7
7 -
8
-
9
-
10
-
11
-
12
-
13
-
14
-
15
-
16
-
17
-
18
-
19
-
20
-
21
-
22
-
23
-
24
-
25
-
26
-
27
-
28
-
29
-
30
-
31
-
32
-
33
-
34
-
35
-
36
-
37
-
38
-
39
-
40
-
41
-
42
-
43
-
44
-
45
-
46
-
47
-
48
-
49
-
50
-
51
-
52
-
53
-
54
-
55
-
56
-
57
-
58
-
59
-
60
-
61
-
62
-
63
-
64
-
65
-
66
-
67
-
68
-
69
-
70
-
71
-
72
-
73
-
74
-
75
-
76
-
77
-
78
-
79
-
80
-
81
-
82
-
83
-
84
-
85
-
86
-
87
-
88
-
89
-
90
-
91
-
92
-
93
-
94
-
95
-
96
-
97
-
98
-
99
-
100
-
101
-
102
-
103
 |
 |
4-437-011-
11
(1)
NEX-6
Interchangeable Lens
Digital Camera
Instruction Manual
E-mount
Preparing the camera
Mastering the basic
operation
Using the recording
functions
Using the playback
functions
Checking the functions
available
Importing images to the
computer
Adding functions to the
camera
Connecting the camera to
a network
Others
©2012 Sony Corporation
Printed in Thailand
NEX-6
Printed using VOC (Volatile Organic
Compound)-free vegetable oil based ink.
Additional information on this product and
answers to frequently asked questions can be
found at our Customer Support Website.