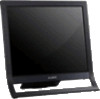
Sony SDM-HS75 Operating Instructions
Sony SDM-HS75 Manual
 |
View all Sony SDM-HS75 manuals
Add to My Manuals
Save this manual to your list of manuals |
Sony SDM-HS75 manual content summary:
- Sony SDM-HS75 | Operating Instructions - Page 1
2-583-745-01(1) TFT LCD Color Computer Display Operating Instructions GB SDM-HS75 SDM-HS95 © 2004 Sony Corporation - Sony SDM-HS75 | Operating Instructions - Page 2
have any questions about this product, you may call; Sony Customer Information Services Center 1-800-222-7669 or http://www.sony.com/ Declaration of Conformity Trade Name: SONY Model: SDM-HS75 SDM-HS95 Responsible Party: Sony Electronics Inc. Address: 16450 W. Bernardo Dr, San Diego, CA - Sony SDM-HS75 | Operating Instructions - Page 3
in each case in this manual. Precautions 4 Identifying parts and controls 5 Setup 7 Step 1: Open the stand 7 Step 2: Connect the display to your computer 7 Step 3: Connect the power cord 8 Step 4: Secure the cords and replace the back cover 8 Step 5: Turn on the monitor and computer - Sony SDM-HS75 | Operating Instructions - Page 4
. This is not malfunction. (Effective dots: more than 99.99%) Maintenance • Be sure to unplug the power cord from the power outlet before cleaning your monitor. • Clean the LCD screen with a soft cloth. If you use a glass cleaning liquid, do not use any type of cleaner containing an anti-static - Sony SDM-HS75 | Operating Instructions - Page 5
the monitor is in power saving mode. OK MENU 54 3 21 Rear of the display Press upward to turn the display on or off. 2 MENU button (pages 10, 11) This button displays or closes the main menu. 3 m/M buttons (page 11) These buttons function as the m/M buttons when selecting the menu items - Sony SDM-HS75 | Operating Instructions - Page 6
the display 7 7 Back cover (page 8) Remove this cover when you connect/disconnect cables or cords. 8 AC IN connector (page 8) Connect the power cord (supplied). 9 HD15 input connector (analog RGB) (page 7) This connector inputs analog RGB video signals (0.7 Vp-p, positive) and SYNC signals. Remove - Sony SDM-HS75 | Operating Instructions - Page 7
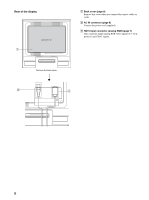
using your monitor, check that the following items are included in your carton: • LCD display • Power cord • HD15-HD15 video signal cable (analog RGB) • Cord strap • CD-ROM (utility software for Windows/Macintosh, Operating Instructions, etc.) • Warranty card • Quick Setup Guide Step 1: Open the - Sony SDM-HS75 | Operating Instructions - Page 8
1 Bundle the cables and cords. Using the supplied cord strap, bundle the cables and cords. to AC IN to a power outlet power cord (supplied) Cord strap The illustration of the back of the monitor shown here is that of the SDM-HS75. The same applies for the other models. 2 Replace the back cover. 8 - Sony SDM-HS75 | Operating Instructions - Page 9
frequency Vertical frequency Resolution SDM-HS75 28-80 kHz SDM-HS95 28-80 kHz 48-75 Hz 48-75 Hz 1280 × 1024 or less 1280 × 1024 or less For more information about the on-screen messages, see "Trouble symptoms and remedies" on page 18. No need for specific drivers The monitor complies with the - Sony SDM-HS75 | Operating Instructions - Page 10
, and BRIGHTNESS items of the menu available (page 11). If you select LOW, the power consumption is reduced (page 16). Navigating the menu Press the MENU button to display the main menu on your screen. See page 11 for more information on using the MENU button. MENU , BACKL I GHT 100 1280 x1024 - Sony SDM-HS75 | Operating Instructions - Page 11
the previous menu. OK , 4 Close the menu. Press the MENU button once to return to normal viewing. If no buttons are pressed, the menu closes automatically after about 45 seconds. MENU x Resetting the adjustments You can reset the adjustments using the RESET menu. See page 15 for more information on - Sony SDM-HS75 | Operating Instructions - Page 12
to select OK button. Return to the menu screen. and press the x Adjust the picture's sharpness manually (PHASE/PITCH) You can adjust the picture's sharpness as follows. 1 Set the resolution to 1280 × 1024 on the computer. 2 Load the CD-ROM. 3 Start the CD-ROM, select the region and model, and - Sony SDM-HS75 | Operating Instructions - Page 13
disappear. 11 Click [END] on the screen to turn off the test pattern. 12 Press the OK button. Return to the SCREEN menu. 13 Press the m/M buttons to select OK button. Return to the menu screen. and press the x Adjust the picture's position manually (H CENTER/V CENTER) If the picture is not in - Sony SDM-HS75 | Operating Instructions - Page 14
the G component is fixed. 3 Press the m/M buttons to select , then press the OK button. The new color MENU button. The main menu appears on the screen. 2 Press the m/M buttons to select (MENU POSITION) and press the OK button. The MENU POSITION menu appears on the screen. 3 Press the m/M buttons - Sony SDM-HS75 | Operating Instructions - Page 15
accidental adjustments or resetting. 1 Press the m/M buttons to select (MENU LOCK) and press the OK button. The MENU LOCK menu appears on the screen. 2 Press the m/M buttons to select ON or OFF and press the OK button. • ON: Only the 1 (power) switch will operate. If you attempt any other operation - Sony SDM-HS75 | Operating Instructions - Page 16
, the monitor will automatically reduce power consumption as shown below. SDM-HS75 Power mode Power consumption 1 (power) indicator normal operation 45 W (max.) green active off* 1.0 W (max.) (deep sleep)** orange power off 1.0 W (max.) off SDM-HS95 Power mode Power consumption 1 (power - Sony SDM-HS75 | Operating Instructions - Page 17
of the following messages appears on the screen. To solve the problem, see "Trouble symptoms and remedies" on page 18. If OUT OF RANGE appears on the screen This indicates that the input signal is not supported by the monitor's specifications. Check the following items. I NFORMA T I ON OUT OF RANGE - Sony SDM-HS75 | Operating Instructions - Page 18
are using Windows and replaced an old monitor with this monitor, • If you replaced an old monitor with this monitor, reconnect the old monitor and do the following. Select "SONY" from the "Manufacturers" list and select "SDM-HS75" or "SDM-HS95" from the "Models" list in the Windows device selection - Sony SDM-HS75 | Operating Instructions - Page 19
. Press the MENU button again to make the box disappear. MENU If any problem persists, call your authorized Sony dealer and give the following information: • Model name: SDM-HS75 or SDM-HS95 • Serial number • Detailed description of the problem • Date of purchase • Name and specifications of your - Sony SDM-HS75 | Operating Instructions - Page 20
Specifications SDM-HS75 LCD panel Panel type: a-Si TFT Active Matrix Picture size: 17.0 inch and vertical) Power requirements 100-240 V, 50-60 Hz, Max. 1.0 A Power consumption Max. page 7. SDM-HS95 LCD panel Panel type: a-Si TFT Active Matrix Picture size: 19.0 inch Input signal format
-
 1
1 -
 2
2 -
 3
3 -
 4
4 -
 5
5 -
 6
6 -
 7
7 -
8
-
9
-
10
-
11
-
12
-
13
-
14
-
15
-
16
-
17
-
18
-
19
-
20
 |
 |

2-583-745-
01
(1)
© 2004 Sony Corporation
TFT LCD Color
Computer Display
SDM-HS75
SDM-HS95
Operating Instructions
GB