Sony SDM-X82 Operating Instructions
Sony SDM-X82 Manual
 |
View all Sony SDM-X82 manuals
Add to My Manuals
Save this manual to your list of manuals |
Sony SDM-X82 manual content summary:
- Sony SDM-X82 | Operating Instructions - Page 1
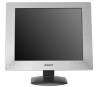
4-089-157-13(1) TFT LCD Color Computer Display Operating Instructions US Mode d'emploi FR Manual de instrucciones ES SDM-X52 SDM-X72 SDM-X82 © 2002 Sony Corporation - Sony SDM-X82 | Operating Instructions - Page 2
Do not open the cabinet. Refer servicing to qualified personnel only. FCC Notice with the instructions, may cause Model No.: Responsible Party: Address: Telephone No.: SONY SDM-X52/X72/X82 Sony Electronics Inc. 680 Kinderkamack Road,Oradell,NJ 07649 USA 201-930-6972 This device complies with Part 15 - Sony SDM-X82 | Operating Instructions - Page 3
(ECO mode 18 Automatic picture quality adjustment function (analog RGB signal only 18 Troubleshooting 19 On-screen messages 19 Trouble symptoms and remedies 20 Self-diagnosis function 22 Specifications 23 TCO'99 Eco-document (for the gray model i TCO'95 Eco-document (for the black - Sony SDM-X82 | Operating Instructions - Page 4
cleaning your monitor. • Clean the LCD screen with cables from the monitor and grasp the support and base sections of the display stand firmly with both hands when transporting. If you drop the monitor, you may be injured or the monitor may be damaged. • When you transport this monitor for repair - Sony SDM-X82 | Operating Instructions - Page 5
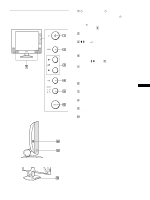
in parentheses for further details. Front of the LCD display Side view of the LCD display 1 1 (Power) switch and 1 (power) indicator (pages 9, 17, 22) This switch turns the monitor on when the 1 (power) indicator lights up in red. To turn the monitor off, press this switch again. If the 1 (power - Sony SDM-X82 | Operating Instructions - Page 6
Rear of the LCD display SDM-X72/X82 SDM-X52 qa Back cover (page 7) Remove this cover when you connect cables or cords. qs Audio input jack for INPUT1 (page 8) This jack inputs audio signals when connected to the audio output jack of a computer or other audio equipment. qd DVI-D input connector ( - Sony SDM-X82 | Operating Instructions - Page 7
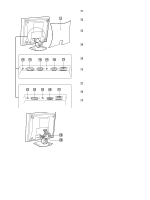
your monitor, check that the following items are included in your carton: • LCD display • Power cord • HD15-HD15 video signal cable (analog RGB) • DVI-D video signal cable (digital RGB) • Audio cord (stereo miniplug) • Windows Utility/Macintosh Utility Disk • Warranty card • This instruction manual - Sony SDM-X82 | Operating Instructions - Page 8
signal cable (analog RGB) (supplied) x Connecting to a Macintosh to the HD 15 input connector (analog RGB) for INPUT1 or INPUT2 to audio output of the computer or other audio equipment audio cord (supplied) Setup 4:Connect the power cord 1 Connect the supplied power cord to the monitor's AC - Sony SDM-X82 | Operating Instructions - Page 9
red. MAIN POWER lights in red 2 Press the 1 (power) switch on the front right of the monitor. The 1 (power) indicator lights up in green. US 3 Note If you cannot bundle all of the cords and cables inside the stand, leave them hanging down outside the stand. lights in green 3 Turn on the - Sony SDM-X82 | Operating Instructions - Page 10
SDM-X52 SDM-X72/X82 Horizontal frequency 28 - 61 kHz 28 - 92 kHz Vertical frequency 56 - 75 Hz 56 - 85 Hz Resolution 1024 × 768 or less 1280 × 1024 or less For more information about on-screen messages, see "Trouble symptoms and remedies" on page 20. No need for specific drivers The monitor - Sony SDM-X82 | Operating Instructions - Page 11
lower sides of the LCD panel, then adjust screen tilt. On-screen message (Appears about 5 seconds on the upper left corner.) Input indicator lights up Input signal configuration INPUT1: DVI-D INPUT1 DVI-D input connector (digital RGB) for INPUT1 INPUT1: HD15 (SDM-X72/X82 only) INPUT1 HD15 - Sony SDM-X82 | Operating Instructions - Page 12
. You can make numerous adjustments to your monitor using the on-screen menu. The menu screen illustrations show the SDM-X72/X82 model. The same operations apply for the SDM-X52 model. Navigating the menu 1 Display the main menu. Press the MENU button to display the main menu on your screen. MENU - Sony SDM-X82 | Operating Instructions - Page 13
adjustments to the picture quality You can manually adjust the picture's sharpness (phase/pitch) monitor's HD15 input connector (analog RGB). 1 Set the resolution to 1024 × 768 (SDM-X52) 1280 × 1024 (SDM-X72/X82) on the computer. 2 Load the Utility Disk. 3 Start the Utility Disk and display - Sony SDM-X82 | Operating Instructions - Page 14
to 1280 × 1024 on the computer when using the SDM-X72/X82 model. When using the SDM-X52 model, it is not necessary to set the resolution. 2 Load the Utility Disk. 3 Start the Utility Disk and display the test pattern. For Windows Click [Utility] t [Windows]/[Win Utility.exe]. For Macintosh - Sony SDM-X82 | Operating Instructions - Page 15
the screen surrounded by a black frame. Note • When using the SDM-X72/X82 model with 1280 × 1024 resolution signals, the above mentioned settings are not available. The picture is displayed on the screen in full. • SDM-X52 can only display the picture on the screen in full. SMOOTHING If the picture - Sony SDM-X82 | Operating Instructions - Page 16
the selected menu according to the following instructions. x MENU POSITION You can change the AUDIO SELECT Select the audio input when connecting to both of the monitor's audio input jacks for INPUT1 and INPUT2. 1 Press the M/m buttons to select (AUDIO SELECT) and press the OK button. The AUDIO - Sony SDM-X82 | Operating Instructions - Page 17
audio equipment connected to the monitor's audio input jack. Notes • You cannot adjust the volume when displaying the main menu on the screen. • When your monitor (Display Power Management Signaling) compliant, the monitor will automatically reduce power consumption as shown below. SDM-X52 Power - Sony SDM-X82 | Operating Instructions - Page 18
always appears on the screen (within the following monitor frequency ranges): Horizontal frequency: 28 - 61 kHz (SDM-X52) 28 - 92 kHz (SDM-X72/X82) Vertical frequency: 56 - 75 Hz (SDM-X52) 56 - 85 Hz (SDM-X72/X82) Consequently, the first time the monitor receives input signals that do not match one - Sony SDM-X82 | Operating Instructions - Page 19
> 1024 × 768" is displayed (SDM-X52) This indicates that the resolution is not supported by the monitor's specifications (1024 × 768 or less). If "RESOLUTION > 1280 × 1024" is displayed (SDM-X72/X82) This indicates that the resolution is not supported by the monitor's specifications (1280 × 1024 or - Sony SDM-X82 | Operating Instructions - Page 20
in the following ranges. Horizontal frequency: 28 - 61 kHz (SDM-X52) 28 - 92 kHz (SDM-X72/X82) Vertical frequency: 56 - 75 Hz (SDM-X52) 56 - 85 Hz (SDM-X72/X82) Resolution: 1024 × 768 or less (SDM-X52) 1280 × 1024 or less (SDM-X72/X82) If using Windows, • If you replaced an old monitor with this - Sony SDM-X82 | Operating Instructions - Page 21
name Serial number Week and year of manufacture If any problem persists, call your authorized Sony dealer and give the following information: • Model name: SDM-X52, SDM-X72, SDM-X82 • Serial number • Name and specifications of your computer and graphics board. • Type of input signals (analog RGB - Sony SDM-X82 | Operating Instructions - Page 22
. If there is a problem with your monitor or computer(s), the screen monitor is working properly. Reconnect the video input cables and check the condition of your computer(s). If the color bars do not appear, there is a potential monitor failure. Inform your authorized Sony dealer of the monitor - Sony SDM-X82 | Operating Instructions - Page 23
Specifications SDM-X52 LCD panel Panel type: a-Si TFT Active Matrix Picture size: 15.0 inch Input signal format RGB operating frequency* Horizontal: 28 - 61 kHz Vertical: 56 - 75 Hz Resolution Horizontal: Max.1024 dots Vertical: Max.768 lines Input signal levels Analog RGB video signal - Sony SDM-X82 | Operating Instructions - Page 24
- Sony SDM-X82 | Operating Instructions - Page 25
un ordinateur équipé d'un connecteur de sortie DVI (RVB numérique 7 Réglage 2 : HD15 (RVB analogique 7 Réglage 3 : Raccordez le cordon audio 8 Réglage 4 : Branchez le câble d'alimentation 8 GAMMA 15 ZOOM (SDM-X72/X82 uniquement 15 SMOOTHING 15 Réglages model i TCO'95 Eco-document (for the black - Sony SDM-X82 | Operating Instructions - Page 26
disquettes. Remarque sur l'écran à cristaux liquides (LCD Liquid Crystal Display) Veuillez noter que l'écran LCD est issu d'une technologie de haute pré bles du moniteur et saisissez le moniteur fermement des deux mains par son support et sa base. Si vous laissez tomber le moniteur, vous risquez de - Sony SDM-X82 | Operating Instructions - Page 27
consommation électrique. FR 7 Haut-parleurs stéréo (page 17) Ce haut-parleurs diffusent les signaux audio sous forme de sons. 8 Commutateur MAIN POWER (page 9) Ce commutateur d'alimentation principal met le est une marque commerciale de Kensington. Arrière du support d'écran (suite page suivante) 5 - Sony SDM-X82 | Operating Instructions - Page 28
SDM-X72/X82 SDM-X52 qa Capot arrière (page 7) Retirez ce capot pour raccorder des câbles ou des cordons. qs Prise d'entrée audio pour INPUT1 (page 8) Cette prise transmet des signaux vidéo lorsqu'elle est raccordée sur la prise de sortie audio raccorder. ql Support de câbles (page 9) Cette pié - Sony SDM-X82 | Operating Instructions - Page 29
si les accessoires suivants se trouvent bien dans le carton d'emballage : • Ecran LCD • Câble d'alimentation • Câble de signal vidéo HD15-HD15 (RVB analogique) • Câble de signal vidéo DVI-D (RVB numérique) • Câble audio (minifiche stéréo) • Windows Utility/Macintosh Utility Disk • Carte de garantie - Sony SDM-X82 | Operating Instructions - Page 30
ble de signal vidéo HD15-HD15 (RVB analogique) (fourni) Vers les prises de sortie de l'ordinateur ou tout autre équipement audio Câble audio (fourni) xRaccordement à un Macintosh vers le connecteur d'entrée HD15 (RVB analogique) pour INPUT1 ou INPUT2 Réglage 4 : Branchez le câble d'alimentation - Sony SDM-X82 | Operating Instructions - Page 31
moniteur. L'indicateur d'alimentation 1 s'allume en vert. 3 Remarque Si vous ne parvenez pas à regrouper tous les cordons et tous les câbles dans le support, faites-les pendre en dehors de celui-ci. FR il s'allume en vert 3 Mettez l'ordinateur sous tension. 4 Appuyez plusieurs fois sur la touche - Sony SDM-X82 | Operating Instructions - Page 32
sur la touche INPUT (page 11). • Si CABLE PAS CONNECTÉ apparaît sur l'écran : - Vé SDM-X52 Fréquence horizontale 28 - 61 kHz Fréquence verticale 56 - 75 Hz Résolution 1024 × 768 ou moins SDM-X72 cas, suivez les instructions indiquées sur l'é LCD contre le bureau ou la base du support d'écran. 10 - Sony SDM-X82 | Operating Instructions - Page 33
DVI-D (RVB numérique) pour INPUT1 ENTRÉE1 (INPUT1): HD15 (SDM-X72/X82 uniquement) INPUT1 Connecteur d'entree HD15 (RVB analogique) pour INPUT1 ENTRÉE2 INPUT2 (INPUT2): HD15 Connecteur d'entree HD15 (RVB analogique) FR pour INPUT2 Sélection du signal d'entrée pour la prise d'entrée audio - Sony SDM-X82 | Operating Instructions - Page 34
effectuer de nombreux réglages l'aide des menus d'affichage. Les illustrations des écrans de menu correspondent au modèle SDM-X72/X82. Les mêmes opérations s'appliquent au modèle SDM-X52. Pilotage par menu 1 Affichez le menu principal. Appuyez sur la touche MENU pour afficher le menu principal sur - Sony SDM-X82 | Operating Instructions - Page 35
Lorsque vous recevez des signaux RVB numériques depuis le connecteur d'entrée DVI-D pour INPUT1, aucun réglage n'est nécessaire. x Fonction de réglage 1 Réglez la résolution de l'ordinateur sur 1024 × 768 (SDM-X52), 1280 × 1024 (SDM-X72/X82). FR 2 Chargez la disquette d'utilitaire. 3 Démarrez la - Sony SDM-X82 | Operating Instructions - Page 36
comme suit : 1 Réglez la résolution sur 1280 × 1024 sur l'ordinateur si vous utilisez le modèle SDM-X72/X82. Il n'est pas nécessaire de régler la résolution avec le modèle SDM-X52. 2 Chargez la disquette d'utilitaire. 3 Démarrez la disquette d'utilitaire et affichez la mire de test. Pour Windows - Sony SDM-X82 | Operating Instructions - Page 37
pour sélectionner le mode souhaité. ZOOM (SDM-X72/X82 uniquement) Le moniteur est réglé SDM-X72/X82 avec des signaux de résolution 1280 × 1024, les réglages mentionnés ci-dessus ne sont pas disponibles. L'image s'affiche en plein écran. • Le SDM-X52 768 (SDM-X52) et 1280 × 1024 (SDM-X72/X82) sont - Sony SDM-X82 | Operating Instructions - Page 38
touche m enfoncée. • POSITION MENU POS I T I ON MENU • ENTRÉE AUDIO • MODE ÉCO ZZ... ZZ... • LANGUAGE • RESTAURE 0 • VERROU RÉGLAGES 1280 sur OK. Réglez l'option de menu sélectionnée en appliquant les instructions suivantes. x POSITION MENU Vous pouvez changer la position du menu s'il - Sony SDM-X82 | Operating Instructions - Page 39
écouter le son à partir de l'ordinateur ou d'un autre appareil audio raccordé sur les prises d'entrée audio du moniteur. Vous pouvez régler le volume à l'aide d'un (Display Power Management Signaling), le moniteur réduit automatiquement sa consommation d'énergie comme indiqué cidessous. SDM-X52 Mode - Sony SDM-X82 | Operating Instructions - Page 40
claire sur l'écran (dans les plages de fréquences suivantes du moniteur) : Fréquence horizontale : 28 - 61 kHz (SDM-X52) 28 - 92 kHz (SDM-X72/X82) Fréquence verticale : 56 - 75 Hz (SDM-X52) 56 - 85 Hz (SDM-X72/X82) En conséquence, la première fois que le moniteur reçoit des signaux d'entrée qui ne - Sony SDM-X82 | Operating Instructions - Page 41
SDM-X52) Cela signifie que la résolution n'est pas prise en charge par les spécifications du moniteur (1024 × 768 ou moins). Si "RESOLUTION > 1280 × 1024" est affiché (SDM-X72 ENTRÉE1 : DV I - D PASSER EN MODE ÉCO Si l'indication CABLE PAS CONNECTÉ apparaît sur l'écran Cela signifie que le câble de - Sony SDM-X82 | Operating Instructions - Page 42
SONY" dans la liste "Fabricants" et sélectionnez "SDM-X52" ou "SDM-X72" ou "SDM-X82" depuis la liste "Modèles" dans l'écran de sélection de périphérique Windows. Si "SDM-X52" ou "SDM-X72" ou "SDM etc.) et la fréquence du signal d'entrée sont supportés par ce moniteur. Même si la fréquence est - Sony SDM-X82 | Operating Instructions - Page 43
Exemple MENU INFORMATIONS MODEL : SDM-X82 SER. NO : 1234567 MANUFACTURED : 2002-40 Désignation Numéro de série Semaine et année de fabrication Si le problème persiste, appelez votre revendeur Sony agréé et fournissez-lui les informations suivantes : • Désignation: SDM-X52, SDM-X72, SDM-X82 • Num - Sony SDM-X82 | Operating Instructions - Page 44
(vos) ordinateur(s). Si les barres de couleur n'apparaissent pas, c'est peut-être en raison d'une défaillance du moniteur. Informez votre revendeur Sony agréé de la condition du moniteur. Si l'indicateur 1 (alimentation) s'allume en orange. Essayez d'appuyer sur une touche quelconque du clavier ou - Sony SDM-X82 | Operating Instructions - Page 45
vert) Signal RVB numérique (DVI) : TMDS (lien simple) 15 1/2 × 11 7/8 × 2 7/8 pouces) (sans support) Masse Approx. 4,8 kg (10 lb 9 oz) (avec support) Approx. 3,5 kg (7 lb 11 oz) (sans support) Plug & Play DDC2B Accessoires Voir page 7. SDM-X72/X82 Panneau LCD Type de panneau : a-Si TFT - Sony SDM-X82 | Operating Instructions - Page 46
- Sony SDM-X82 | Operating Instructions - Page 47
conector de salida DVI (RGB digital 7 Paso 2: Conexión de un ordenador equipado con conector de salida HD15 (RGB analógica 7 Paso 3: Conexión del cable de audio 8 Paso 4: Conexión del cable de alimentación 8 Paso 5: Agrupación de los cables 9 Paso 6: Encendido del monitor y el ordenador 9 Paso - Sony SDM-X82 | Operating Instructions - Page 48
es un fallo de funcionamiento. (Puntos efectivos: más del 99,99%) Mantenimiento • Asegúrese de desenchufar el cable de alimentación de la toma de corriente antes de limpiar el monitor. • Limpie la pantalla LCD con un paño suave. Si utiliza un producto líquido de limpieza de cristales, no emplee ning - Sony SDM-X82 | Operating Instructions - Page 49
LCD Vista lateral de la pantalla LCD 1 Interruptor e indicador 1 (alimentación) (páginas 9, 17, 22) Este interruptor enciende el monitor ñales de audio como sonido. 8 Interruptor MAIN POWER (alimentacion principal) ES (página 9) Este interruptor cambia la alimentación del monitor de conectado - Sony SDM-X82 | Operating Instructions - Page 50
Parte posterior de la pantalla LCD SDM-X72/X82 SDM-X52 qa Cubierta posterior (página 7) Extraiga esta cubierta cuando conecte cables. qs Toma de entrada de audio para INPUT1 (página 8) Esta toma introduce las señales de audio al conectarse a la toma de salida de audio de un ordenador o de otro - Sony SDM-X82 | Operating Instructions - Page 51
Configuración Antes de utilizar el monitor, compruebe que los siguientes artículos se incluyen en la caja: • Pantalla LCD • Cable de alimentación • Cable de señal de vídeo HD15-HD15 (RGB analógica) • Cable de señal de vídeo DVI-D (RGB digital) • Cable de audio (minienchufe estéreo) • Windows Utility - Sony SDM-X82 | Operating Instructions - Page 52
conector de entrada HD 15 (RGB analógica) para INPUT1 o INPUT2 a la salida de audio del ordenador o de otro equipo de audio Cable de audio (suministrado) Paso 4: Conexión del cable de alimentación 1 Conecte el cable de alimentación suministrado al conector AC IN del monitor 2 Conéctelo a una toma - Sony SDM-X82 | Operating Instructions - Page 53
ilumina en rojo 2 Pulse el interruptor 1 (alimentación) situado en la parte frontal derecha del monitor. El indicador 1 (alimentación) se ilumina en verde. 3 Nota Si no es posible agrupar todos los cables dentro del soporte, déjelos colgando fuera del soporte. se ilumina en verde ES 3 Encienda - Sony SDM-X82 | Operating Instructions - Page 54
). • Si CABLE DESCONECTADO aparece en pantalla: - Compruebe que el cable de señal monitor antiguo. A continuación, ajuste la tarjeta gráfica del ordenador en los siguientes rangos. SDM-X52 Frecuencia horizontal 28 - 61 kHz Frecuencia vertical 56 - 75 Hz Resolución 1024 × 768 o inferior SDM-X72 - Sony SDM-X82 | Operating Instructions - Page 55
DVI-D (RGB digital) para INPUT1 ENTRADA1 (INPUT1): HD15 (sólo SDM-X72/ X82) INPUT1 Conector de entrada HD15 (RGB analógica) para INPUT1 ENTRADA2 INPUT2 (INPUT2): HD15 Conector de entrada HD15 (RGB analógica) para INPUT2 ES Selección de la señal de entrada para la toma de entrada de audio - Sony SDM-X82 | Operating Instructions - Page 56
mejores resultados posibles. Es posible realizar diversos ajustes en el monitor mediante el menú en pantalla. Las ilustraciones de la pantalla de menú muestran el modelo SDM-X72/X82. Se aplican las mismas operaciones para el modelo SDM-X52. Navegación por el menú 1 Muestre el menú principal. Pulse - Sony SDM-X82 | Operating Instructions - Page 57
ñales RGB del conector de entrada DVI-D para INPUT1. x Función de ajuste automático de la calidad de imagen Cuando el monitor recibe una señal de entrada, de entrada HD15 (RGB analógica) del monitor. 1 Ajuste la resolución en 1024 × 768 (SDM-X52) 1280 × 1024 (SDM-X72/X82) en el ordenador. 2 Cargue - Sony SDM-X82 | Operating Instructions - Page 58
pulse x Ajuste manual de la posición de la imagen (CENTRADO H/CENTRADO V) Si la imagen no aparece en el centro de la pantalla, ajuste el centrado de la imagen de la siguiente forma. 1 Con el modelo SDM-X72/X82, ajuste la resolución del ordenador en 1280 × 1024. Si utiliza el modelo SDM-X52, no es - Sony SDM-X82 | Operating Instructions - Page 59
(sólo SDM-X72/X82) El monitor está utiliza el modelo SDM-X72/X82 con señ software de ES CD-ROM como imágenes fotográficas o ilustraciones.) Notas • Si ajusta el menú (ZOOM) en REAL, el menú (SUAVIZADO) no estará disponible. • Las señales de resolución 1024 × 768 (SDM-X52) y 1280 × 1024 (SDM-X72 - Sony SDM-X82 | Operating Instructions - Page 60
las nueve posiciones en la que aparecerá el menú. x SELECCIÓN AUDIO Seleccione la entrada de audio al realizar una conexión a ambas tomas de entrada de audio del monitor para INPUT1 e INPUT2. 1 Pulse los botones M/m para seleccionar (SELECCIÓN AUDIO) y pulse el botón OK. Aparecerá el menú SELECCI - Sony SDM-X82 | Operating Instructions - Page 61
auriculares del monitor, es posible escuchar el sonido del ordenador o de otro equipo de audio conectado a las tomas de entrada de audio del monitor. Notas (Display Power Management Signaling), dicho monitor reducirá automáticamente el consumo de energía como se muestra a continuación. SDM-X52 Modo - Sony SDM-X82 | Operating Instructions - Page 62
(dentro de los siguientes intervalos de frecuencia del monitor): Frecuencia horizontal: 28 - 61 kHz (SDM-X52) 28 - 92 kHz (SDM-X72/X82) Frecuencia vertical: 56 - 75 Hz (SDM-X52) 56 - 85 Hz (SDM-X72/X82) Como consecuencia, la primera vez que el monitor reciba señales de entrada que no coincidan con - Sony SDM-X82 | Operating Instructions - Page 63
x x x . x kHz / x x xHz Si CABLE DESCONECTADO aparece en pantalla Esto indica que el cable de señal de vídeo se ha desconectado del conector SDM-X52) Esto indica que la resolución no cumple las especificaciones del monitor (1024 × 768 o inferior). Si aparece "RESOLUCIÓN > 1280 × 1024" (SDM-X72 - Sony SDM-X82 | Operating Instructions - Page 64
manual el cable de se monitor antiguo por éste, vuelva a conectar el antiguo y realice lo siguiente. Seleccione "SONY" en la lista "Manufacturers" y elija "SDM-X52", o "SDMX72", o "SDM-X82" en la lista "Models" de la pantalla de selección de dispositivos de Windows. Si "SDM-X52", o "SDM-X72", o "SDM - Sony SDM-X82 | Operating Instructions - Page 65
causado por un ordenador u otro equipo conectado y no por el monitor • Ajuste la resolución en 1024 × 768 (SDM-X52), 1280 × 1024 (SDM-X72/X82) en el ordenador. Aparecen imágenes fantasma. • Deje de utilizar cables prolongadores de vídeo y/o dispositivos de conmutación de vídeo. • Compruebe que - Sony SDM-X82 | Operating Instructions - Page 66
funciona correctamente. Vuelva a conectar los cables de entrada de vídeo y compruebe el estado del ordenador. Si las barras de color no aparecen, significa que existe un fallo potencial del monitor. Informe a un proveedor Sony autorizado sobre el estado del monitor. Si el indicador 1 (alimentaci - Sony SDM-X82 | Operating Instructions - Page 67
Especificaciones SDM-X52 Panel LCD Tipo de panel: Matriz activa a-Si TFT Tamaño de imagen: 15,0 pulgadas DVI) digital: TMDS (enlace único) Requisitos de alimentación 100 - 240 V, 50 - 60 Hz, Máx. 0,9 A (SDM-X72) Máx. 1,2 A (SDM-X82) Consumo de energía Máx. 40 W (SDM-X72) Máx. 58 W (SDM - Sony SDM-X82 | Operating Instructions - Page 68
- Sony SDM-X82 | Operating Instructions - Page 69
- Sony SDM-X82 | Operating Instructions - Page 70
gray model) and services to the environment. The main problem, cover a wide range of issues: include a demand that the computer and/or display, after a certain period of inactivity, shall Flame retardants are present in printed circuit boards, cables, wires, casings and housings. Their purpose is - Sony SDM-X82 | Operating Instructions - Page 71
black model) and services to the environment. The main problem, requirements cover a wide range of issues: environment, ergonomics present in printed circuit boards, cables, wires, casings and housings. of cadmium. The colour-generating layers of display screens must not contain any cadmium. Mercury - Sony SDM-X82 | Operating Instructions - Page 72
Sony Corporation Printed in Thailand
-
 1
1 -
 2
2 -
 3
3 -
 4
4 -
 5
5 -
 6
6 -
 7
7 -
8
-
9
-
10
-
11
-
12
-
13
-
14
-
15
-
16
-
17
-
18
-
19
-
20
-
21
-
22
-
23
-
24
-
25
-
26
-
27
-
28
-
29
-
30
-
31
-
32
-
33
-
34
-
35
-
36
-
37
-
38
-
39
-
40
-
41
-
42
-
43
-
44
-
45
-
46
-
47
-
48
-
49
-
50
-
51
-
52
-
53
-
54
-
55
-
56
-
57
-
58
-
59
-
60
-
61
-
62
-
63
-
64
-
65
-
66
-
67
-
68
-
69
-
70
-
71
-
72
 |
 |
4-089-157-
13
(1)
© 2002 Sony Corporation
TFT LCD Color
Computer Display
Operating Instructions
Mode d’emploi
Manual de instrucciones
US
FR
ES
SDM-X52
SDM-X72
SDM-X82