Sony SMP-N100 Operating Instructions - Page 12
Step 3: Easy Setup, Perform Easy Setup. - power
 |
UPC - 027242800205
View all Sony SMP-N100 manuals
Add to My Manuals
Save this manual to your list of manuals |
Page 12 highlights
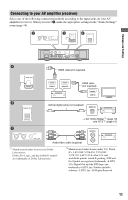
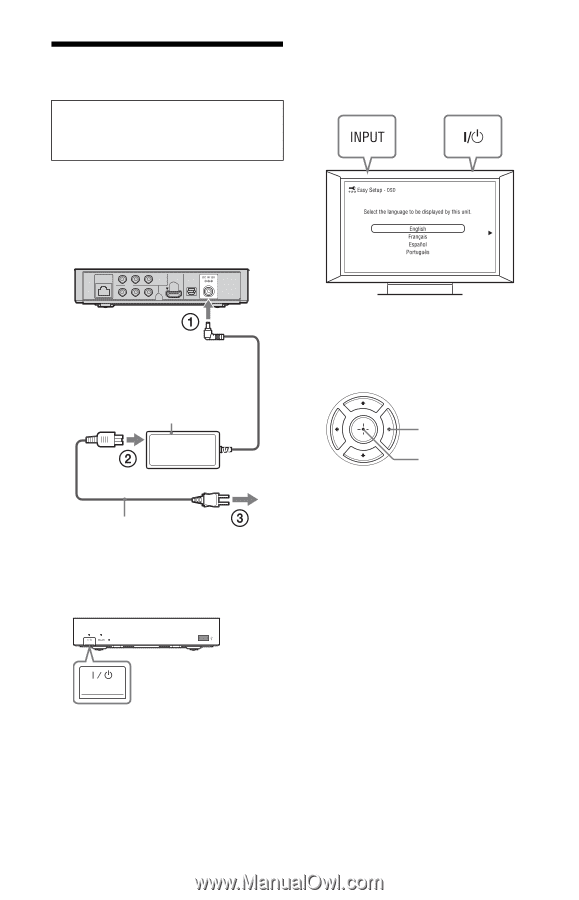
Step 3: Easy Setup When turned on for the first time Wait for a short while before the player turns on and starts "Easy Setup." 1 Connect the supplied AC adapter and AC power cord in the numeric order shown below. When removing them, do so in reverse order. 3 Turn on the TV, then switch the input selector on your TV so that the signal from the player appears on your TV screen. to DC IN 12V AC adapter (supplied) 4 Perform "Easy Setup." Follow the on-screen instructions to make the basic settings using
-
 1
1 -
2
-
3
-
4
-
5
-
6
-
 7
7 -
 8
8 -
 9
9 -
 10
10 -
 11
11 -
 12
12 -
 13
13 -
 14
14 -
 15
15 -
 16
16 -
 17
17 -
18
-
19
-
20
-
21
-
22
-
23
-
24
-
25
-
26
-
27
-
28
-
29
-
30
-
31
 |
 |
12
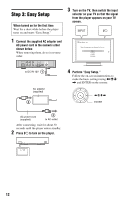
Step 3: Easy Setup
1
Connect the supplied AC adapter and
AC power cord in the numeric order
shown below.
When removing them, do so in reverse
order.
After connecting, wait for about 30
seconds until the player enters standby.
2
Press
[
/
1
to turn on the player.
3
Turn on the TV, then switch the input
selector on your TV so that the signal
from the player appears on your TV
screen.
4
Perform “Easy Setup.”
Follow the on-screen instructions to
make the basic settings using
<
/
M
/
m
/
,
and ENTER on the remote.
When turned on for the first time
Wait for a short while before the player
turns on and starts “Easy Setup.”
to DC IN 12V
AC adapter
(supplied)
AC power cord
(supplied)
to AC outlet
ENTER
<
/
M
/
m
/
,