Sony STR-DG600 Operating Instructions - Page 49
Settings for the video (VIDEO menu), VIDEO menu, SYSTEM menu
 |
View all Sony STR-DG600 manuals
Add to My Manuals
Save this manual to your list of manuals |
Page 49 highlights
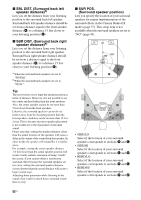
Amplifier Operations Settings for the video (VIDEO menu) You can use the VIDEO menu to reassign the component video input to another input and to name inputs. Select "6-VIDEO" in the amplifier menus. For details on adjusting the parameters, see "Navigating through menus" (page 40) and "Overview of the menus" (page 41). VIDEO menu parameters x COMP. V. A. (Component video assign) Lets you reassign the component video input to another input. For details, see "Watching component images from other inputs" (page 71). x NAME IN (Naming inputs) Lets you set the name of inputs. For details, see "Naming inputs" (page 72). Settings for the system (SYSTEM menu) You can use the SYSTEM menu to set the size and distance of the speakers connected to this system. Select "7-SYSTEM" in the amplifier menus. For details on adjusting the parameters, see "Navigating through menus" (page 40) and "Overview of the menus" (page 41). SYSTEM menu parameters x SW SPK (Sub woofer) • YES If you have connected a sub woofer, select "YES". • NO If you have not connected a sub woofer, select "NO". This activates the bass redirection circuitry and outputs the LFE signals from other speakers. Tip In order to take full advantage of the Dolby Digital bass redirection circuitry, we recommend setting the sub woofer's cut off frequency as high as possible. x FRT SPK (Front speakers) • LARGE If you connect large speakers that will effectively reproduce bass frequencies, select "LARGE". Normally, select "LARGE". When the sub woofer is set to "NO", the front speakers are automatically set to "LARGE". continued 49US
-
 1
1 -
2
-
3
-
4
-
5
-
6
-
7
-
8
-
9
-
10
-
11
-
12
-
13
-
14
-
15
-
16
-
17
-
18
-
19
-
20
-
21
-
22
-
23
-
24
-
25
-
26
-
27
-
28
-
29
-
30
-
31
-
32
-
33
-
34
-
35
-
36
-
37
-
38
-
39
-
40
-
41
-
42
-
43
-
 44
44 -
 45
45 -
 46
46 -
 47
47 -
 48
48 -
 49
49 -
 50
50 -
 51
51 -
 52
52 -
 53
53 -
 54
54 -
55
-
56
-
57
-
58
-
59
-
60
-
61
-
62
-
63
-
64
-
65
-
66
-
67
-
68
-
69
-
70
-
71
-
72
-
73
-
74
-
75
-
76
-
77
-
78
-
79
-
80
-
81
-
82
-
83
-
84
-
85
-
86
-
87
-
88
 |
 |