Sony STR-K502 Operating Instructions - Page 10
Other Hookups - sound system
 |
View all Sony STR-K502 manuals
Add to My Manuals
Save this manual to your list of manuals |
Page 10 highlights
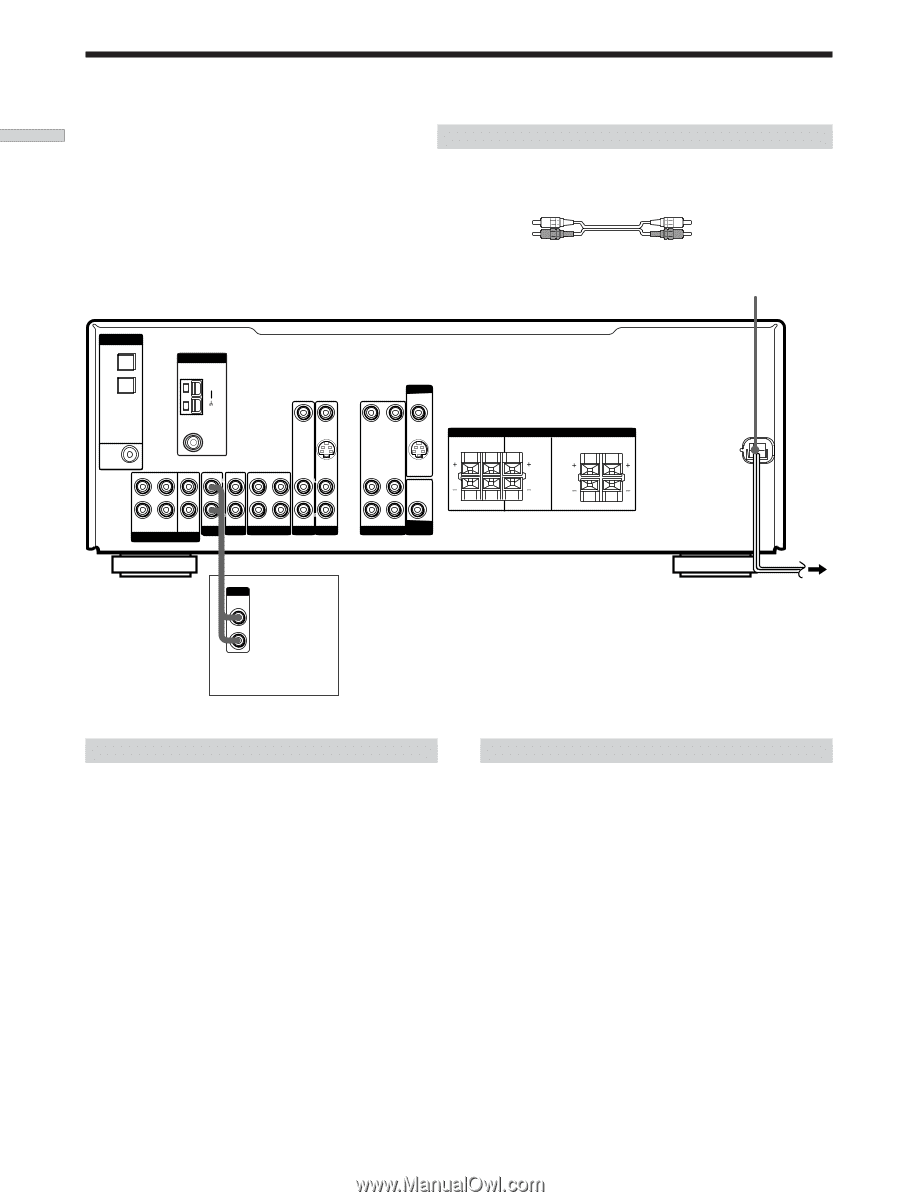
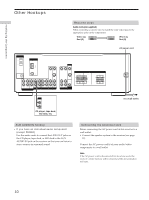
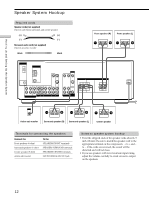
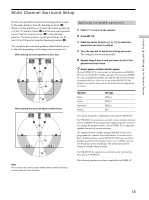
Hooking Up the Components Other Hookups Required cords Audio cords (not supplied) When connecting a cord, be sure to match the color-coded pins to the appropriate jacks on the components. White (L) Red (R) White (L) Red (R) AC power cord DIGITAL OPTICAL DVD/LD IN TV/SAT IN ANTENNA AM MONITOR DVD/LD IN COAXIAL FM 75Ω COAXIAL VIDEO IN VIDEO IN S VIDEO IN L L L L CENTER R FRONT SURROUND SUB WOOFER MULTI CH IN R IN IN AUX CD R OUT IN MD/TAPE R AUDIO IN AUDIO IN TV/SAT DVD/LD VIDEO OUT VIDEO IN VIDEO OUT S VIDEO OUT L AUDIO OUT R AUDIO OUT AUDIO IN SUB VIDEO WOOFER SPEAKERS IMPEDANCE USE 8 - 16Ω SURROUND R L CENTER FRONT R L R L R L OUTPUT LINE To a wall outlet CD player, tape deck, MD deck, etc. AUX AUDIO IN hookup • If you have an individual audio component (except PHONO) Use the audio cords to connect the LINE OUT jacks on the CD player, tape deck, or MD deck to the AUX AUDIO IN jack on the receiver so that you can listen to stereo sources in surround sound. Connecting the AC power cord Before connecting the AC power cord of this receiver to a wall outlet: • Connect the speaker system to the receiver (see page 12). Connect the AC power cord(s) of your audio/video components to a wall outlet. Note If the AC power cord is disconnected for about one week, the receiver's entire memory will be cleared and the demonstration will start. 10
-
 1
1 -
2
-
3
-
4
-
 5
5 -
 6
6 -
 7
7 -
 8
8 -
 9
9 -
 10
10 -
 11
11 -
 12
12 -
 13
13 -
 14
14 -
 15
15 -
16
-
17
-
18
-
19
-
20
-
21
-
22
-
23
-
24
-
25
-
26
-
27
-
28
-
29
-
30
-
31
-
32
-
33
-
34
-
35
-
36
-
37
-
38
-
39
-
40
-
41
-
42
-
43
-
44
-
45
-
46
-
47
-
48
-
49
-
50
-
51
-
52
-
53
-
54
-
55
-
56
-
57
-
58
-
59
 |
 |