Sony STR-K740P Operating Instructions (primary manual) - Page 4
About This Manual, Note for the supplied remote, Demonstration Mode - receiver
 |
View all Sony STR-K740P manuals
Add to My Manuals
Save this manual to your list of manuals |
Page 4 highlights
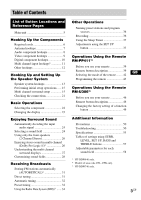
About This Manual The instructions in this manual are for models HT-DDW840 and HT-DDW740. Check your model number by looking at the lower right corner of the front panel. In this manual, the HT-DDW840 is used for illustration purpose unless stated otherwise. Any difference in operation is clearly indicated in the text, for example, "HT-DDW840 only". The HT-DDW840 consists of: - Receiver - Speaker system • Front/surround speakers • Center speaker • Sub woofer STR-K840P SS-MSP2 SS-CNP2 SA-WMSP4 The HT-DDW740 consists of: - Receiver - Speaker system • Front/surround speakers • Center speaker • Sub woofer STR-K740P SS-MSP2 SS-CNP2 SA-WMSP2 About area codes The area code of the receiver you purchased is shown on the lower portion of the rear panel (see the illustration below). IMPEDANCE USE 8 - 16Ω ENTER FRONT R L R L 4-XXX-XXX-XX AA Area code Any differences in operation, according to the area code, are clearly indicated in the text, for example, "Models of area code AA only". Tip The instructions in this manual describe the controls on the receiver. You can also use the controls on the supplied remote if they have the same or similar names as those on the receiver. For details on the use of your remote, see pages 39 - 45 for RM-PP411 (HT-DDW840 only) and pages 46 - 49 for RM-U306 (HT-DDW740 only). Note for the supplied remote For RM-PP411 (HT-DDW840 only) The VIDEO 3, TV/SAT, PHONO, AUX, SOURCE, MPX/DUAL, ANALOG DIRECT, 12 and ON SCREEN buttons on the remote are not available. For RM-U306 (HT-DDW740 only) The MULTI CH button on the remote is not available. Demonstration Mode The demonstration will activate the first time you turn on the power. When the demonstration starts, the following message appears in the display: "NOW DEMONSTRATION MODE IF YOU FINISH DEMONSTRATION PLEASE PRESS POWER KEY WHILE THIS MESSAGE APPEARS IN THE DISPLAY THANK YOU" To cancel the demonstration Press ?/1 to turn the receiver off while the above message is being displayed. The next time you turn the receiver on, the demonstration will not appear. To view the demonstration Hold down SET UP and press ?/1 to turn on the power. Notes • Running the demonstration will clear the receiver's memory. For details on what will be cleared, see "Clearing the receiver's memory" on page 15. • There will be no sound when the demonstration mode is activated. • You cannot cancel demonstration if you did not press ?/1 while the above message is being displayed. To cancel demonstration after the above message appears, press ?/1 twice to activate the demonstration again. Then, press ?/1 while the above message is being displayed. 4GB
-
 1
1 -
 2
2 -
 3
3 -
 4
4 -
 5
5 -
 6
6 -
 7
7 -
 8
8 -
 9
9 -
 10
10 -
11
-
12
-
13
-
14
-
15
-
16
-
17
-
18
-
19
-
20
-
21
-
22
-
23
-
24
-
25
-
26
-
27
-
28
-
29
-
30
-
31
-
32
-
33
-
34
-
35
-
36
-
37
-
38
-
39
-
40
-
41
-
42
-
43
-
44
-
45
-
46
-
47
-
48
-
49
-
50
-
51
-
52
-
53
-
54
-
55
-
56
-
57
-
58
-
59
 |
 |