Sony SU-WL830 Operating Instructions
Sony SU-WL830 Manual
 |
View all Sony SU-WL830 manuals
Add to My Manuals
Save this manual to your list of manuals |
Sony SU-WL830 manual content summary:
- Sony SU-WL830 | Operating Instructions - Page 1
4-690-669-12(1) Wall-Mount Bracket Operating Instructions US Manuel d'instructions FR Manual de instrucciones ES SU-WL830 Lea este manual antes de usar el producto - Sony SU-WL830 | Operating Instructions - Page 2
If the Wall-Mount Bracket is removed after installing it on the wall, the screw holes are left. Do not use the Wall-Mount Bracket in a place where it is subjected to mechanical vibrations. Installing the WallMount Bracket To Sony Dealers WARNING The following instructions are for Sony dealers only - Sony SU-WL830 | Operating Instructions - Page 3
, an electric shock or a malfunction of the TV. Be sure to install the Wall-Mount Bracket securely to the wall following the instructions in this instruction manual. If any of the screws are loose or fall out, the Wall-Mount Bracket may fall and cause injury or property damage. Be sure to use the - Sony SU-WL830 | Operating Instructions - Page 4
inch) for nominal. Keep minimum 406 mm (16 inch) horizontal space between fasteners. Precautions Mount the Wall-Mount Bracket directly onto the solid concrete wall. Ensure that the thickness of solid concrete wall is at least 203 mm (8 inch). Ensure that the size of each concrete block is - Sony SU-WL830 | Operating Instructions - Page 5
*2 (6) Tools needed *1 (6) US 5.5 mm (7/32 inch) 10 mm (13/32 inch) *2 13 mm (1/2 inch) 1.5 N.m/1,5 N.m 12.5 N.m/12,5 N.m {15 kgf.cm} {130 kgf.cm} *1 Only for dry wall with studs *2 Only for solid concrete or concrete block *3 Only for 75 inch (189.3 cm) model US 5 - Sony SU-WL830 | Operating Instructions - Page 6
Attaching TV to the Dry Wall with Studs Dry wall with studs WM5 WM1 Installing the Lateral Shift Bracket to the wall 1 Decide on the installation location. Make sure that the wall has enough space for the TV and is capable of supporting a weight of at least six times that of the TV. A F E - Sony SU-WL830 | Operating Instructions - Page 7
G H US (mm/inch) XBR A 75X940E 65X930E 1,673 / 65 7/8 1,451 / 57 1/4 B 962 / 37 7/8 838 / 33 C 716 / 28 1/4 691 / 27 1/4 D 230 / 9 1/8 268 / 10 5/8 E 246 / 9 3/4 147 / 5 7/8 F 87 / 3 1/2 59 / 2 3/8 G 339 / 13 3/8 309/ 12 1/4 H*2 (°) 15 15 TV installation dimensions table (mm/inch) - Sony SU-WL830 | Operating Instructions - Page 8
Note We recommend you to check the position of TV in the viewing environment. 3 Align WM5 to the wall and make four marks aligned with the studs. 2 406 mm (16 inch) / 610 mm (24 inch) WM5 Note Use a level to check whether WM5 is - Sony SU-WL830 | Operating Instructions - Page 9
5 7 Attach WM1 to WM5 on the WM1 wall. WM5 WS1 6 Install WM5 on the wall. Note Use a level to check whether the Lateral Shift Bracket is level. WM1 8 Pull out the arm of the bracket to the end. WS2 US WW1 Precaution Do not over-tighten the lag bolts WS2 . Improper tightening could reduce - Sony SU-WL830 | Operating Instructions - Page 10
. 65 * * 65 inch (163.9 cm) model only Precaution If the Table-Top Stand is already attached to the TV, be sure to attach the WallMount Bracket parts to the TV before detaching the Table-Top Stand. US 10 - Sony SU-WL830 | Operating Instructions - Page 11
Installing the TV on the wall 1 3 2 4 US WM2 US 11 - Sony SU-WL830 | Operating Instructions - Page 12
5 Screw the left and right side of the Wall-Mount Bracket to adjust the angle of the TV. 6 M6L13 7 2 65 * 3 1 65 * * 65 inch (163.9 cm) model only US 12 M6L13 - Sony SU-WL830 | Operating Instructions - Page 13
8 Attach WM3 . 1 65 * 2 WM3 * 65 inch (163.9 cm) model only 9 2 WM3 10 When moving the TV, hold it firmly from the bottom. US 11 US 13 - Sony SU-WL830 | Operating Instructions - Page 14
or Concrete Block Solid Concrete or Concrete Block WM1 Installing the Wall-Mount Bracket to the wall 1 Decide on the installation location. Make sure that the wall has enough space for the TV and is capable of supporting a weight of at least six times that of the TV. A F E D B C *1 US - Sony SU-WL830 | Operating Instructions - Page 15
G H US (mm/inch) XBR A 75X940E 65X930E 1,673 / 65 7/8 1,451 / 57 1/4 B 962 / 37 7/8 838 / 33 C 685 / 27 660 / 26 D 199 / 7 7/8 237 / 9 3/8 E 277 / 11 178 / 7 1/8 F 73 / 2 7/8 45 / 1 13/16 G 325 / 12 7/8 295 / 11 5/8 H*2 (°) 15 15 TV installation dimensions table (mm/inch) Figures in - Sony SU-WL830 | Operating Instructions - Page 16
Note We recommend you to check the position of TV in the viewing environment. 3 Drill pilot holes on the marks. 75 mm (3 inch) 10 mm (13/32 inch) 1, 2, 3, 4, 5, 6 2 Align WM1 to the wall and make six marks. 4 WM1 Note Use a level to check whether WM1 is level. WA1 US 16 - Sony SU-WL830 | Operating Instructions - Page 17
5 7 Pull out the arm of WM1 to the WM1 end. 6 Install WM1 on the wall. Note Use a level to check whether the Wall-Mount Bracket is level. WM1 US WS2 WW1 Precaution Do not over-tighten the lag bolts WS2 . Improper tightening could reduce the holding power of the lag bolts WS2 . US 17 - Sony SU-WL830 | Operating Instructions - Page 18
. 65 * * 65 inch (163.9 cm) model only Precaution If the Table-Top Stand is already attached to the TV, be sure to attach the WallMount Bracket parts to the TV before detaching the Table-Top Stand. US 18 - Sony SU-WL830 | Operating Instructions - Page 19
Installing the TV on the wall 1 3 2 4 US WM2 US 19 - Sony SU-WL830 | Operating Instructions - Page 20
5 Screw the left and right side of the Wall-Mount Bracket to adjust the angle of the TV. 6 M6L13 7 2 65 * 3 1 US 20 * 65 inch (163.9 cm) model only 65 * M6L13 - Sony SU-WL830 | Operating Instructions - Page 21
8 Attach WM3 . 1 65 * 2 WM3 * 65 inch (163.9 cm) model only 9 2 WM3 10 When moving the TV, hold it firmly from the bottom. US 11 US 21 - Sony SU-WL830 | Operating Instructions - Page 22
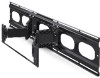
Specifications WM5 a d bc WM1 g h i k ef j Dimension: (Approx.) (mm (inch)) a : 1,040 mm (41 inch) b : 273 mm (10 3/4 inch) c : 245 mm (9 3/4 inch) d : 14 mm (9/16 inch) e : 206 mm (8 1/8 inch) f : 180 mm (7 1/8 inch) g : 446 mm (17 5/8 inch) h : 336 mm (13 1/4 inch) i : 244 mm (9 5/8 inch - Sony SU-WL830 | Operating Instructions - Page 23
- Sony SU-WL830 | Operating Instructions - Page 24
Conservez ce mode d'emploi pour toute référence ultérieure. Les produits Sony sont conçus pour vous offrir le maximum de sécurité. Toutefois, des dommages matériels. Précautions Si vous utilisez le téléviseur fixé au Support de fixation murale pendant une longue période, le mur situé derrière le - Sony SU-WL830 | Operating Instructions - Page 25
correctement les câbles. AVERTISSEMENT Les instructions suivantes sont destinées uniquement aux détaillants Sony. Lisez attentivement les consignes de Support de fixation murale solidement au mur en suivant les instructions présentes dans ce mode d'emploi. Si une vis se desserre ou tombe, le Support - Sony SU-WL830 | Operating Instructions - Page 26
de matériau du mur sur lequel vous souhaitez installer le téléviseur. Le Support de fixation murale varie selon le type de mur. Quel est le type mm (16 pouces) entre les pièces de fixation. Précautions Fixez le Support de fixation murale directement sur le mur en béton solide. Assurez-vous que - Sony SU-WL830 | Operating Instructions - Page 27
Accessoires fournis WM1 WM2 WM3 WM4 *3 WM5 M6L23 (2) M6L13 (2) WS1 LIMITED WARRANTY 6 mm x 23 mm (1/4 pouces x 29/32 pouces) (2) 6 mm x 13 mm (1/4 pouces x 17/32 pouces) (2) 8 mm x 15 mm (11/32 pouces x 19/32 pouces) (6) WS2 8 mm x 60 mm (11/32 pouces x 2 3/8 pouces) WW1 (6) WA1 *2 - Sony SU-WL830 | Operating Instructions - Page 28
avec montants Cloison sèche avec montants WM5 WM1 Installation du support de déplacement latéral sur le mur 1 Décidez de l'emplacement d'installation. Assurez-vous que le mur offre suffisamment d'espace pour le téléviseur et qu'il peut supporter un poids équivalent à au moins six fois celui du - Sony SU-WL830 | Operating Instructions - Page 29
G H FR (mm/pouces) FR XBR A B C D E F G H*2 (°) 75X940E 1 673 / 65 7/8 962 / 37 7/8 716 / 28 1/4 230 / 9 1/8 246 / 9 3/4 87 / 3 1/2 339 / 13 3/8 15 65X930E 1 451 / 57 1/4 838 / 33 691 / 27 1/4 268 / 10 5/8 147 / 5 7/8 59 / 2 3/8 309/ 12 1/4 15 Tableau des dimensions d' - Sony SU-WL830 | Operating Instructions - Page 30
Remarque Nous vous recommandons de vérifier la position du téléviseur dans l'environnement de visionnement. 3 Alignez WM5 sur le mur et tracez quatre repères alignés avec les montants. 2 406 mm (16 pouces) / 610 mm (24 pouces) WM5 Remarque Utilisez un niveau pour vérifier que WM5 est de - Sony SU-WL830 | Operating Instructions - Page 31
WM1 à WM5 au mur. WM1 WM5 WS1 6 Installez WM5 au mur. Remarque Utilisez un niveau pour vérifier que le support de déplacement latéral est de niveau. WM1 8 Tirez le bras du support entièrement vers l'extérieur. WS2 FR FR WW1 Précautions Ne serrez pas excessivement les tirefonds WS2 . Un - Sony SU-WL830 | Operating Instructions - Page 32
(189,3 cm) uniquement). 2 Retirez les vis situées à l'arrière du téléviseur. WM4 65 * * Modèle 65 pouces (163,9 cm) uniquement Précautions Si le support de table est déjà fixé au téléviseur, assurez-vous de fixer les pièces du - Sony SU-WL830 | Operating Instructions - Page 33
Installation du téléviseur sur le mur 3 1 4 2 FR FR WM2 FR 11 - Sony SU-WL830 | Operating Instructions - Page 34
5 Vissez les côtés droit et gauche du Support de fixation murale pour régler l'angle du téléviseur. 6 M6L13 7 2 65 * 3 1 65 * * Modèle 65 pouces (163,9 cm) uniquement FR 12 M6L13 - Sony SU-WL830 | Operating Instructions - Page 35
8 Fixez WM3 . 1 65 * 2 WM3 * Modèle 65 pouces (163,9 cm) uniquement 9 2 WM3 10 Lorsque vous déplacez le téléviseur, tenez-le fermement par le bas. FR FR 11 FR 13 - Sony SU-WL830 | Operating Instructions - Page 36
de béton Béton solide ou bloc de béton WM1 Installation du Support de fixation murale sur le mur 1 Décidez de l'emplacement d'installation. Assurez-vous que le mur offre suffisamment d'espace pour le téléviseur et qu'il peut supporter un poids équivalent à au moins six fois celui du téléviseur - Sony SU-WL830 | Operating Instructions - Page 37
G H FR (mm/pouces) FR XBR A B C D E F G H*2 (°) 75X940E 1 673 / 65 7/8 962 / 37 7/8 685 / 27 199 / 7 7/8 277 / 11 73 / 2 7/8 325 / 12 7/8 15 65X930E 1 451 / 57 1/4 838 / 33 660 / 26 237 / 9 3/8 178 / 7 1/8 45 / 1 13/16 295 / 11 5/8 15 Tableau des dimensions d' - Sony SU-WL830 | Operating Instructions - Page 38
Remarque Nous vous recommandons de vérifier la position du téléviseur dans l'environnement de visionnement. 3 Percez des avant-trous sur les repères. 75 mm (3 pouces) 10 mm (13/32 pouces) 1, 2, 3, 4, 5, 6 2 Alignez WM1 sur le mur et tracez six repères. 4 WM1 Remarque Utilisez un niveau pour - Sony SU-WL830 | Operating Instructions - Page 39
7 Tirez le bras de WM1 WM1 entièrement vers l'extérieur. 6 Installez WM1 au mur. Remarque Utilisez un niveau pour vérifier que le Support de fixation murale est de niveau. WM1 WS2 FR FR WW1 Précautions Ne serrez pas excessivement les tirefonds WS2 . Un serrage incorrect pourrait réduire - Sony SU-WL830 | Operating Instructions - Page 40
(189,3 cm) uniquement). 2 Retirez les vis situées à l'arrière du téléviseur. WM4 65 * * Modèle 65 pouces (163,9 cm) uniquement Précautions Si le support de table est déjà fixé au téléviseur, assurez-vous de fixer les pièces du - Sony SU-WL830 | Operating Instructions - Page 41
Installation du téléviseur sur le mur 3 1 4 2 FR FR WM2 FR 19 - Sony SU-WL830 | Operating Instructions - Page 42
5 Vissez les côtés droit et gauche du Support de fixation murale pour régler l'angle du téléviseur. 6 M6L13 7 2 65 * 3 1 65 * FR 20 * Modèle 65 pouces (163,9 cm) uniquement M6L13 - Sony SU-WL830 | Operating Instructions - Page 43
8 Fixez WM3 . 1 65 * 2 WM3 * Modèle 65 pouces (163,9 cm) uniquement 9 2 WM3 10 Lorsque vous déplacez le téléviseur, tenez-le fermement par le bas. FR FR 11 FR 21 - Sony SU-WL830 | Operating Instructions - Page 44
Spécifications WM5 a d bc WM1 g h i k ef j Dimensions : (Environ) (mm (pouces)) a : 1 040 mm (41 pouces) b : 273 mm (10 3/4 pouces) c : 245 mm (9 3/4 pouces) d : 14 mm (9/16 pouces) e : 206 mm (8 1/8 pouces) f : 180 mm (7 1/8 pouces) g : 446 mm (17 5/8 pouces) h : 336 mm (13 1/4 pouces) i - Sony SU-WL830 | Operating Instructions - Page 45
- Sony SU-WL830 | Operating Instructions - Page 46
este manual y utilice el producto correctamente. Conserve este manual para poder consultarlo en el futuro. Los productos de Sony están de al menos seis veces el peso del televisor. (Consulte las instrucciones de su televisor para obtener información sobre el peso de éste.) Si la instalación - Sony SU-WL830 | Operating Instructions - Page 47
Para distribuidores de Sony ADVERTENCIA Las siguientes instrucciones son únicamente para distribuidores de Sony. Asegúrese de y dañarse o provocar daños personales. pared siguiendo las instrucciones de este manual de instrucciones. Tenga cuidado de no someter el TV a descargas eléctricas Si - Sony SU-WL830 | Operating Instructions - Page 48
Tabla de contenido Antes de comenzar...4 ¿De qué está hecha la pared? ...4 Artículos suministrados ...5 Herramientas necesarias ...5 Fijar el TV a yeso con pernos...6 Instalar el soporte de movimiento lateral en la pared 6 Preparar la instalación del TV ...10 Instalar el TV en la pared ...11 - Sony SU-WL830 | Operating Instructions - Page 49
Artículos suministrados WM1 WM2 WM3 WM4 *3 WM5 M6L23 (2) M6L13 (2) WS1 LIMITED WARRANTY 6 mm x 23 mm (1/4 pulgadas x 29/32 pulgadas) (2) 6 mm x 13 mm (1/4 pulgadas x 17/32 pulgadas) (2) 8 mm x 15 mm (11/32 pulgadas x 19/32 pulgadas) (6) WS2 8 mm x 60 mm (11/32 pulgadas x 2 3/8 pulgadas - Sony SU-WL830 | Operating Instructions - Page 50
Fijar el TV a yeso con pernos Pared de mampostería con pernos de tope WM5 WM1 Instalar el soporte de movimiento lateral en la pared 1 Decida dónde va a realizar la instalación. Asegúrese de que la pared tenga espacio suficiente para el TV y pueda soportar un peso que represente al menos seis - Sony SU-WL830 | Operating Instructions - Page 51
G H (mm/pulgadas) ES XBR A B C D E F G H*2 (°) ES 75X940E 1 673 / 65 7/8 962 / 37 7/8 716 / 28 1/4 230 / 9 1/8 246 / 9 3/4 87 / 3 1/2 339 / 13 3/8 15 65X930E 1 451 / 57 1/4 838 / 33 691 / 27 1/4 268 / 10 5/8 147 / 5 7/8 59 / 2 3/8 309/ 12 1/4 15 Tabla de dimensiones - Sony SU-WL830 | Operating Instructions - Page 52
Nota Le recomendamos verificar la posición del TV en el entorno donde lo va a ver. 3 Alinee WM5 a la pared y haga cuatro marcas en línea con los pernos. 2 406 mm (16 pulgadas) / 610 mm (24 pulgadas) WM5 Nota Use un nivel para verificar si WM5 está nivelado. 4 Perfore orificios en las marcas. - Sony SU-WL830 | Operating Instructions - Page 53
5 7 Fije WM1 a WM5 en la pared. WM1 6 Instale WM5 en la pared. Nota Use un nivel para verificar si el soporte de movimiento lateral está nivelado. WS2 WM5 WS1 WM1 8 Saque el brazo del soporte en el extremo. ES ES WW1 Precauciones No ajuste demasiado los pernos de fijación WS2 . El ajuste - Sony SU-WL830 | Operating Instructions - Page 54
Preparar la instalación del TV 3 1 M6L23 WM2 4 Fije WM4 al TV (solo el modelo de 75 pulgadas (189,3 cm)). 2 Quite los tornillos de la parte trasera del TV. WM4 65 * * Solo el modelo de 65 pulgadas (163,9 cm) Precauciones Si el soporte de sobremesa ya está fijado al TV, asegúrese de fijar - Sony SU-WL830 | Operating Instructions - Page 55
Instalar el TV en la pared 1 3 2 4 ES ES WM2 ES 11 - Sony SU-WL830 | Operating Instructions - Page 56
5 Atornille el lado izquierdo y derecho del soporte de montaje mural para ajustar el ángulo del TV. 6 M6L13 7 2 65 * 3 1 65 * * Solo el modelo de 65 pulgadas (163,9 cm) ES 12 M6L13 - Sony SU-WL830 | Operating Instructions - Page 57
8 Fije WM3 . 1 65 * 2 WM3 * Solo el modelo de 65 pulgadas (163,9 cm) 9 2 WM3 10 Cuando mueva el TV, sosténgalo con firmeza desde la parte inferior. ES ES 11 ES 13 - Sony SU-WL830 | Operating Instructions - Page 58
Coloque el soporte de montaje mural al concreto sólido o al bloque de concreto Concreto sólido o bloque de concreto WM1 Instalar el soporte de montaje mural en la pared 1 Decida dónde va a realizar la instalación. Asegúrese de que la pared tenga espacio suficiente para el TV y pueda soportar un - Sony SU-WL830 | Operating Instructions - Page 59
G H (mm/pulgadas) ES XBR A B C D E F G H*2 (°) ES 75X940E 1 673 / 65 7/8 962 / 37 7/8 685 / 27 199 / 7 7/8 277 / 11 73 / 2 7/8 325 / 12 7/8 15 65X930E 1 451 / 57 1/4 838 / 33 660 / 26 237 / 9 3/8 178 / 7 1/8 45 / 1 13/16 295 / 11 5/8 15 Tabla de dimensiones para la - Sony SU-WL830 | Operating Instructions - Page 60
Nota Le recomendamos verificar la posición del TV en el entorno donde lo va a ver. 3 Perfore orificios en las marcas. 75 mm (3 pulgadas) 10 mm (13/32 pulgadas) 1, 2, 3, 4, 5, 6 2 Alinee WM1 a la pared y haga seis marcas. 4 WM1 Nota Use un nivel para verificar si WM1 está nivelado. WA1 ES 16 - Sony SU-WL830 | Operating Instructions - Page 61
5 7 Saque el brazo de WM1 en el WM1 extremo. 6 Instale WM1 en la pared. Nota Use un nivel para verificar si el soporte de montaje mural está nivelado. WM1 WS2 ES ES WW1 Precauciones No ajuste demasiado los pernos de fijación WS2 . El ajuste inadecuado puede reducir la capacidad de retención - Sony SU-WL830 | Operating Instructions - Page 62
Preparar la instalación del TV 3 1 M6L23 WM2 4 Fije WM4 al TV (solo el modelo de 75 pulgadas (189,3 cm)). 2 Quite los tornillos de la parte trasera del TV. WM4 65 * * Solo el modelo de 65 pulgadas (163,9 cm) Precauciones Si el soporte de sobremesa ya está fijado al TV, asegúrese de fijar - Sony SU-WL830 | Operating Instructions - Page 63
Instalar el TV en la pared 1 3 2 4 ES ES WM2 ES 19 - Sony SU-WL830 | Operating Instructions - Page 64
5 Atornille el lado izquierdo y derecho del soporte de montaje mural para ajustar el ángulo del TV. 6 M6L13 7 2 65 * 3 1 65 * ES 20 * Solo el modelo de 65 pulgadas (163,9 cm) M6L13 - Sony SU-WL830 | Operating Instructions - Page 65
8 Fije WM3 . 1 65 * 2 WM3 * Solo el modelo de 65 pulgadas (163,9 cm) 9 2 WM3 10 Cuando mueva el TV, sosténgalo con firmeza desde la parte inferior. ES ES 11 ES 21 - Sony SU-WL830 | Operating Instructions - Page 66
de la base): (Aprox.) WM5 4,9 kg / 10,8 lb. WM1 2,7 kg / 6,0 lb. El diseño y las especificaciones pueden cambiar sin aviso. Sólo para México: IMPORTADO POR: SONY DE MÉXICO, S.A. DE C.V. AV. LA FE No. 50 COL. LOMAS DE SANTA FE C.P. 01210 MÉXICO, D.F. TEL. 3067-1000 Tel. de contacto: 01 800 759 7669 - Sony SU-WL830 | Operating Instructions - Page 67
- Sony SU-WL830 | Operating Instructions - Page 68
http://www.sony.net/ © 2017 Sony Corporation Printed in China
-
 1
1 -
 2
2 -
 3
3 -
 4
4 -
 5
5 -
 6
6 -
 7
7 -
8
-
9
-
10
-
11
-
12
-
13
-
14
-
15
-
16
-
17
-
18
-
19
-
20
-
21
-
22
-
23
-
24
-
25
-
26
-
27
-
28
-
29
-
30
-
31
-
32
-
33
-
34
-
35
-
36
-
37
-
38
-
39
-
40
-
41
-
42
-
43
-
44
-
45
-
46
-
47
-
48
-
49
-
50
-
51
-
52
-
53
-
54
-
55
-
56
-
57
-
58
-
59
-
60
-
61
-
62
-
63
-
64
-
65
-
66
-
67
-
68
 |
 |

Lea este manual antes de usar
el producto
4-690-669-
12
(1)
SU-WL830
Wall-Mount
Bracket
Operating Instructions
US
Manuel d’instructions
FR
Manual de instrucciones
ES