Sony VGP-XL1B VGX-XL1 Welcome Mat
Sony VGP-XL1B - Vaio Digital Living System Media Changer Manual
 |
View all Sony VGP-XL1B manuals
Add to My Manuals
Save this manual to your list of manuals |
Sony VGP-XL1B manual content summary:
- Sony VGP-XL1B | VGX-XL1 Welcome Mat - Page 1
Getting to Know Your VGX-XL1 Digital Living System™ VGX-XL1A Digital Living System Computer VGP-XL1B Media Changer/Recorder VGX-XL1A - Front Inputs & Outputs Power Button CD-RW/ DVD Combo Drive Wireless Keyboard Remote Control WLAN Antenna Power Cord Coaxial Cable HDMI™ Cable Optical S/ - Sony VGP-XL1B | VGX-XL1 Welcome Mat - Page 2
Using your wireless keyboard w/ integrated pointing device, select Windows Start. 2. From the Start menu, select All Programs. 3. From the All Programs menu, select VAIO Support Central. Note: To access the most updated information available for VGX-XL1 Digital Living System, go to Support Control
-
 1
1 -
 2
2
 |
 |
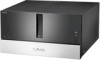
VGP-XL1B Media Changer/Recorder
VGX-XL1A Digital Living System Computer
Wireless Keyboard
VGP-XL1B – Front Controls
VGP-XL1B – Inputs/Outputs
Getting to Know Your VGX-XL1 Digital Living System
™
Setting Up Keyboard
Insert the Batteries
✔
On the back of the keyboard
, remove the battery compartment cover.
✔
Insert
four (4) Alkaline AA batteries oriented as shown in the
battery compartment. (Supplied)
✔
Replace
the battery compartment cover.
Activate Wireless Keyboard Communication
Before using the keyboard, you must activate communications
between the DLS computer and the wireless keyboard w/integrated
pointing device.
Please see Step 4 Activate Wireless Keyboard
Communications on back.
Setting Up Remote
Insert the Batteries
✔
On the back of the remote control
, remove the battery
compartment cover.
✔
Insert
two (2) Sony Super Mangan Alkaline AA batteries
oriented as shown in the battery compartment. (Supplied)
✔
Replace
the battery compartment cover.
Note:
When using the VAIO
®
remote control, remember to point the
remote at the VGX-XL1A personal computer, not at the TV or monitor.
Headphone
Volume
Email
Internet
Keyboard Status
Left Button
Right Button
Point Device/
Touch Pad
Remote Control
Wireless Keyboard
Power Cord
Keyboard
(4) AA Batteries
WLAN Antenna
MCE
Standby
Remote Control
Standby
Puts your computer into standby mode
My Media
Links directly to your TV, Music, Pictures, & Videos.
Playback
Play, Record, Stop, Pause, Rewind, Fast Forward,
Replay, & Skip for TV, Music, Pictures & Video.
Navigation
Move through Menus
Media Center
Recorded TV
Guide
Live TV
DVD Menu
Channel # and Data Input
VGX-XL1A – Front Inputs & Outputs
Power Button
CompactFlash
®
& Microdrive
™
Memory Stick
Pro/Duo
™
Secure Digital (SD) &
MultiMediaCard
™
(MMC)
SmartMedia
™
(SM)
xD-Picture Card
™
CD-RW/ DVD Combo Drive
S-Video
Connect
Keyboard/Pointing
Device
MIcrophone
Headphone/
Line-out
Volume
i.LINK
®
(4 pin)
USB 2.0
x2
Composite
Audio/Video IN
HDMI
™
Cable
Optical
S/PDIF Cable
Coaxial Cable
HDMI
™
to DVI-D
Adapter
Infrared Blaster
Power Cord
i.LINK
®
Cable (6pin-S400)
Before installation:
Please make sure you have all the items shown above.
See back
for setup instructions.
Remote
(2) AA Batteries
Entertainment Guide
Legal & Safety Guides
Note:
There are two i.LINK
®1
ports on the back of the VGP-XL1B; however, you
cannot connect this device to two different computers or a second changer.
The second i.LINK
®1
port functions as a normal 1394 port, with one exception:
DO NOT connect a second 1394 device on the second port of the changer while
the device is being used (burning, ripping, or playing back any type of discs).
Note:
Once a new device is plugged into the second i.LINK
®1
port of the
VGX-XL1B, both the changer and the second device are re-enumerated by the
OS, which could interrupt the current process running on the changer drive.
The VGP-XL1B Media Changer/Recorder is a Class 1 Laser Product.
VGX-XL1A – Rear Inputs & Outputs
Audio/Video
IN
Line IN
(L/R)
Line OUT
(L/R)
S-Video
IN
Infrared Transmitter
OUT x2
Optical S/PDIF
OUT &
Coaxial S/PDIF
OUT
Optical
S/PDIF IN
Ethernet
10/100/1000baseT
USB 2.0
x2
HDMI
™
Component Video OUT
(480i/480p/720p)
Antenna/Cable
Power Cord
i.LINK
®
x2
Wireless LAN
Antenna
Optical Drive Slot
Power Button
Load & Eject
Buttons
i.LINK
®
S400
x2
Power Cord
2-652-535-01