Sony VPCL214FX User Guide - Page 130
Connect the AC adapter and the peripheral devices to the computer
 |
UPC - 027242820425
View all Sony VPCL214FX manuals
Add to My Manuals
Save this manual to your list of manuals |
Page 130 highlights
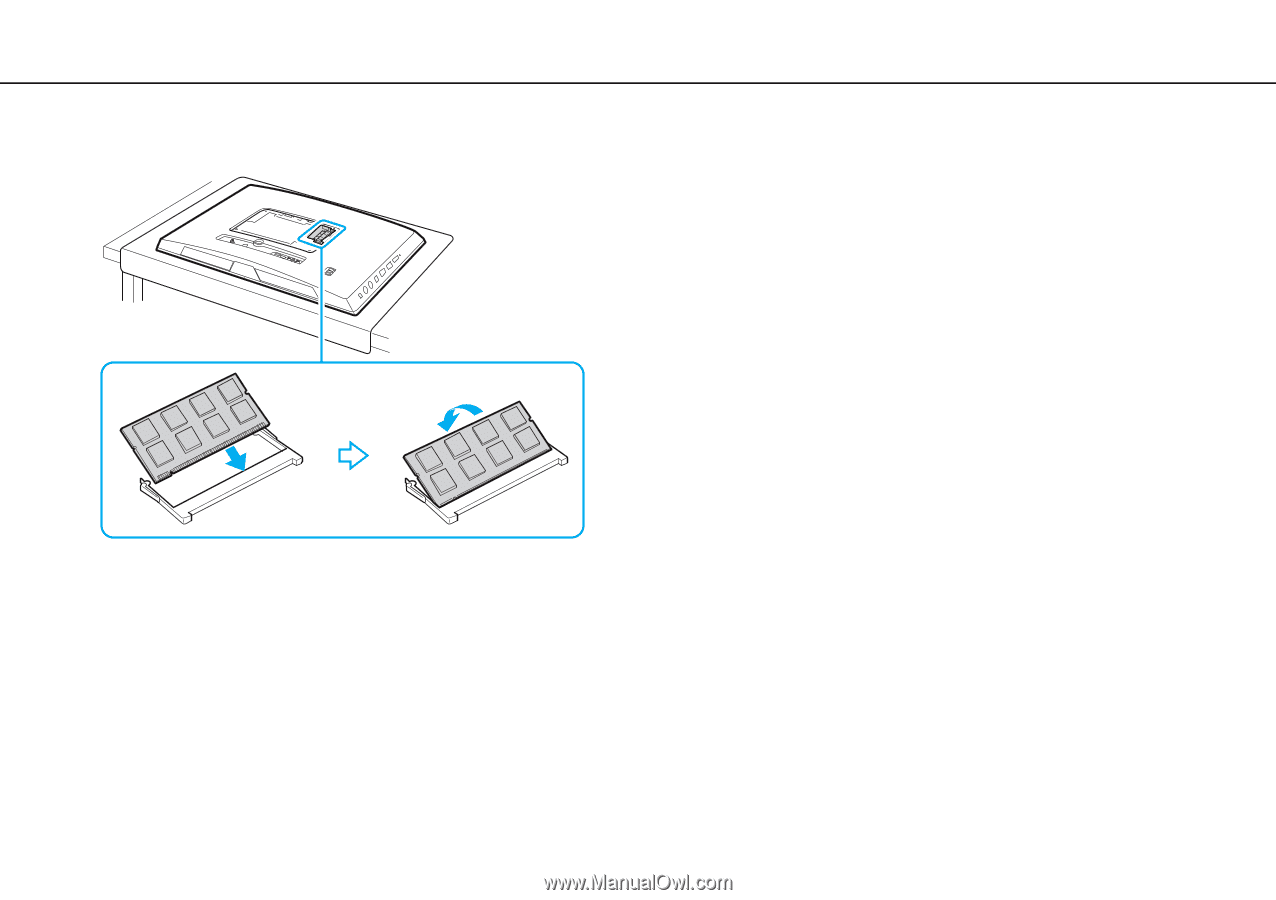
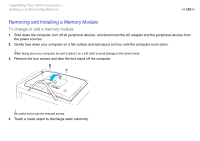
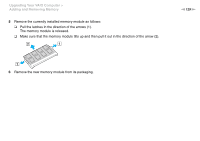
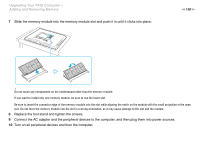
Upgrading Your VAIO Computer > Adding and Removing Memory 7 Slide the memory module into the memory module slot and push it in until it clicks into place. n 130 N ! Do not touch any components on the motherboard other than the memory module. If you want to install only one memory module, be sure to use the lower slot. Be sure to insert the connector edge of the memory module into the slot while aligning the notch on the module with the small projection in the open slot. Do not force the memory module into the slot in a wrong orientation, as it may cause damage to the slot and the module. 8 Replace the foot stand and tighten the screws. 9 Connect the AC adapter and the peripheral devices to the computer, and then plug them into power sources. 10 Turn on all peripheral devices and then the computer.
-
 1
1 -
2
-
3
-
4
-
5
-
6
-
7
-
8
-
9
-
10
-
11
-
12
-
13
-
14
-
15
-
16
-
17
-
18
-
19
-
20
-
21
-
22
-
23
-
24
-
25
-
26
-
27
-
28
-
29
-
30
-
31
-
32
-
33
-
34
-
35
-
36
-
37
-
38
-
39
-
40
-
41
-
42
-
43
-
44
-
45
-
46
-
47
-
48
-
49
-
50
-
51
-
52
-
53
-
54
-
55
-
56
-
57
-
58
-
59
-
60
-
61
-
62
-
63
-
64
-
65
-
66
-
67
-
68
-
69
-
70
-
71
-
72
-
73
-
74
-
75
-
76
-
77
-
78
-
79
-
80
-
81
-
82
-
83
-
84
-
85
-
86
-
87
-
88
-
89
-
90
-
91
-
92
-
93
-
94
-
95
-
96
-
97
-
98
-
99
-
100
-
101
-
102
-
103
-
104
-
105
-
106
-
107
-
108
-
109
-
110
-
111
-
112
-
113
-
114
-
115
-
116
-
117
-
118
-
119
-
120
-
121
-
122
-
123
-
124
-
 125
125 -
 126
126 -
 127
127 -
 128
128 -
 129
129 -
 130
130 -
 131
131 -
 132
132 -
 133
133 -
 134
134 -
 135
135 -
136
-
137
-
138
-
139
-
140
-
141
-
142
-
143
-
144
-
145
-
146
-
147
-
148
-
149
-
150
-
151
-
152
-
153
-
154
-
155
-
156
-
157
-
158
-
159
-
160
-
161
-
162
-
163
-
164
-
165
-
166
-
167
-
168
-
169
-
170
-
171
-
172
-
173
-
174
-
175
-
176
-
177
-
178
-
179
-
180
-
181
-
182
-
183
-
184
-
185
-
186
-
187
-
188
-
189
-
190
 |
 |