Sony VPCL214FX User Guide - Page 44
To connect the wireless mouse, Enter, Start, wconnect, User Account Control
 |
UPC - 027242820425
View all Sony VPCL214FX manuals
Add to My Manuals
Save this manual to your list of manuals |
Page 44 highlights
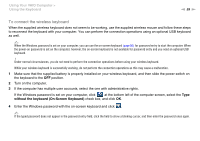
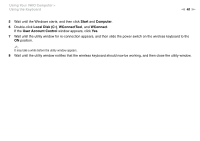
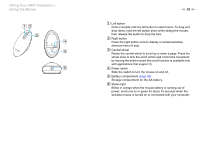
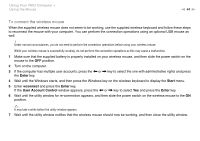
Using Your VAIO Computer > Using the Mouse n 44 N To connect the wireless mouse When the supplied wireless mouse does not seem to be working, use the supplied wireless keyboard and follow these steps to reconnect the mouse with your computer. You can perform the connection operations using an optional USB mouse as well. ! Under normal circumstances, you do not need to perform the connection operations before using your wireless mouse. While your wireless mouse is successfully working, do not perform the connection operations as this may cause a malfunction. 1 Make sure that the supplied battery is properly installed on your wireless mouse, and then slide the power switch on the mouse to the OFF position. 2 Turn on the computer. 3 If the computer has multiple user accounts, press the < or , key to select the one with administrative rights and press the Enter key. 4 Wait until the Windows starts, and then press the Windows key on the wireless keyboard to display the Start menu. 5 Enter wconnect and press the Enter key. If the User Account Control window appears, press the < or , key to select Yes and press the Enter key. 6 Wait until the utility window for re-connection appears, and then slide the power switch on the wireless mouse to the ON position. ✍ It may take a while before the utility window appears. 7 Wait until the utility window notifies that the wireless mouse should now be working, and then close the utility window.
-
 1
1 -
2
-
3
-
4
-
5
-
6
-
7
-
8
-
9
-
10
-
11
-
12
-
13
-
14
-
15
-
16
-
17
-
18
-
19
-
20
-
21
-
22
-
23
-
24
-
25
-
26
-
27
-
28
-
29
-
30
-
31
-
32
-
33
-
34
-
35
-
36
-
37
-
38
-
 39
39 -
 40
40 -
 41
41 -
 42
42 -
 43
43 -
 44
44 -
 45
45 -
 46
46 -
 47
47 -
 48
48 -
 49
49 -
50
-
51
-
52
-
53
-
54
-
55
-
56
-
57
-
58
-
59
-
60
-
61
-
62
-
63
-
64
-
65
-
66
-
67
-
68
-
69
-
70
-
71
-
72
-
73
-
74
-
75
-
76
-
77
-
78
-
79
-
80
-
81
-
82
-
83
-
84
-
85
-
86
-
87
-
88
-
89
-
90
-
91
-
92
-
93
-
94
-
95
-
96
-
97
-
98
-
99
-
100
-
101
-
102
-
103
-
104
-
105
-
106
-
107
-
108
-
109
-
110
-
111
-
112
-
113
-
114
-
115
-
116
-
117
-
118
-
119
-
120
-
121
-
122
-
123
-
124
-
125
-
126
-
127
-
128
-
129
-
130
-
131
-
132
-
133
-
134
-
135
-
136
-
137
-
138
-
139
-
140
-
141
-
142
-
143
-
144
-
145
-
146
-
147
-
148
-
149
-
150
-
151
-
152
-
153
-
154
-
155
-
156
-
157
-
158
-
159
-
160
-
161
-
162
-
163
-
164
-
165
-
166
-
167
-
168
-
169
-
170
-
171
-
172
-
173
-
174
-
175
-
176
-
177
-
178
-
179
-
180
-
181
-
182
-
183
-
184
-
185
-
186
-
187
-
188
-
189
-
190
 |
 |
