Sony VPL-CX76 Operating Instructions
Sony VPL-CX76 - Portable Wireless Networking LCD Business Projector Manual
 |
UPC - 027242666238
View all Sony VPL-CX76 manuals
Add to My Manuals
Save this manual to your list of manuals |
Sony VPL-CX76 manual content summary:
- Sony VPL-CX76 | Operating Instructions - Page 1
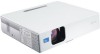
2-634-403-11 (1) Data Projector Operating Instructions VPL-CX76 VPL-CX70 © 2005 Sony Corporation - Sony VPL-CX76 | Operating Instructions - Page 2
Installing the Projector 12 Connecting the Projector 13 Connecting Shot) (VPL-CX76 only 22 Off & Go Function 22 Effective Tools for Your Presentation 23 2 Maintenance Replacing the Lamp 36 Cleaning the Air Filter 38 Others Troubleshooting 39 Messages List 42 Specifications 44 "Side Shot - Sony VPL-CX76 | Operating Instructions - Page 3
Instructions stored on the CD-ROM. Software (on the CD-ROM) Projector Station for Air Shot Version 2 (VPL-CX76 only) (Japanese and English only) This is an application software for transmitting data from a computer to the projector via wireless LAN. Projector Station for Presentation (VPL-CX76 - Sony VPL-CX76 | Operating Instructions - Page 4
Variety of network presentations (VPL-CX76 only) Air Shot Air Shot features data transmission from a computer to the projector via a wireless LAN. Use of the supplied wireless LAN card (for the projector) and the USB wireless LAN module (for a computer) enables a wireless presentation. A Simple Mode - Sony VPL-CX76 | Operating Instructions - Page 5
VPL-CX76 only) Connection to a wireless LAN allows you to obtain projector status information such as the lamp timer status or to control the projector away from the installation location via a Web browser. Also, the projector has a mail report function to send the information on the time to replace - Sony VPL-CX76 | Operating Instructions - Page 6
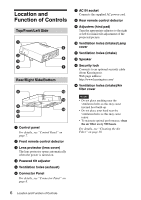
Side Rear/Right Side/Bottom a Control panel For details, see "Control Panel" on page 7. b Front remote control detector c Lens protector (lens cover) The lens tilt adjustment of the projected picture. j Ventilation holes (intake)/Lamp cover k Ventilation holes (intake) l Speaker m Security lock - Sony VPL-CX76 | Operating Instructions - Page 7
"Even when projecting using "Side Shot", the four sides of a picture may sometimes not be parallel to the respective sides of a screen frame." on page 33 and ""Side Shot" and "V Keystone" Adjustments" on page 49. j Status indicators • POWER SAVING Lights when the projector is in power saving mode - Sony VPL-CX76 | Operating Instructions - Page 8
Note Remove the wireless LAN card from the wireless LAN card slot when storing the projector in the carrying case. 8 Location and Function of Controls For details, see Operating Instructions for Air Shot (stored on the CD-ROM). d Memory Stick slot (for standard/ Duo size) (VPL-CX76 only) A "Memory - Sony VPL-CX76 | Operating Instructions - Page 9
of the projector, or the horizonal/vertical trapezoidal distortion of the image manually. Each time you press this key, the Tilt menu, the V Keystone menus, and the Side Shot menu are displayed in turn. Use the arrow keys (M/m/ - Sony VPL-CX76 | Operating Instructions - Page 10
29. q VOLUME +/- keys r LENS key Each time you press this key, the Focus adjustment and Zoom adjustment menus are displayed alternately. s PJ NETWORK (Projector/ Network) selector switch Normally, set to install the battery from the # side. 2 Replace the lid. 10 Location and Function of Controls - Sony VPL-CX76 | Operating Instructions - Page 11
VPL-CX76 only) You can use a laser pointer or control a presentation file made using Microsoft PowerPoint when projecting a picture using the Air Shot Remote Commander/Presentation tool and the remote control detector on the projector. Direct the Remote Commander/ Presentation tool toward the front - Sony VPL-CX76 | Operating Instructions - Page 12
B Projecting the Picture Installing the Projector The distance between the lens and the screen varies depending on the size of the screen. Use the following table as a guide. Screen Distance between the screen and the center of the lens Screen size (inches) Minimum Distance Maximum Distance Unit: - Sony VPL-CX76 | Operating Instructions - Page 13
the Air Shot, see "Operating Instructions for Air Shot" stored on the CD-ROM (VPLCX76 only). AUDIO INPUT A S VIDEO VIDEO STD/DUO 3 21 Connecting a Computer This section describes how to connect the projector to a computer. For more information, refer to the computer's instruction manual. to - Sony VPL-CX76 | Operating Instructions - Page 14
Station for Presentation (VPL-CX76 only). Connecting a VCR This section describes how to connect the projector to a VCR. For more information, refer to the instruction manuals of the equipment you are connecting. To connect to a video or S video output connector Left side to audio output (L) to - Sony VPL-CX76 | Operating Instructions - Page 15
connector Left side Projecting ON connect the projector to a video GBR output connector, select "Video GBR" or when you connect the projector to projector goes into standby mode. 2 Press the ?/1 key. The ON/STANDBY indicator flashes in green and the Advanced Intelligent Auto-setup starts. The lens - Sony VPL-CX76 | Operating Instructions - Page 16
Side Shot. In this case, adjust it manually in step 8 on page 17. • When the projector is turned on, the Startup screen is projected (VPLCX76 only). For details, see the attached "Operating Instructions connector Air Shot/"Memory Stick" (when you use the Air Shot/"Memory Stick") (VPL-CX76 only) - Sony VPL-CX76 | Operating Instructions - Page 17
adjust the distortion. For details, see "Side Shot" on page 32 and ""Side Shot" and "V Keystone" Adjustments" on page 49. 8 Adjust the size of the picture and the focus. To adjust using the Remote Commander Select the item to be adjusted by pressing the LENS key, then adjust with the M/m/ - Sony VPL-CX76 | Operating Instructions - Page 18
than the ?/1 key, or if you do not press any key for five seconds. 2 Press the ?/1 key again. The lens protector closes and the powered tilt adjuster is retracted into the projector. The ON/STANDBY indicator flashes in green and the fan continues to run to reduce the internal heat. Also, the - Sony VPL-CX76 | Operating Instructions - Page 19
," then press the , or ENTER key. Convenient Functions 1 Plug the AC power cord into a wall outlet. 2 Press the ?/1 key to turn on the projector. 6 Press the M, m, < or , key to select a language, then press the ENTER key. The menu changes to the selected language. Selecting the Menu Language - Sony VPL-CX76 | Operating Instructions - Page 20
you do not input the correct password, you will not be able to project the picture. Note You will not be able to use the projector if you forget your password and the password administrator is not available. Be please aware that using the security lock can prevent valid usage in - Sony VPL-CX76 | Operating Instructions - Page 21
. 2 Enter the password. Enter the password that was set. Note If you call the customer service center because you have forgotten the password, you will need to be able to verify the projector's serial number and your identity. (This process may differ in other countries/regions.) Once your identity - Sony VPL-CX76 | Operating Instructions - Page 22
projector. Controlling the Computer Using the Supplied Presentation Tool (When Using the Air Shot) (VPL-CX76 only) When you are using the Air Shot , turn the projector off, and then, after the lens protector closes and the powered tilt adjuster is retracted into the projector, you can unplug - Sony VPL-CX76 | Operating Instructions - Page 23
Use the arrow key (M/m/ - Sony VPL-CX76 | Operating Instructions - Page 24
, then press the , or ENTER key. The selected menu appears. The projector is equipped with an on-screen menu for making various adjustments and settings. "Component," or "Video GBR." For Input-B: Shows "Air Shot" or "Memory Stick" (VPL-CX76 only) For Video/S-Video input: Shows "Auto" or the - Sony VPL-CX76 | Operating Instructions - Page 25
the item that you have selected is factory preset values. Items that can be reset are: • "Contrast," "Brightness," "Color," "Hue" and "Sharpness" on ..." menu Storage of the settings The settings are automatically stored in the projector memory when the ENTER key is pressed. If no signal is input - Sony VPL-CX76 | Operating Instructions - Page 26
The PICTURE SETTING Menu The PICTURE SETTING menu is used for adjusting the picture or volume. Items that can be adjusted or set depend on the kind of input signals. For details, see "Input signals and adjustable/setting items" on page 35. PICTURE SETTING Picture Mode Standard Adjust Picture... - Sony VPL-CX76 | Operating Instructions - Page 27
. When the signal is input from a computer Setting items Adjust Signal... Dot Phase H Size Functions Initial setting Adjusts the dot phase of the LCD panel and the signal output from a computer. Adjust the picture further for finer picture after the picture is adjusted by pressing the APA key - Sony VPL-CX76 | Operating Instructions - Page 28
to that of the LCD. The picture will be clear but the picture size will be smaller. Note Note that if the projector is used for profit 0. When you adjust the data of the signal using the INPUT SETTING menu, it will be registered in the projector. If more than 20 user memory items are registered, - Sony VPL-CX76 | Operating Instructions - Page 29
connector. Computer Input-B Select Select "Air Shot" or "Memory Stick" as the input (VPL-CX76 only) source that you want to project via Input-B. Air Shot Color System Selects the color system of the input signal. If you select "Auto," the projector detects the color system of the input signal - Sony VPL-CX76 | Operating Instructions - Page 30
projector goes into power saving Off mode if no signal is input for 10 minutes. Although the lamp the SONY logo on the top panel of the On projector lights when the projector is on the rear and side Off panels of the projector so that the projector can be operated manually. 30 The SET SETTING Menu - Sony VPL-CX76 | Operating Instructions - Page 31
The MENU SETTING Menu The MENU SETTING menu is used for changing the menu displays. Setting items Status (on-screen display) Language Menu Position Menu Color Functions Sets up the on-screen display. When set to "Off," turns off the on-screen displays except for the menus, a message when the - Sony VPL-CX76 | Operating Instructions - Page 32
INSTALL SETTING menu is used for changing the settings of the projector. INSTALL SETTING Tilt... V Keystone: Auto Side Shot: 0 Auto Focus: On Image Flip: Off Background: Blue Test Pattern: Off Lamp Mode: Standard Lens Control: On High Altitude Mode:Off Security Lock: Off Input - Sony VPL-CX76 | Operating Instructions - Page 33
," the LENS (FOCUS, ZOOM) key on the On Remote Commander, and the FOCUS and ZOOM keys on the projector do not function. Set to "On" when the projector is used Even when projecting using "Side Shot", the four sides of a picture may sometimes not be parallel to the respective sides of a screen frame - Sony VPL-CX76 | Operating Instructions - Page 34
the model name, serial number, the horizontal and vertical frequencies of the input signal and the cumulated hours of usage of the lamp. INFORMATION VPL-CX76 fH: fV: Lamp Timer: Input A Serial No. 3 3 3 3 3 3 3 48,47kHz 60,00Hz No.23 1024x768 2 H Model name Serial number Memory number of an input - Sony VPL-CX76 | Operating Instructions - Page 35
: Not adjustable/cannot be set *1: Preset memory No. 3, 4 only *2: VPL-CX76 only INPUT SETTING menu Input signal Video GBR Computer z z z z z z z - z - z - z*1 z z z z z B&W z z z - - z - z z Air Shot or "Memory Stick"*2 z z z - - - z z z Item Adjust Signal... Dot Phase H Size - Sony VPL-CX76 | Operating Instructions - Page 36
the following cases. • When the lamp has burnt out or dims • "Please replace the Lamp." appears on the screen • The LAMP/COVER indicator lights up The lamp life varies depending on conditions of use. Use an LMP-C161 Projector Lamp as the replacement lamp. Use of any other lamps than the LMP-C161 may - Sony VPL-CX76 | Operating Instructions - Page 37
projector cannot be turned on. 7 Turn the projector back over. 8 Connect the power cord. The ON/STANDBY indicator around the ?/1 key lights in red. 9 Press the following keys on the Remote Commander in the following order for less than five seconds each: RESET, - Sony VPL-CX76 | Operating Instructions - Page 38
projector over. 3 Remove the air filter cover. 4 Remove the air filter. Claws 5 Wash the air filter with a mild detergent solution and dry it in a shaded place. 6 Attach the air filter so that it fits into the each claws (8 positions) on the air filter covers and replace a reverse side. Place the - Sony VPL-CX76 | Operating Instructions - Page 39
B Others Troubleshooting If the projector appears to be operating erratically, try to diagnose and correct the problem using the following instructions. If the problem persists, consult with qualified Sony personnel. Power Symptom Cause and Remedy The power is not turned on. • The power has - Sony VPL-CX76 | Operating Instructions - Page 40
numbers of pixels on the LCD panel. c Change the lamp has burnt out or is dim. c Replace the lamp with a new one (see page 36). The picture is not clear. • The picture is out of focus. c Adjust the focus (see page 17). • Condensation has accumulated on the lens. c Leave the projector Troubleshooting - Sony VPL-CX76 | Operating Instructions - Page 41
c Replace them projector to the computer using the USB cable. • You are operating the Air Shot (VPL-CX76 only). c When using the Air Shot, the computer cannot be controlled with the Remote Commander. Use the presentation tool. The computer cannot be controlled with the presentation tool (VPLCX76 - Sony VPL-CX76 | Operating Instructions - Page 42
press the ?/1 key. If this problem occurs again, consult with qualified Sony personnel. • The electrical system may have broken down. c Consult with qualified Sony personnel. The LAMP/COVER indicator lights up. • The lamp has reached the end of its life. c Replace the lamp (see page 36). • The - Sony VPL-CX76 | Operating Instructions - Page 43
replace the Lamp. Please clean the filter. Meaning and Remedy • This input signal cannot be projected as the frequency is out of the acceptable range of the projector of the projector are locked. Operate the projector with the keys on the Remote Commander (see page 30). Others Troubleshooting 43 - Sony VPL-CX76 | Operating Instructions - Page 44
inch XGA panel, about 2,360,000 pixels (786,432 pixels × 3) Lens 1.2 times zoom lens (powered) f 23.5 to 28.2 mm/F1.6 to 1.78 Lamp 165 W UHP Projected picture size 40 to 300 inches (measured diagonally) Light output ANSI lumen1) 2500 lm (VPL- CX76) ANSI lumen1) 2000 lm (VPL- CX70) (When - Sony VPL-CX76 | Operating Instructions - Page 45
(1) Security Label (1) VPL-CX76 only Presentation tool (1) Size AAA (R03) batteries (2) Wireless LAN card (1) USB wireless LAN module (IFU- WLM2) (1) Design and specifications are subject to change without notice. Optional accessories Projector Lamp LMP-C161(for replacement) Signal Cable SMF-402 - Sony VPL-CX76 | Operating Instructions - Page 46
16" 49.724 XGA VESA 43 Hz 35.524 XGA VESA 60 Hz 48.363 XGA VESA 70 Hz 56.476 XGA VESA 75 Hz 60.023 XGA VESA 85 Hz .061 74.550 86.958 60.004 69.955 75.029 84.997 70.019 75.000 85.057 65.960 76.047 S on G/Y or Composite Sync S on G/Y or Composite Sync S on G/Y H-pos, V-neg H-pos, Specifications - Sony VPL-CX76 | Operating Instructions - Page 47
a signal with no black edges around the image, and disconnect and reconnect the cable or select the input signal by pressing the INPUT key. Others Specifications 47 - Sony VPL-CX76 | Operating Instructions - Page 48
Warning on power connection Use the supplied power cord when you use the projector in your country/region. Otherwise, use a proper power cord meeting the following specifications. Plug type Female end Cord type Rated Voltage & Current Safety approval Cord length (max.) The United States, Canada YP - Sony VPL-CX76 | Operating Instructions - Page 49
screen. FOCUS - + ZOOM - + SIDE SHOT - + POWER SAVING TEMP/FAN LAMP/COVER SIDE SHOT - + SIDE SHOT key Adjustment Areas of "Side Shot" and "V Keystone" The adjustable distortion area using "Side Shot" and "V Keystone" is described below. Screen a a b b a: Tilting angle of the projector in the - Sony VPL-CX76 | Operating Instructions - Page 50
(VPL-CX76 only), "Memory Stick" (VPL-CX76 only) a=0 a≠0 or b≠0 b=0 a=0 a≠0 or b≠0 b=0 a=0 a≠0 or b≠0 b=0 a=0 a≠0 or b≠0 b=0 a 0 +/-20 +/-30 0 +/-20 +/-30 0 +/-20 +/-30 0 +/-20 +/-30 b +/-20 +/-11 0 +/-16 +/-11 0 +/-16 +/-7 0 +/-14 +/-7 0 Notes • If "V Keystone" is set to "Auto," the "Side Shot - Sony VPL-CX76 | Operating Instructions - Page 51
69 (2 3/4) Dimensions Front 73.3 (3) 298 (11 3/4) 75.7 (3) 38.7 (1 9/16) Center of the lens Left side Center of the projector 243.5 (9 5/8) 69 (2 3/4) Top INPUT TILT MENU PUSH ENTER Others 243.5 (9 5/8) 298 (11 3/4) Unit: mm (inches) Dimensions 51 - Sony VPL-CX76 | Operating Instructions - Page 52
Auto Focus 32 Lamp replacement 36 Lamp Timer 34 Language 31 selecting the menu language 19 Lens Control 33 Lens protector 6 Location and function of controls connector panel 8 control panel 7 rear/right side/bottom 6 Remote Commander 9 top/front/left side 22 Optional accessories 45 P - Sony VPL-CX76 | Operating Instructions - Page 53
resettable items 25 resetting an item 25 S Scan Converter 28 Screen size 12, 44 Security Lock 33 Sharpness 26 Shift 28 Side Shot 32, 33 Smart APA 29 Specifications 44 Startup screen 16 Status 31 Supplied accessories 45 T Test Pattern 32 Tilt 32 Troubleshooting 39 U USB connector - Sony VPL-CX76 | Operating Instructions - Page 54
Sony Corporation
-
 1
1 -
 2
2 -
 3
3 -
 4
4 -
 5
5 -
 6
6 -
 7
7 -
8
-
9
-
10
-
11
-
12
-
13
-
14
-
15
-
16
-
17
-
18
-
19
-
20
-
21
-
22
-
23
-
24
-
25
-
26
-
27
-
28
-
29
-
30
-
31
-
32
-
33
-
34
-
35
-
36
-
37
-
38
-
39
-
40
-
41
-
42
-
43
-
44
-
45
-
46
-
47
-
48
-
49
-
50
-
51
-
52
-
53
-
54
 |
 |

2-634-403-
11
(1)
Data Projector
Operating Instructions
© 2005 Sony Corporation
VPL-CX76
VPL-CX70