Sony XAV-AX6000 Operating Instructions
Sony XAV-AX6000 Manual
 |
View all Sony XAV-AX6000 manuals
Add to My Manuals
Save this manual to your list of manuals |
Sony XAV-AX6000 manual content summary:
- Sony XAV-AX6000 | Operating Instructions - Page 1
l'affichage de démonstration (Mode démo), reportez-vous à la page 6. Para cancelar la pantalla de demostración (Modo de prueba), consulte la página 6. Operating Instructions GB Mode d'emploi FR Manual de instrucciones ES XAV-AX6000(UC) https://rd1.sony.net/help/ev/xav-ax60/h_zz/ XAV-AX6000 - Sony XAV-AX6000 | Operating Instructions - Page 2
instructions manual sony.com/electronics/support Contact: Sony Customer Information Service Center at 1-800-222-7669 Write: Sony Customer Information Service Center 12451 Gateway Blvd., Fort Myers, FL 33913 Supplier's Declaration of Conformity Trade Name: SONY Model: XAV-AX6000 Responsible Party: Sony - Sony XAV-AX6000 | Operating Instructions - Page 3
services offered by third parties Services offered by third parties may be changed, suspended, or terminated without prior notice. Sony alarm • This unit supports security capabilities that comply problems concerning your unit that are not covered in this manual, consult your nearest Sony dealer. 3GB - Sony XAV-AX6000 | Operating Instructions - Page 4
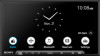
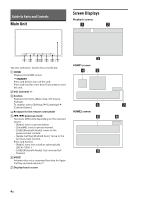
Guide to Parts and Controls Main Unit Screen Displays Playback screen: Ǵ ǵ The VOL (volume) + button has a tactile dot. HOME Displays the HOME screen. STANDBY Press and - Sony XAV-AX6000 | Operating Instructions - Page 5
Status indication (left side) (back) (list) Returns to the previous display. Opens the list. The available lists differ depending on the source. Status indication (right side) Clock Displays the time which was set on the Date/Time setting. (mute) Lights up when the sound is muted. ( - Sony XAV-AX6000 | Operating Instructions - Page 6
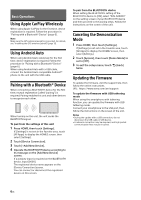
ON], select "XAV-AX6000" on the setting screen of your BLUETOOTH device and then proceed to the pairing steps. Follow the instructions on the screen update the firmware, visit the support site, then follow the online instructions. URL: https://www.sony.com/am/support To update the firmware with USB - Sony XAV-AX6000 | Operating Instructions - Page 7
. • Check the Apple CarPlay website for supported iOS versions. Update to the latest iOS version before use. If you have any questions or problems concerning your unit that are not covered in this Operating Instructions, consult your nearest Sony dealer. Specifications FOR THE CUSTOMERS IN THE - Sony XAV-AX6000 | Operating Instructions - Page 8
trademarks of Google LLC. The Wi-Fi CERTIFIED™ Logo is a certification mark of Wi-Fi Alliance®. LDAC and LDAC logo are trademarks of Sony Corporation. USB Type-C® and USB-C® are registered trademarks of USB Implementers Forum. The terms HDMI, HDMI High-Definition Multimedia Interface, and the HDMI - Sony XAV-AX6000 | Operating Instructions - Page 9
display may come loose. Periodically tighten these screws. • Do not make any changes or modifications to the unit other than those described in this manual. Note on the power supply lead (yellow) When connecting this unit in combination with other stereo components, the amperage rating of the car - Sony XAV-AX6000 | Operating Instructions - Page 10
Connection • To prevent short circuits, insulate leads with a cover or tape. • Note that the unit may be damaged if it is connected incorrectly or by short circuits at the leads. *4 *3 *5 *3 *4 Blue *3 *4 *3 Rear view camera*1 iDataLink Maestro module*1*11*12 *8*9 from a steering - Sony XAV-AX6000 | Operating Instructions - Page 11
how to install the SiriusXM Connect Vehicle Tuner, consult the installation guide supplied with the tuner. *11 When connecting the iDataLink Maestro power antenna (aerial) or antenna (aerial) booster, or with a manually-operated telescopic antenna (aerial). To AMP REMOTE IN of an optional power - Sony XAV-AX6000 | Operating Instructions - Page 12
Installing the microphone To capture your voice during handsfree calling, you need to install the microphone . Clip (not supplied) 1 Decide the installation location on the dashboard, then clean the attachment surface. Choose a flat surface where: the GPS antenna (aerial) can be - Sony XAV-AX6000 | Operating Instructions - Page 13
details, then connect each lead properly to the appropriate leads. Making an improper connection may damage the unit. URL: https://www.sony.com/am/support • Consulting the dealer or an experienced technician for help is recommended. • When connecting the iDataLink Maestro module (not supplied), do - Sony XAV-AX6000 | Operating Instructions - Page 14
in a Japanese car You may not be able to install this unit in some makes of Japanese cars. In such a case, consult your Sony dealer. Example to dashboard/center console Bracket Bracket Existing parts supplied with your car When mounting this unit to the preinstalled brackets of your - Sony XAV-AX6000 | Operating Instructions - Page 15
depends might be interrupted or discontinued at the discretion of the suppliers (software suppliers, service suppliers, or SONY). SONY and such suppliers do not warrant that the SOFTWARE, network services or other products will continue to be available, or will operate without interruption or - Sony XAV-AX6000 | Operating Instructions - Page 16
SONY HAS NO CONTROL. USE OF THE CONTENT SERVICE REQUIRES AN INTERNET CONNECTION. THE CONTENT SERVICE MAY BE DISCONTINUED AT ANY TIME. INTERNET CONNECTIVITY AND THIRD PARTY SERVICES or communication systems, air traffic control, direct life support machines, or weapons systems, in which the failure - Sony XAV-AX6000 | Operating Instructions - Page 17
SERVICING, REPAIR OR CORRECTION. SOME JURISDICTIONS DO NOT ALLOW THE EXCLUSION OF IMPLIED WARRANTIES, SO THESE EXCLUSIONS MAY NOT APPLY TO YOU. LIMITATION OF LIABILITY SONY rights. ARBITRATION INSTRUCTIONS (ONLY FOR UNITED STATES RESIDENTS) To begin arbitration, either you or SONY must make a - Sony XAV-AX6000 | Operating Instructions - Page 18
TO DO SO IN WRITING FOLLOWING INITIATION OF THE ARBITRATION. OPT-OUT INSTRUCTIONS (ONLY FOR UNITED STATES RESIDENTS) IF YOU DO NOT WISH TO AND (D) A CLEAR STATEMENT THAT YOU DO NOT WISH TO RESOLVE DISPUTES WITH ANY SONY ENTITY THROUGH ARBITRATION AND/OR TO BE BOUND BY THE CLASS ACTION WAIVER. 18GB - Sony XAV-AX6000 | Operating Instructions - Page 19
do not agree to the amendment, you should promptly contact SONY for instructions. Your continued use of the SOFTWARE after the effective date other licenses) at http://www.sony.net/Products/Linux/. To download, please access the URL, then select the model name "XAV-AX6000." You may obtain the source - Sony XAV-AX6000 | Operating Instructions - Page 20
ACC. L'affichage de l'appareil ne s'éteint pas même lorsque vous coupez le contact, ce qui risque d'épuiser la batterie. Avis d'exclusion de responsabilité relatif aux services proposés par des tiers Les services proposés par des tiers peuvent être modifiés, suspendus ou clôturés sans avis préalable - Sony XAV-AX6000 | Operating Instructions - Page 21
Avis important Mise en garde SONY NE PEUT EN AUCUN CAS ÊTRE TENU RESPONSABLE DE TOUT DOMMAGE où du gaz inflammable est présent, dans un hôpital, un train, un avion ou une station-service - à proximité de portes automatiques ou d'un avertisseur d'incendie • Cet appareil prend en charge les capacit - Sony XAV-AX6000 | Operating Instructions - Page 22
Guide des pièces et commandes Appareil principal Affichages à l'écran Écran de lecture : Ǵ ǵ La touche VOL (volume) + comporte un point tactile. HOME Permet d'afficher l'écran HOME. - Sony XAV-AX6000 | Operating Instructions - Page 23
Indication d'état (côté gauche) (retour) (liste) Permet de revenir à l'affichage précédent. Permet d'ouvrir la liste. Les listes disponibles diffèrent selon la source. Indication d'état (côté droit) Horloge (sourdine) (option) Permet d'afficher l'heure réglée dans le réglage Date/Heure. S' - Sony XAV-AX6000 | Operating Instructions - Page 24
retour). Mise à jour du micrologiciel Pour mettre à jour le micrologiciel, visitez le site d'assistance, puis suivez les instructions en ligne. URL : https://www.sony.com/am/support Pour mettre à jour le micrologiciel avec le mode modem USB Lors de l'utilisation d'un téléphone intelligent muni d'une - Sony XAV-AX6000 | Operating Instructions - Page 25
Si vous avez des questions ou des problèmes concernant cet appareil qui ne sont pas abordés dans ce mode d'emploi, contactez votre détaillant Sony le plus proche. Caractéristiques techniques Section du moniteur Type d'écran : Moniteur ACL couleur large Dimensions : 17,6 cm/6,95 po Système : Matrice - Sony XAV-AX6000 | Operating Instructions - Page 26
Le logo Wi-Fi CERTIFIED™ est une marque de certification de Wi-Fi Alliance®. LDAC et le logo LDAC sont des marques de commerce de Sony Corporation. USB Type-C® et USB-C® sont des marques commerciales déposées d'USB Implementers Forum. Les termes HDMI et HDMI High-Definition Multimedia Interface, de - Sony XAV-AX6000 | Operating Instructions - Page 27
à ne pas faire tomber l'écran pendant l'installation. • Lors de l'installation, veillez à ne pas vous couper les doigts avec les parties métalliques des supports et de la base de montage. • Ne vous coincez pas les doigts lorsque vous fixez l'écran à l'appareil. • En cas d'utilisation prolongée de - Sony XAV-AX6000 | Operating Instructions - Page 28
Raccordement • Pour éviter de causer un court-circuit, isolez les câbles avec un recouvrement ou du ruban. • Veuillez noter que l'appareil pourrait être endommagé s'il est raccordé incorrectement ou en cas de court-circuit au niveau des câbles. *4 *3 *5 *4 *3 *4 *3 *3 Caméra arrière*1 Bleu - Sony XAV-AX6000 | Operating Instructions - Page 29
Installation du microphone » (page 12). *10 Pour plus d'informations sur la manière d'installer le récepteur SiriusXM Connect Voiture, consultez le guide d'installation fourni avec le récepteur. *11 Lors du raccordement du module iDataLink Maestro (non fourni), ne raccordez aucun appareil à la borne - Sony XAV-AX6000 | Operating Instructions - Page 30
Installation du microphone Pour capter votre voix pendant les appels en mains libres, vous devez installer le microphone . Clip (non fourni) 1 Trouvez un emplacement d'installation sur le tableau de bord, puis nettoyez la surface de fixation. Choisissez une surface plate où : l'antenne - Sony XAV-AX6000 | Operating Instructions - Page 31
plus de détails, puis raccordez chaque câble correctement aux câbles adéquats. Un raccordement incorrect pourrait endommager l'appareil. URL : https://www.sony.com/am/support • Il est recommandé de consulter le détaillant ou un technicien spécialisé pour obtenir de l'aide. • Lors du raccordement du - Sony XAV-AX6000 | Operating Instructions - Page 32
peut que vous ne puissiez pas installer cet appareil dans certaines voitures japonaises. Dans ce cas, consultez votre détaillant Sony. Exemple vers le tableau de bord/la console centrale Support Support Pièces existantes fournies avec votre voiture Si vous installez cet appareil sur les - Sony XAV-AX6000 | Operating Instructions - Page 33
interrompus ou abandonnés à la discrétion des fournisseurs (fournisseurs de logiciels, fournisseurs de services, ou SONY). SONY et ses fournisseurs ne garantissent pas que le LOGICIEL, les services réseau ou les autres produits continueront à être disponibles ou fonctionneront sans interruption ou - Sony XAV-AX6000 | Operating Instructions - Page 34
DU LOGICIEL PUISSENT ÊTRE FOURNIS PAR DES TIERS SUR LESQUELS SONY N'A AUCUN CONTRÔLE. L'UTILISATION DU SERVICE DE CONTENU REQUIERT UNE CONNEXION INTERNET. LE SERVICE DE CONTENU PEUT ÊTRE INTERROMPU À TOUT MOMENT. CONNECTIVITÉ INTERNET ET SERVICES DE TIERS Vous reconnaissez et acceptez que l'acc - Sony XAV-AX6000 | Operating Instructions - Page 35
ÉRIEL OU N'IMPORTE QUELLES DONNÉES, (D) QUE TOUT LOGICIEL, SERVICE DE RÉSEAU (Y COMPRIS INTERNET) OU PRODUITS (AUTRES QUE LE sent CLUF, tout conflit ou réclamation découlant du présent CLUF et votre relation avec Sony à l'égard du présent CLUF, seront régis et interprétés conformément aux lois - Sony XAV-AX6000 | Operating Instructions - Page 36
résidez aux États-Unis, l'arbitrage sera administré par les JAMS (services d'arbitrage judiciaire et de médiation) et les arbitres devront être choisis conform la modification, vous devrez rapidement communiquer avec SONY pour obtenir des instructions. La poursuite de l'utilisation du LOGICIEL apr - Sony XAV-AX6000 | Operating Instructions - Page 37
la GPLv2 (et d'autres licences), à l'adresse http://www.sony.net/Products/Linux/. Pour télécharger, veuillez accéder à l'URL, puis sélectionnez le modèle « XAV-AX6000 ». Vous pouvez obtenir le code source, tel que requis par la GPLv2, sur un support physique pour une période de trois ans après notre - Sony XAV-AX6000 | Operating Instructions - Page 38
drene. Exención de responsabilidad sobre los servicios prestados por otros proveedores Los servicios prestados por otros proveedores están sujetos a cambios, anulaciones o interrupciones sin previo aviso. Sony no asume responsabilidad alguna en estas situaciones. 2ES - Sony XAV-AX6000 | Operating Instructions - Page 39
O SU SOFTWARE. Estimado cliente, este producto incluye un transmisor de radio. Consulte el manual de instrucciones del vehículo o póngase en contacto con el fabricante del mismo o su relativo a la unidad que no se traten en este manual, póngase en contacto con el distribuidor Sony más cercano. 3ES - Sony XAV-AX6000 | Operating Instructions - Page 40
Guía para las partes y los controles Unidad principal Visualizaciones en pantalla Pantalla de reproducción: Ǵ ǵ El botón VOL (volumen) + tiene un punto táctil. HOME Muestra la pantalla HOME. STANDBY Manténgalo presionado para apagar la unidad. Manténgalo presionado durante más de 10 - Sony XAV-AX6000 | Operating Instructions - Page 41
Indicación de estado (lado izquierdo) (atrás) (lista) Vuelve a la pantalla anterior. Abre la lista. Las listas disponibles difieren según la fuente. Indicación de estado (lado derecho) Reloj Muestra la hora establecida en los ajustes Fecha/Hora. (mudo) Se enciende cuando se silencia el - Sony XAV-AX6000 | Operating Instructions - Page 42
ón del firmware Para actualizar el sistema, visite el sitio web de soporte técnico y luego siga las instrucciones en línea. URL: https://www.sony.com/am/support Para actualizar el sistema con el modo módem USB Cuando se usa el smartphone con la función módem, puede actualizar el sistema con el - Sony XAV-AX6000 | Operating Instructions - Page 43
desea realizar alguna consulta o solucionar algún problema con respecto a la unidad que no se traten en este manual de instrucciones, póngase en contacto con el distribuidor Sony más cercano. Especificaciones Sección del monitor Tipo de pantalla: monitor color LCD ancho Dimensiones: 17,6 cm/ 6,95 - Sony XAV-AX6000 | Operating Instructions - Page 44
El logo Wi-Fi CERTIFIED™ es una marca de certificación de Wi-Fi Alliance®. Los logos LDAC y LDAC son marcas registradas de Sony Corporation. USB Type-C® y USB-C® son marcas comerciales registradas de USB Implementers Forum. Los términos HDMI y HDMI High-Definition Multimedia Interface, y el logotipo - Sony XAV-AX6000 | Operating Instructions - Page 45
. Apriete estos tornillos de forma periódica. • No realice cambios ni modificaciones en la unidad diferentes a los que se describen en este manual. Nota sobre el cable del sistema de alimentación (amarillo) Cuando conecte esta unidad junto con otros componentes estéreo, la capacidad nominal de - Sony XAV-AX6000 | Operating Instructions - Page 46
Lista de piezas para la instalación Cables de alimentación (1) Cables de conexión (Sonido/Cámara) (1) Tornillo para el montaje (5 × máx. 9 mm) (4) Micrófono (1) Base plana para montaje (1) Cinta adhesiva de doble cara (1) Cable extensor de USB Type-C (1) Cable para entrada - Sony XAV-AX6000 | Operating Instructions - Page 47
Conexión • Aísle los cables con una cubierta o cinta para evitar cortocircuitos. • Tenga presente que la unidad puede dañarse si se conecta incorrectamente o los cables se cortocircuitan. *4 *3 *5 *3 *4 Azul *3 *4 Cámara de *3 visión trasera*1 Módulo iDataLink Maestro*1*11*12 desde - Sony XAV-AX6000 | Operating Instructions - Page 48
*1 No suministrado *2 Impedancia del altavoz: 4 Ω a 8 Ω × 4 *3 Cable con clavija RCA (no suministrado) *4 Amplificador de potencia (no suministrado) *5 Altavoz potenciador de graves (no suministrado) *6 Según el tipo de automóvil, utilice un adaptador para un control remoto del volante (no - Sony XAV-AX6000 | Operating Instructions - Page 49
Instalación del micrófono Para capturar su voz durante una llamada con manos libres, necesita instalar el micrófono . Clip (no suministrado) 1 Decida la ubicación de la instalación en el tablero, luego limpie la superficie de sujeción. Escoja una superficie plana donde: la antena del - Sony XAV-AX6000 | Operating Instructions - Page 50
ón, y luego conecte adecuadamente cada cable con los cables correspondientes. Una conexión incorrecta puede dañar la unidad. URL: https://www.sony.com/am/support • Se recomienda consultar con el vendedor o un técnico experimentado para obtener ayuda. • Cuando conecte el módulo iDataLink Maestro (no - Sony XAV-AX6000 | Operating Instructions - Page 51
vil japonés Tal vez no pueda instalar esta unidad en algunas versiones de automóviles japoneses. En dicho caso, consúltelo con su distribuidor Sony. Ejemplo al panel o la consola central Soporte Soporte Partes presentes en su automóvil Al montar esta unidad en los soportes preinstalados de - Sony XAV-AX6000 | Operating Instructions - Page 52
del SOFTWARE podrán dejar de prestarse o comercializarse a elección exclusiva de los proveedores (proveedores de software, proveedores de servicioo SONY). Ni SONY ni los mencionados proveedores garantizan que el SOFTWARE, los servicios de red, los contenidos y el resto de productos seguirán estando - Sony XAV-AX6000 | Operating Instructions - Page 53
LIMITADA. Usted reconoce y acepta que determinados contenidos y servicios disponibles a través del SOFTWARE podrán ser proporcionados por otros terceros sobre los que SONY no tiene ningún tipo de control. EL USO DE LOS SERVICIOS DE CONTENIDO EXIGE CONEXIÓN A INTERNET. LOS SERVICIOS DE CONTENIDO PODR - Sony XAV-AX6000 | Operating Instructions - Page 54
USUARIO, AUN CUANDO SE HAYA ADVERTIDO DE LA POSIBILIDAD DE QUE SE PRODUZCAN TALES DAÑOS. EN TODO CASO, LA RESPONSABILIDAD TOTAL DE SONY DERIVADA DE CUALQUIER DISPOSICIÓN DEL PRESENTE EULA ESTARÁ LIMITADA AL IMPORTE EFECTIVAMENTE ABONADO POR EL PRODUCTO. ALGUNAS JURISDICCIONES NO PERMITEN LA EXCLUSI - Sony XAV-AX6000 | Operating Instructions - Page 55
á una copia del código fuente necesario que solicita GPLv2 (y otras licencias) en http://www.sony.net/Products/Linux/. Para descargarlo, obtenga acceso a la dirección URL y luego seleccione el nombre del modelo "XAV-AX6000." Para que le enviemos el código fuente que solicita GPLv2 de forma física en - Sony XAV-AX6000 | Operating Instructions - Page 56
If you have any questions/problems regarding this product, try the following: 1 Read Troubleshooting in Help Guide (online manual). 2 Please contact (U.S.A. only); Call 1-800-222-7669 URL https://www.SONY.com ©2022 Sony Corporation Printed in Thailand https://www.sony.net/
-
 1
1 -
 2
2 -
 3
3 -
 4
4 -
 5
5 -
 6
6 -
 7
7 -
8
-
9
-
10
-
11
-
12
-
13
-
14
-
15
-
16
-
17
-
18
-
19
-
20
-
21
-
22
-
23
-
24
-
25
-
26
-
27
-
28
-
29
-
30
-
31
-
32
-
33
-
34
-
35
-
36
-
37
-
38
-
39
-
40
-
41
-
42
-
43
-
44
-
45
-
46
-
47
-
48
-
49
-
50
-
51
-
52
-
53
-
54
-
55
-
56
 |
 |

XAV-AX6000
5-035-394-
11
(1)
XAV-AX6000(UC)
AV RECEIVER
Owner’s Record
The model and serial numbers are located on the bottom of the
unit.
Record the serial number in the space provided below.
Refer to these numbers whenever you call upon your Sony dealer
regarding this product.
Model No. XAV-AX6000
Serial No.
Operating Instructions
GB
Mode d’emploi
FR
Manual de instrucciones
ES
To cancel the demonstration (Demo Mode) display, see
page 6.
Pour annuler l’affichage de démonstration (Mode démo),
reportez-vous à la page 6.
Para cancelar la pantalla de demostración (Modo de prueba),
consulte la página 6.