Sub-Zero 601F Built-In Installation Guide
Sub-Zero 601F Manual
 |
View all Sub-Zero 601F manuals
Add to My Manuals
Save this manual to your list of manuals |
Sub-Zero 601F manual content summary:
- Sub-Zero 601F | Built-In Installation Guide - Page 1
B UILT- I N R EFRIGERATION I NSTALLATION I NSTRUCTIONS - Sub-Zero 601F | Built-In Installation Guide - Page 2
the Installation 20 Service Information 23 Specifications are subject to change without notice. Check our website, subzero.com, for the most up-to-date specifications. SUB-ZERO® is a registered trademark of Sub-Zero Freezer Company, Inc. As you follow these instructions, you will notice - Sub-Zero 601F | Built-In Installation Guide - Page 3
instructions carefully, you will make the installation process easier, problem-free and, most importantly, safe. Any questions or problems about the installation should be directed to your Sub-Zero dealer or the Sub-Zero Customer Service Department at 800-222-7820 or e-mail customerservice@subzero - Sub-Zero 601F | Built-In Installation Guide - Page 4
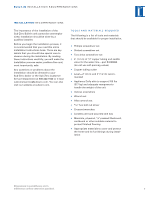
If the unit you receive does not match your requirements, contact your Sub-Zero dealer. SITE PREPARATION Make sure that the finished rough opening where steel. Make sure that the rough opening dimensions, door swing clearance, electrical service and plumbing are correct for the model you are - Sub-Zero 601F | Built-In Installation Guide - Page 5
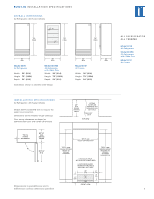
Freezer Models 73" (1854) 73" (1854) 73" (1854) 36" (914) 36" (914) Model 601R All Refrigerator Width 36" (914) Height 73" (1854) Depth 24" (610) Model 601RG All Refrigerator with Glass Door Width 36" (914) Height 73" (1854) Depth 24" (610) Illustrations shown in stainless steel design. 36 - Sub-Zero 601F | Built-In Installation Guide - Page 6
762) Height 84" (2138) Depth 24" (610) Model 611G with Glass Door Width 30" (762) Height 84" (2138) Depth 24" (610) Model 650 Width 36" (914) Height 84" (2138) Depth 24" (610) Model 650G with Glass Door Width 36" (914) Height 84" (2138) Depth 24" (610) Illustrations shown in stainless - Sub-Zero 601F | Built-In Installation Guide - Page 7
471/2" (1207) 291/4" (743) Model 695 A) Rough Opening Width B) Min Door Clearance 471/2" (1207) 291/4" (743) Dimensions are for finished rough openings. Door swing clearances are based on stainless steel door and handle dimensions. Dimensions in parentheses are in millimeters unless otherwise - Sub-Zero 601F | Built-In Installation Guide - Page 8
PLUMBING REQUIREMENTS A 115 V AC, 60 Hz, 15 amp circuit breaker and electrical supply are required. A separate circuit, servicing only this appliance, is required. All Sub-Zero Built-In models are equipped with a power supply cord with a 3-prong grounding plug, which must be plugged into a mating - Sub-Zero 601F | Built-In Installation Guide - Page 9
drain pan, and allow for proper placement of the appliance dolly. Keep door(s) and drawer taped closed while moving unit. In order to prevent damage cut the red nylon shipping strap. NOTE: Grille screws are accessed with door(s) open. Then tilt the grille forward and release the springs from behind - Sub-Zero 601F | Built-In Installation Guide - Page 10
rear leveling legs, raise the unit until it makes contact with the wood block. See Level the Unit, page 11. IMPORTANT NOTE: If possible, keep door(s) closed on the unit until it is properly anchored. IMPORTANT NOTE: If for any reason the unit has been laid on its back or side - Sub-Zero 601F | Built-In Installation Guide - Page 11
surrounding cabinetry. This could affect the operation of the unit, such as door(s) not closing properly. For proper alignment, place the level on the top must be removed for servicing. The floor cannot interfere with removal. Refer to label mounted on kickplate support for height clearance. Replace - Sub-Zero 601F | Built-In Installation Guide - Page 12
overlay model, you will be installing panels to give the unit the custom Sub-Zero look. If your customer has chosen a framed design application, make sure handle. See Raised Panels, page 13. To install framed panels, the door handle(s) must be removed. The handle screws are hidden by a magnet - Sub-Zero 601F | Built-In Installation Guide - Page 13
and refrigerator doors. Slide the panel into the frame on the door. With door panels. Detailed installation instructions are included with the framed retrofit accessory kit. PA N E L DESIGN Additional panel design information can be found in the Sub-Zero Design Guide. Check our website at subzero - Sub-Zero 601F | Built-In Installation Guide - Page 14
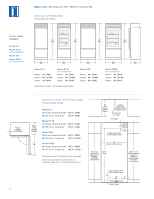
are for Built-In framed (F) models. Panel specifications for overlay models are on pages 18-19. FRAMED DOOR PANELS Over-and-Under Framed (F) Models Model 611 Refrigerator Framed Panel Freezer Framed Panel W 281/8" (714) 281/8" (714) H 481/16" (1221) 18 3/8" (467) Raised Panel Handle - Sub-Zero 601F | Built-In Installation Guide - Page 15
for this option. Kit includes partial framed molding and classic stainless steel inset handle panels for above and below glasswell on the refrigerator door. PANEL GRILLE OPTION Framed (F) Models Models 611 and 611G Grille Panel Width W 28 3/16" (716) Models 650, 650G, 661 Grille Panel Width - Sub-Zero 601F | Built-In Installation Guide - Page 16
bend at the center so that you can remove it. Remove the frame by removing the four screws. The door channel is now ready to accept the overlay panel assembly. Sub-Zero allows a 1/4" (6) space to slide the backing material into place in the frame. If your material is thicker than a 1/4" (6), either - Sub-Zero 601F | Built-In Installation Guide - Page 17
procedure as for other Built-In models. The refrigerator door panel will need to accommodate a cut-out in place, by removing the center plastic mandrel supports. Carefully tilt the touch pad out and disconnect be found in the Sub-Zero Design Guide. Check our website at subzero.com. Do not exceed - Sub-Zero 601F | Built-In Installation Guide - Page 18
Panel W 34 7/16" (875) 331/2" (851) 341/8" (867) H 591/4" (1505) 58 5/16" (1481) 5815/16" (1497) Model 601RG Refrigerator Overlay Panel Refrigerator Spacer Panel Refrigerator Backer Panel Window Cut-out Dimensions Window Cut-out Location W 34 7/16" (875) 331/2" (851) 341/8" (867) H 591/4" (1505 - Sub-Zero 601F | Built-In Installation Guide - Page 19
6711/16" (1719) 1415/16" (379) 14" (356) 14 5/8" (371) 68" (1727) 671/16" (1703) 6711/16" (1719) Model 642 Refrigerator Overlay Panel Refrigerator Spacer Panel Refrigerator Backer Panel Freezer Overlay Panel Freezer Spacer Panel Freezer Backer Panel W 24 5/16" (618) 23 3/8" (594) 24" (610) H 68 - Sub-Zero 601F | Built-In Installation Guide - Page 20
UNIT 21/2" (64) 1/2" (13) SIDE PANEL MATERIAL 24" (610) METAL SIDE PANEL FITTED UP TO UNIT FRAME DOOR PAN HEAD SCREW SIDE OF SUB-ZERO UNIT FRAME METAL SIDE PANEL MATERIAL 24" (610) Top Views 3" (76) 4" (102) Illus. 17 20 Dimensions in parentheses are in millimeters unless otherwise specified - Sub-Zero 601F | Built-In Installation Guide - Page 21
have been installed, the unit has been leveled and door adjustment completed, anchor the unit to the opening. This will assure a proper fit and a secure installation. The Sub-Zero Anchoring Kit (part #4200900), available from your Sub-Zero dealer, includes the necessary hardware. IMPORTANT NOTE: Be - Sub-Zero 601F | Built-In Installation Guide - Page 22
has been overlooked. Any questions or problems about the installation should be directed to your Sub-Zero dealer or the Sub-Zero Customer Service Department at 800-222-7820 or e-mail [email protected]. You can also visit our website at subzero.com. Illus. 22 Dimensions in parentheses - Sub-Zero 601F | Built-In Installation Guide - Page 23
inside the door. Contact a Sub-Zero Factory Authorized Service Center, a Sub-Zero dealer, or the Sub-Zero Customer Service Department, P. O. Box 44130, Madison, WI 53744-4130, call 800-222-7820 or e-mail [email protected]. If you are storing or disposing of your old refrigerator or freezer - Sub-Zero 601F | Built-In Installation Guide - Page 24
S U B - Z E R O F R E E Z E R C O M PA N Y, I N C . P. O . B O X 4 4 1 3 0 M A D I S O N , W I 5 3 7 4 4 - 4 1 3 0 8 0 0 - 2 2 2 - 7 8 2 0 S U B Z E R O . C O M 3758610 5/2005
-
 1
1 -
 2
2 -
 3
3 -
 4
4 -
 5
5 -
 6
6 -
 7
7 -
8
-
9
-
10
-
11
-
12
-
13
-
14
-
15
-
16
-
17
-
18
-
19
-
20
-
21
-
22
-
23
-
24
 |
 |
I
NSTALLATION
I
NSTRUCTIONS
B
UILT
-I
N
R
EFRIGERATION