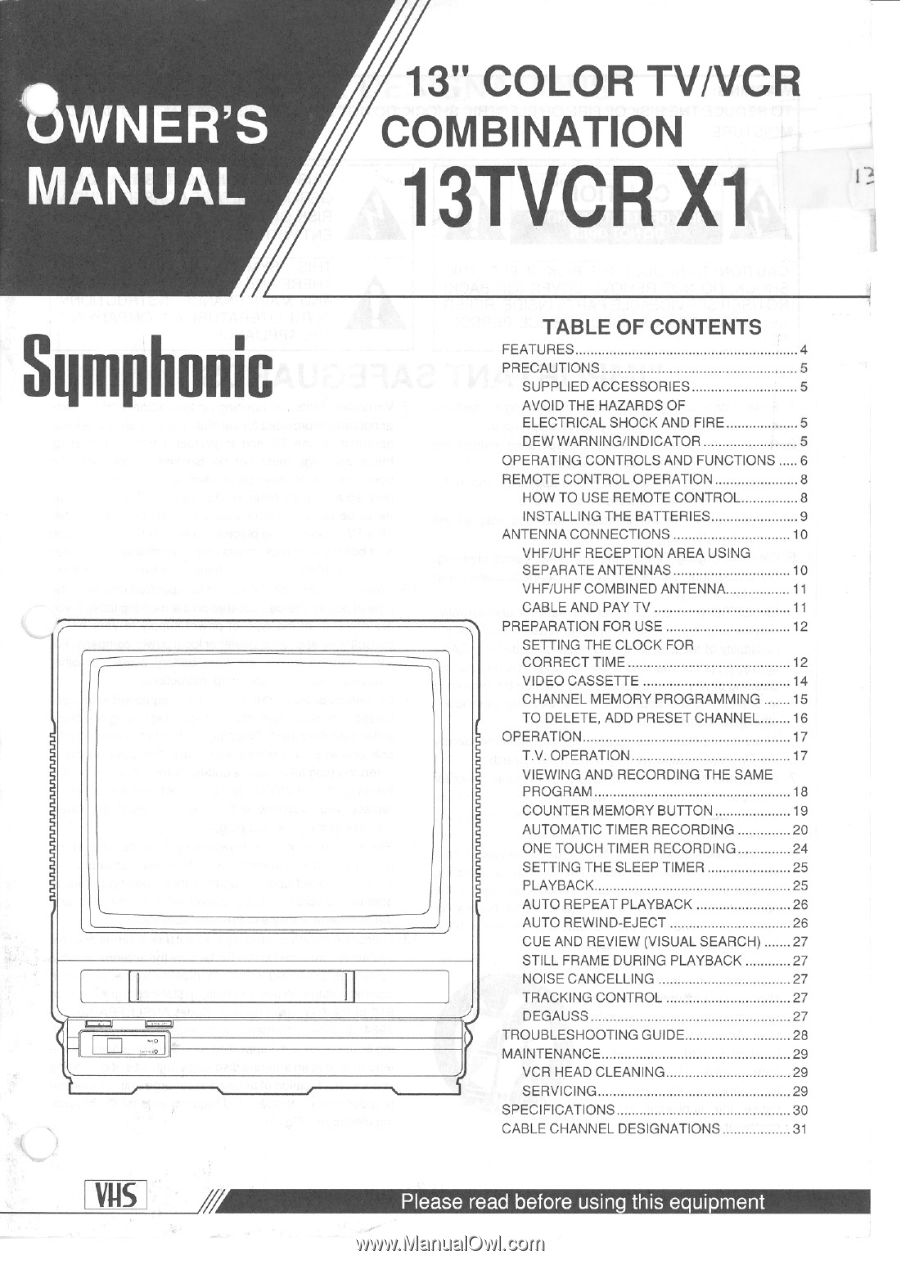
Symphonic 13TVCRX1 Owner's Manual
Symphonic 13TVCRX1 Manual
 |
View all Symphonic 13TVCRX1 manuals
Add to My Manuals
Save this manual to your list of manuals |
Symphonic 13TVCRX1 manual content summary:
- Symphonic 13TVCRX1 | Owner's Manual - Page 1
CUE AND REVIEW (VISUAL SEARCH) 27 STILL FRAME DURING PLAYBACK 27 NOISE CANCELLING 27 TRACKING CONTROL 27 DEGAUSS 27 TROUBLESHOOTING GUIDE 28 MAINTENANCE 29 VCR HEAD CLEANING 29 SERVICING 29 SPECIFICATIONS 30 CABLE CHANNEL DESIGNATIONS 31 Please read before usin this e•ui ment - Symphonic 13TVCRX1 | Owner's Manual - Page 2
SERVICEABLE PARTS INSIDE. REFER SERVICING TO QUALIFIED SERVICE PERSONNEL. THIS SYMBOL INDICATES THAT A THERE ARE IMPORTANT OPERATING AND MAINTENANCE INSTRUCTIONS Electrical Code, ANSI/NFPA No. 701984, provides information with respect to proper grounding of the mast and supporting structure, - Symphonic 13TVCRX1 | Owner's Manual - Page 3
ELECTRIC SERVICE EQUIPMENT GROUNDING CONDUCTORS (NEC SECTION 810-21) GROUND CLAMPS NEC - NATIONAL ELECTRICAL CODE S2898A POWER SERVICE GROUNDING by following the oper- ating instructions. Adjust only those controls that are cov- ered by the operating instructions as improper adjustment of other - Symphonic 13TVCRX1 | Owner's Manual - Page 4
power off. • Auto Repeat Playback- Allows you to repeat a tape indefinitely without touching the PLAY button. • DEW Sensor System with Dew Indicator • Infrared Remote Control- You can operate all the tape transport controls, and change the channel up and down volume up and down from the comfort of - Symphonic 13TVCRX1 | Owner's Manual - Page 5
ACCESSORIES Remote Control unplug the power cord immediately and take the unit to an authorized video service center for servicing. • Do not put your fingers or objects into the VCR cassette INFORMATION Unauthorized recording or use of broadcast television programming, video tape, film, or other - Symphonic 13TVCRX1 | Owner's Manual - Page 6
OPERATING CONTROLS AND FUNCTIONS - FRONT VIEW - 1 2 3 • 4 56 7 8 9 PLAY \ )1 ) Il II DOWN•YOL-UP IRI El W F FWD 10 11 12 - REAR VIEW - 14 • 13 15 16 17 - 6 - - Symphonic 13TVCRX1 | Owner's Manual - Page 7
remote control unit. 5 TIMER REC indicator- Lights when in the Timer Recording mode. 6 REC indicator- Lights when in the Recording mode. 7 CHANNEL UP/DOWN button- To select the channel for viewing or recording. 8 PLAY button- To begin playback of a tape. 9 RECORD/OTR button- Press to begin manual - Symphonic 13TVCRX1 | Owner's Manual - Page 8
can operate all of tape transport functions and TV control functions from the Remote Control (included). The buttons on the Remote Control have the same functions as the corresponding buttons on the unit. HOW TO USE REMOTE CONTROL 1 POWER button- To turn power, monitor on and off. kEe4T3/fri 0 Li - Symphonic 13TVCRX1 | Owner's Manual - Page 9
/A. ..fflmh. INSTALLING THE BAITERIES 1 Slide the battery compartment cover on the remote unit in the direction of the arrow. 2 Insert 2 "AAA" penlight batteries into the battery compartment in the direction as indicated by the polarity (+/-) markings. 3 Replace the cover I I - 9 - - Symphonic 13TVCRX1 | Owner's Manual - Page 10
ANTENNA CONNECTIONS UHF/VHF RECEPTION AREA USING SEPARATE ANTENNAS UHF/VHF ANTENNA HOOK UP The UHF/VHF Rod Antenna(supplied) is detachable. Push the stem of the antenna into the hole which is located on the upper back cabinet of the unit. Connect the Rod antenna to ANT.IN terminal of TV as shown - Symphonic 13TVCRX1 | Owner's Manual - Page 11
VHF/UHF COMBINED ANTENNA A VHF UHF 75 ohm combination antenna can be connected to ANT.IN terminal. VHF/UHF Combination Antenna CABLE AND PAY TV From Cable System 75-ohm Coaxial Cable (Not supplied) 0 O From Cable System (Not supplied) CATV Box (Not supplied) OUT C) IN 75-ohm Coaxial Cable ( - Symphonic 13TVCRX1 | Owner's Manual - Page 12
PREPARATION FOR USE SETTING THE CLOCK FOR CORRECT TIME • You must use the remote control unit. In the example below, the clock is to be set to Monday at 5:40PM. 1 Make sure the POWER is ON. 5 Press SELECT button. - Symphonic 13TVCRX1 | Owner's Manual - Page 13
10 Press CHANNEL button up (or down) repeatedly until the desired hour is displayed. Make sure time of day "AM" or "PM" is correct, if not continue pressing the channel up. (Example: 5PM) CHANNEL V • li • CLOCK SET MODE - SET THE DATE AND CLOCK MONTH DAY YEAR (6).( 3) MON (1991) HOUR,MINUTE - Symphonic 13TVCRX1 | Owner's Manual - Page 14
VIDEO CASSETTE This VCR will operate with any cassette that has the VHS mark. For best results we recommend the use of high-quality tape. The table below shows the recording/playback time using T-60, T-120 or T-160 tape in the SP, LP or SLP mode. MODE SP Mode LP Mode T-60 1 hour CASSETTE T-120 2 - Symphonic 13TVCRX1 | Owner's Manual - Page 15
your area. • Programed channels are erased when you dis- connect the power cord or the power failure occur. AUTOMATIC MEMORY-IN • You must use the remote control unit. 1 Attach the smaller end of the supplied AC cord to the AC 120V connector on the back of the TV/VCR. Then, plug - Symphonic 13TVCRX1 | Owner's Manual - Page 16
TO DELETE, ADD PRESET CHANNEL • You must use the remote control unit. 1 Press PROG. button. Select the channel number you wish to erase with 10 keys. PROG. [[ t; 1. CLOCK 2. PROGRAM 3. REPEAT ON 4. PRESET 5 Select the channel - Symphonic 13TVCRX1 | Owner's Manual - Page 17
3 Adjust the VOLUME to desired listening level SELECT ( I using the VOLUME UP and DOWN buttons COLOR VOLUME ONTR• VOLUME >>>» • You must use remote control unit. 4 Adjust picture controls for a natural looking image. Press SELECT button. Now you can adjust contrast, brightness, color & tint with - Symphonic 13TVCRX1 | Owner's Manual - Page 18
VIEWING AND RECORDING THE SAME PROGRAM 1 Insert a cassette with erasure prevention tab intact. The unit will turn on automatically. 5 Press RECORD button. The RECORD indicator will light. If you want to edit out some material while you are recording. o=n RECORD REC Sp 2 Ensure TIMER REC - Symphonic 13TVCRX1 | Owner's Manual - Page 19
button can be used during REWIND or F.FWD mode, to stop tape as tape approaches counter display of approx. 0000. • You must use remote control unit. 1 Before playback or recording, press CALL button repeatedly until the counter number is displayed. 5 Press STOP button when recording or playback - Symphonic 13TVCRX1 | Owner's Manual - Page 20
necessary, rewind or fast forward the tape to the point you want to start recording. cc:3=E» STOP • You must use the remote control. 2 Press PROG. button. PROG. = 1. CLOCK 2. PROGRAM a REPEAT ON 4. PRESET 3 Select 2 (PROGRAM). 12 16 S g 7, ® 9 1,0 P DAY r: r _ 2 START/ENO CH MD - 4 Press - Symphonic 13TVCRX1 | Owner's Manual - Page 21
9 Press SELECT button. The start minutes indicator will flash. 14 Press CHANNEL buttons repeatedly until desired minutes are displayed. (Example: 50) SELECT P DAY START/END CU MD I 4 TUE .h3i/Ali, 3 4 - - .. .. CHANNEL P DAY START/ND CH MD I 4 TUE 4 ,, 1=T. 2 _ 3 4 - 10 Press CHANNEL - Symphonic 13TVCRX1 | Owner's Manual - Page 22
19 Press SELECT button, the program #1 will flash. Now the program set 1 is completed. SELECT y 405 AY STAIIT,END CH MO ... ,1' ICIME 4 ' 2, .. 3 - 4 - 7 30AA1 e .- .- . ..._ 32 SIP .. _ .. - Nore: If you do not wish to enter another program for AUTOMATIC TIMER RECORDING proceed to step 21. 20 - Symphonic 13TVCRX1 | Owner's Manual - Page 23
button. The selected program is erased. CLEAR/ RESET , ! DAY STARTENO CH MD ...7- ..., _, a- 4 - POWER TIMER REC'iii kt> 2 Press PROG. button on the remote control unit. The information for all programs appears on the display. PROG. P DAY START/ENO CH MO 1 4 TUE 730AM IMAM 32 UP 3 - Note - Symphonic 13TVCRX1 | Owner's Manual - Page 24
program according to the table below. Simply press RECORD button as many times as needed, depending upon your required length of recording. • The remote control unit is not needed for this function. 1 Insert a cassette tape (with erasure prevention tab intact). 0 11 STOP 2 Select the program to - Symphonic 13TVCRX1 | Owner's Manual - Page 25
to shut off the power without pressing POWER button after a desired period. 1 Press SLEEP button on the remote control unit. The shut off time can be determined by the number of times you press the button. ( normal position or display nothing. This is not an indication of the trouble. - 25 - - Symphonic 13TVCRX1 | Owner's Manual - Page 26
AUTO REPEAT PLAYBACK This unit has an auto repeat playback function that allows you to repeat a tape indefinitely without having to continue to push the PLAY button. 1 Press PROG. button. PROG. 1. CLOCK 2. PROGRAM 3. REPEAT OFF 4. PRESET 4 Select 3 (REPEAT ON) and it will go to Repeat off. ® ® ® - Symphonic 13TVCRX1 | Owner's Manual - Page 27
Also, the picture color fluctuates on and off. This is not an indication of trouble. • You will get best results when playing back tapes that were recorded in the during playback, adjust the channel UP/DOWN buttons on the TVCR, remote control to achieve the best picture, with channel "A" or "V" - Symphonic 13TVCRX1 | Owner's Manual - Page 28
TROUBLESHOOTING GUIDE If you have followed the instructions contained in this manual and have difficulty in operating your unit, locate the SYMPTOM in the left column below. Check the corresponding POSSIBLE CAUSE and CORRECTIVE ACTION columns to locate and remedy the problem. SYMPTOM POSSIBLE - Symphonic 13TVCRX1 | Owner's Manual - Page 29
symptom occurs. Bring the unit to your nearest Service Center for a complete cleaning of the heads and cassette compartment. SERVICING • Should your unit become inoperative, do not try to correct the problem by yourself. There are no user-serviceable parts inside. Switch power off, unplug the power - Symphonic 13TVCRX1 | Owner's Manual - Page 30
SPECIFICATIONS GENERAL SPECIFICATIONS CRT: Television system: Recording system: Tape width: Tape speed SP LP SLP Tuner channel TV VHF Low TV VHF High TV UHF CATV VHF MID band SUPER - Symphonic 13TVCRX1 | Owner's Manual - Page 31
CABLE CHANNEL DESIGNATIONS This model is capable of receiving 181 cable channels. The channels are displayed as 1 thru 125. Cable companies often designate the other channels with letters or letter-number combinations. Please check with your local cable company. The following is a chart of common - Symphonic 13TVCRX1 | Owner's Manual - Page 32
original retail purchase will be required together with the product to obtain service under this warranty. This warranty shall not be extended to any THIS WARRANTY DOES NOT COVER PACKING MATERIALS, ANY ACCESSORIES (EXCEPT REMOTE CONTROL). ANY COSMETIC PARTS, COMPLETE ASSEMBLY PARTS. DEMO OR FLOOR
-
 1
1 -
 2
2 -
 3
3 -
 4
4 -
 5
5 -
 6
6 -
 7
7 -
8
-
9
-
10
-
11
-
12
-
13
-
14
-
15
-
16
-
17
-
18
-
19
-
20
-
21
-
22
-
23
-
24
-
25
-
26
-
27
-
28
-
29
-
30
-
31
-
32
 |
 |
roWNER'S
MANUAL
13"
COLOR
TV/VCR
COMBINATION
13TVCR
X1
Sqmphonic
TABLE
OF
CONTENTS
FEATURES
4
PRECAUTIONS
5
SUPPLIED
ACCESSORIES
5
AVOID
THE
HAZARDS
OF
ELECTRICAL
SHOCK
AND
FIRE
5
DEW
WARNING/INDICATOR
5
OPERATING
CONTROLS
AND
FUNCTIONS
6
REMOTE
CONTROL OPERATION
8
HOW
TO
USE
REMOTE
CONTROL
8
INSTALLING
THE
BATTERIES
9
ANTENNA
CONNECTIONS
10
VHF/UHF
RECEPTION
AREA
USING
SEPARATE
ANTENNAS
10
VHF/UHF
COMBINED
ANTENNA
11
CABLE
AND
PAY
TV
11
PREPARATION
FOR
USE
12
SETTING
THE
CLOCK
FOR
CORRECT
TIME
12
VIDEO
CASSETTE
14
CHANNEL
MEMORY
PROGRAMMING
15
TO
DELETE,
ADD
PRESET
CHANNEL
16
OPERATION
17
T.V.
OPERATION
17
VIEWING
AND
RECORDING
THE
SAME
PROGRAM
18
COUNTER
MEMORY
BUTTON
19
AUTOMATIC
TIMER
RECORDING
20
ONE
TOUCH
TIMER
RECORDING
24
SETTING
THE
SLEEP
TIMER
25
PLAYBACK
25
AUTO
REPEAT
PLAYBACK
26
AUTO
REWIND
-EJECT
26
CUE
AND
REVIEW
(VISUAL
SEARCH)
27
STILL
FRAME
DURING
PLAYBACK
27
NOISE
CANCELLING
27
TRACKING
CONTROL
27
DEGAUSS
27
TROUBLESHOOTING
GUIDE
28
MAINTENANCE
29
VCR
HEAD
CLEANING
29
SERVICING
29
SPECIFICATIONS
30
CABLE
CHANNEL
DESIGNATIONS
31
VAS
///
Please
read
before
usin
this
e•ui
ment