Symphonic RSMWD200E Owner's Manual
Symphonic RSMWD200E Manual
 |
View all Symphonic RSMWD200E manuals
Add to My Manuals
Save this manual to your list of manuals |
Symphonic RSMWD200E manual content summary:
- Symphonic RSMWD200E | Owner's Manual - Page 1
using this equipment. DVD/CD Player MRSWMWDD202000EE SYMPHONIC INSTRUCCIONES EN ESPAÑOL INCLUIDAS. Precautions Setup Information Functions Supplied Accessory Table of Contents • Remote control (NB069UD) with two AA batteries • Audio/Video cables • Owner's Manual (WPZ0102TM015/ (1VMN20394 - Symphonic RSMWD200E | Owner's Manual - Page 2
DO NOT REMOVE COVER (OR BACK). NO USER SERVICEABLE PARTS INSIDE. REFER SERVICING TO QUALIFIED SERVICE PERSONNEL. The lightning flash with arrowhead symbol, within interference unless the modifications are expressly approved in the instruction manual. The user could lose the authority to operate this - Symphonic RSMWD200E | Owner's Manual - Page 3
rieusement endommagé. Utiliser uniquement un chariot, un support, un trépied ou une table recommandés proper ventilation is provided or the manufacturer's instructions have been adhered to. 11) Power on the product. 18) Servicing - Do not attempt to service this product yourself as opening - Symphonic RSMWD200E | Owner's Manual - Page 4
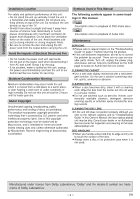
following symbols appear in some headings in this manual. DVD-V : Description refers to playback of DVD-Video discs. CD : Description refers to playback of Audio CDs. Maintenance SERVICING ¡Please refer to relevant topics on the "Troubleshooting Guide" on page 17 before returning the product. ¡If - Symphonic RSMWD200E | Owner's Manual - Page 5
as PAL cannot be played back. *2: Certain DVD-Video discs do not operate as described in this manual due to the intentions of the disc's producers Otherwise, malfunction may result! DVD-RAM CD-I Photo CD Video CD DVD with region codes other than 1 or ALL DTS-CD DVD-ROM for personal computers CD-ROM - Symphonic RSMWD200E | Owner's Manual - Page 6
TV has AUDIO/VIDEO input jacks, see the following instructions. If not, see the section "Before using your DVD player" on the front page. Connection to a TV this unit. If the picture does not appear, also refer to the manual accompanying your TV. INPUT MODES FOR COMMON TV BRANDS • Listed below are - Symphonic RSMWD200E | Owner's Manual - Page 7
an MD or DAT deck. • Unless connected to a Dolby Digital decoder, set "DOLBY DIGITAL" to "OFF" for the AUDIO setting in the setup mode. Playing a DVD using incorrect settings may generate noise distortion and may also damage the speakers. (Refer to pages 14-15) • Set "DOLBY DIGITAL" to "OFF" for the - Symphonic RSMWD200E | Owner's Manual - Page 8
sure that there is no obsta- cle between the remote and the remote sensor on the unit. • Use within the operating range and angle, as shown. Remote control W2it3hifneeatb(o7umt ) Button Disc (Alphabetical order) 123 456 789 0 +10 DVD-V · To select chapter or title directly. CD · To select - Symphonic RSMWD200E | Owner's Manual - Page 9
remote control use. Some operations can be carried out on main unit. Playback Before: Turn on the TV, amplifier and any other components which are connected to the DVD player depending on the disc. Refer to the manual accompanying the disc for details. Resume DVD-V CD Hit [STOP C ]. Resume - Symphonic RSMWD200E | Owner's Manual - Page 10
On-Screen Display You can check the information about the current disc by hitting [DISPLAY] on the remote control. DVD-V DISPLAY 1 11/16 0:00:00 - 0:03:30 DISPLAY 2 1/3 0:00:00 - 1:23:45 DISPLAY Current playback status Remaining time of the current chapter Elapsed time of - Symphonic RSMWD200E | Owner's Manual - Page 11
played, this function can also be performed by directly entering the desired chapter number with the Number buttons. Refer to the manual accompanying the disc. Marker Setup DVD-V CD This feature allows you to assign a specific point on a disc to be called back later. To set a marker 1 PLAY - Symphonic RSMWD200E | Owner's Manual - Page 12
(A). 2 A-B A-B CD You may determine the order in which tracks will play. 1 STOP CD-DA TOTAL 0:00:00 MODE ENTER x1 (Hit once) DVD-V CHAPTER (current chapter repeat) TITLE (current title repeat) OFF (repeat off) CD TRACK (current track repeat) ALL (entire disc repeat) OFF (repeat off - Symphonic RSMWD200E | Owner's Manual - Page 13
PLAY 1.ENG/6 SUB TITLE 2 OFF FRE (French audio) Camera Angle DVD-V Some DVD discs may contain scenes which have been shot simultaneously from various angles. You refer to the manual included in the disc.) ¡If you choose a language that has three-letter-language code, the code will be displayed - Symphonic RSMWD200E | Owner's Manual - Page 14
" on page 14 or 15. CUSTOM Menu You can change the DVD player's settings. 1 STOP SETUP 2 or SETUP QUICK CUSTOM four-digit number to enter the code for the desired language. (Refer to the language code list on page 18) • Only the languages supported by the disc can be selected - Symphonic RSMWD200E | Owner's Manual - Page 15
"ON" to show the angle icon when multiple camera angles are available during DVD playback. TV ASPECT 4:3 LETTER BOX STILL MODE AUTO ANGLE ICON ON AUTO audio settings for your equipment. It only affects during the playback of DVD discs. Follow the steps 1) to 3) in the "CUSTOM Menu" section - Symphonic RSMWD200E | Owner's Manual - Page 16
not play.) This feature prevents your children from viewing inappropriate materials. Parental Levels Parental Level allows you to set the rating levels of your DVD discs. Playback will stop if the ratings exceed the levels you set. Follow the steps 1) to 3) in the "CUSTOM Menu" section on page 14 - Symphonic RSMWD200E | Owner's Manual - Page 17
Troubleshooting Guide If the DVD player does not perform properly when operated as instructed in this Operating Instruction, check the player consulting the following checklist. Problem No power No sound or picture Distorted picture Completely distorted picture or black/white picture with DVD - Symphonic RSMWD200E | Owner's Manual - Page 18
. (3 letter language code is written in bracket.) SYMPHONIC Limited Warranty Information FUNAI required together with the product to obtain service under this warranty. This warranty shall COVER PACKING MATERIALS, ANY ACCESSORIES (EXCEPT REMOTE CONTROL), ANY COSMETIC PARTS, COMPLETE ASSEMBLY - Symphonic RSMWD200E | Owner's Manual - Page 19
páginas 6-7. En caso contrario, vea la sección "Antes de utilizar su reproductor de DVD" en la página del frente. 2 Instalación de las pilas en el mando a distancia 2 Confirme que ha seleccionado "PLAY- ER MENU" SETUP QUICK PLAYER MENU TV ASPECT DOLBY DIGITAL ENGLISH 4:3 LETTER BOX ON ENTER - Symphonic RSMWD200E | Owner's Manual - Page 20
Quick Use Guide 1 Connections If your TV has AUDIO/VIDEO input jacks, see the section "Connections" on pages 6-7. If not, see the section "Before using your DVD player" on the front page. 2 Installing the Batteries for the Remote Control 1 2 3 3 To Change the OnScreen Language 1 STANDBY-ON
-
 1
1 -
 2
2 -
 3
3 -
 4
4 -
 5
5 -
 6
6 -
 7
7 -
8
-
9
-
10
-
11
-
12
-
13
-
14
-
15
-
16
-
17
-
18
-
19
-
20
 |
 |

• Remote control
(NB069UD) with
two AA batteries
•
Audio/Video cables
(WPZ0102TM015/
WPZ0102LTE01/
WPZ0102CAB01)
• Owner’s Manual
(1VMN20394)
Owner’s Manual
Please read before using this equipment.
DVD/CD Player
MWD200E
INSTRUCCIONES EN ESPAÑOL INCLUIDAS.
Precautions
Functions
Setup
Information
Español
Supplied Accessory
Owner's Manual
If you need additional operating assistance after
reading this owner’s manual or to order replacement
accessories, please call
TOLL FREE : 1-800-605-8610
or visit our web site at http://www.funai-corp.com
Precautions
Laser Safety
. . . . . . . . . . . . . . . . . . . . . . . . . . . . . . . . . 2
■
IMPORTANT SAFEGUARDS
. . . . . . . . . . . . . . . . . . . . 3
Installation Location. . . . . . . . . . . . . . . . . . . . . . . . . . . . 4
Avoid the Hazards of Electrical Shock and Fire
. . . . . . . 4
Moisture Condensation Warning
. . . . . . . . . . . . . . . . . . 4
About Copyright. . . . . . . . . . . . . . . . . . . . . . . . . . . . . . . 4
Symbols Used in This Manual . . . . . . . . . . . . . . . . . . . . 4
Maintenance . . . . . . . . . . . . . . . . . . . . . . . . . . . . . . . . . 4
■
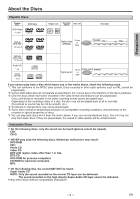
About the Discs . . . . . . . . . . . . . . . . . . . . . . . . . . . . . . 5
Playable Discs. . . . . . . . . . . . . . . . . . . . . . . . . . . . . . . . 5
Unplayable Discs. . . . . . . . . . . . . . . . . . . . . . . . . . . . . . 5
Setup
■
Connections
. . . . . . . . . . . . . . . . . . . . . . . . . . . . . . . . 6
Connection to a TV . . . . . . . . . . . . . . . . . . . . . . . . . . . . 6
Connection to an Audio System. . . . . . . . . . . . . . . . . . . 7
Rear Terminals
. . . . . . . . . . . . . . . . . . . . . . . . . . . . . . . 7
■
About the Remote Control
. . . . . . . . . . . . . . . . . . . . . 8
Remote Control . . . . . . . . . . . . . . . . . . . . . . . . . . . . . . . 8
Installing the Batteries for the Remote Control . . . . . . . . 8
Functions
■
Playback. . . . . . . . . . . . . . . . . . . . . . . . . . . . . . . . . . . . 9
■
On-Screen Display. . . . . . . . . . . . . . . . . . . . . . . . . . . 10
■
Search Function
. . . . . . . . . . . . . . . . . . . . . . . . . . . . 11
Track Search . . . . . . . . . . . . . . . . . . . . . . . . . . . . . . . . 11
Title / Chapter Search . . . . . . . . . . . . . . . . . . . . . . . . . 11
Time Search . . . . . . . . . . . . . . . . . . . . . . . . . . . . . . . . 11
■
Marker Setup . . . . . . . . . . . . . . . . . . . . . . . . . . . . . . . 11
■
Repeat / Random / Programmed Playback . . . . . . . . 12
Repeat Playback . . . . . . . . . . . . . . . . . . . . . . . . . . . . . 12
Repeat A-B Playback. . . . . . . . . . . . . . . . . . . . . . . . . . 12
Random Playback . . . . . . . . . . . . . . . . . . . . . . . . . . . . 12
Programmed Playback. . . . . . . . . . . . . . . . . . . . . . . . . 12
■
Special Settings. . . . . . . . . . . . . . . . . . . . . . . . . . . . . 13
Subtitle Language . . . . . . . . . . . . . . . . . . . . . . . . . . . . 13
Audio Language
. . . . . . . . . . . . . . . . . . . . . . . . . . . . . 13
Camera Angles . . . . . . . . . . . . . . . . . . . . . . . . . . . . . . 13
Black Level Setting
. . . . . . . . . . . . . . . . . . . . . . . . . . . 13
Stereo Sound Mode. . . . . . . . . . . . . . . . . . . . . . . . . . . 13
Virtual Surround
. . . . . . . . . . . . . . . . . . . . . . . . . . . . . 13
■
DVD Set Up
. . . . . . . . . . . . . . . . . . . . . . . . . . . . . . . . 14
LANGUAGE Setting. . . . . . . . . . . . . . . . . . . . . . . . . . . 14
DISPLAY Setting . . . . . . . . . . . . . . . . . . . . . . . . . . . . . 15
AUDIO Setting. . . . . . . . . . . . . . . . . . . . . . . . . . . . . . . 15
PARENTAL Setting
. . . . . . . . . . . . . . . . . . . . . . . . . . . 16
Reset to the Default Setting
(except for PARENTAL Setting)
. . . . . . . . . . . . . . . . . . 16
Information
■
Troubleshooting Guide . . . . . . . . . . . . . . . . . . . . . . . 17
■
Specifications
. . . . . . . . . . . . . . . . . . . . . . . . . . . . . . 18
■
Language List
. . . . . . . . . . . . . . . . . . . . . . . . . . . . . . 18
■
Limited Warranty . . . . . . . . . . . . . . . . . . . . . . . . . . . . 18
Español
. . . . . . . . . . . . . . . . . . . . . . . . . . . . . . . . . . . .19
Quick Use Guide . . . . . . . . . . . . . . . . . . . . . . . . . . . . .20
Table of Contents
Before Using Your DVD player
If your TV has AUDIO/VIDEO input jacks, see
the section “Connections” on pages 6–7. If not,
it is still possible to connect this DVD player to
your TV by using a STEREO AUDIO/VIDEO
RF Modulator (commercially available.) In this
case, follow the instructions below.
1) Connect the AUDIO/VIDEO output jacks of
this DVD player to the AUDIO/VIDEO input
jacks of your RF Modulator by audio and
video cables.
2) The antenna input jack of your TV may
have been already occupied. If so, discon-
nect the RF cable from your TV, and then
connect the RF cable to your RF Modulator
(usually marked “ANT IN”.)
3) Connect your RF modulator to your TV by
another RF cable.
4) Set your RF modulator’s channel 3/4 switch
to either 3 or 4, whichever the TV channel
is least used in your area. If your RF modu-
lator has a Modulator/Antenna switch, set it
according to your RF modulator’s manual.
5) Turn on your TV and choose the same
channel as you set the RF modulator’s
channel 3/4 switch to.
For more details, follow the instructions
supplied with the RF Modulator.
Hint
Hint
•
The quality of
picture may
become poor if
this DVD player is
connected to an
RF Modulator.
TO TV
CHANNEL
VIDEO
AUDIO
R
L
3
4
ANT IN
AC 120V
AUDIO OUT
L
R
DIGITAL
AUDIO OUT
COAXIAL
VIDEO
OUT
S-VIDEO
OUT
Stereo Audio/Video RF Modulator
(commercially available)
(Back of TV)
Audio/Video
Cables
(Supplied)
(Back of DVD player)
RF Cable (Not supplied)
Antenna
Cable
Signal
3
2
1
Antenna in jack