Symphonic SD200E Owner's Manual
Symphonic SD200E Manual
 |
View all Symphonic SD200E manuals
Add to My Manuals
Save this manual to your list of manuals |
Symphonic SD200E manual content summary:
- Symphonic SD200E | Owner's Manual - Page 1
before using this equipment. DVD/CD Player SD200E INSTRUCCIONES EN ESPAÑOL INCLUIDAS. Precautions Setup Information Functions Supplied Accessory Table of Contents • Remote control (NB000UD/ NB050UD) with two AA batteries • Audio/Video • Owner's Manual cables (1VMN20046) (WPZ0102TM015 - Symphonic SD200E | Owner's Manual - Page 2
instructions in the literature accompanying the appliance. Laser Safety This unit employs a laser. Only a qualified service person should remove the cover or attempt to service this device, due to possible eye injury. CAUTION: CAUTION: LOCATION: USE OF CONTROLS in the instruction manual. The user - Symphonic SD200E | Owner's Manual - Page 3
uniquement un chariot, un support, un trépied instructions. Adjust only those controls that are covered by the operating instructions as an improper adjustment of other controls service. 20) Replacement Parts - When replacement parts are required, be sure the service technician has used replacement - Symphonic SD200E | Owner's Manual - Page 4
symbols appear in some headings and notes in this manual. DVD-V : Description refers to playback of DVD-Video discs. CD : Description refers to playback of Audio CDs. Maintenance SERVICING ¡Please refer to relevant topics on the Troubleshooting Guide on page 17 before you return the product. ¡When - Symphonic SD200E | Owner's Manual - Page 5
played back. *2: Certain DVD-Video discs do not operate as described in this manual due to the intentions of CD-G ¡ NEVER play back the following discs. Otherwise, malfunction may result! DVD-RAM CD-I Photo CD Video CD DVD with region codes other than 1 or ALL DTS-CD DVD-ROM for personal computers CD - Symphonic SD200E | Owner's Manual - Page 6
Connections Setup If your TV has AUDIO/VIDEO input jacks, see the following instructions. If not, see the section "Before using your DVD player" on the front page. Connection to a TV Basic Audio TV AUDIO IN R L Method 1 Good picture VIDEO IN Method 2 Better picture S-VIDEO IN Audio cable ( - Symphonic SD200E | Owner's Manual - Page 7
cable (supplied) Audio Coaxial Digital cable (commercially available) DVD player (Analog) AUDIO OUT L AUDIO OUT DIGITAL AUDIO OUT " to "OFF" for the AUDIO setting in the setup mode. Playing a DVD using incorrect settings may generate noise distortion and may also damage the speakers. (Refer - Symphonic SD200E | Owner's Manual - Page 8
location of disc. • Search the markers. • To call up the DVD setup menu. • To call up the DVD setup menu. • To skip chapters. • To skip tracks. • To stop playback. • To stop playback. • To select subtitles on a disc. Remote control W2it3hifneeatb(o7umt ) TOP MENU V.SURR. • To call up the - Symphonic SD200E | Owner's Manual - Page 9
DVD player. Make sure the TV and audio receiver (commercially available) are set to the correct channel. OP/CL PLAY STOP POWER DVD-V 1 POWER CD 2 OPEN/CLOSE POWER 3 4 Remote Control the disc. Refer to the manual accompanying the disc for details. Resume DVD-V CD Press the STOP button. - Symphonic SD200E | Owner's Manual - Page 10
the information about the current disc by pressing the DISPLAY button on the remote control. DVD-V DISPLAY 11/16 0:00:00 - 0:03:30 DISPLAY 1/3 0:00: title Elapsed time of the current title TT(Title): Current title number / Total titles CD DISPLAY 4/12 0:03:21 - 0:02:15 DISPLAY 4/12 0:13:45 - - Symphonic SD200E | Owner's Manual - Page 11
function can also be performed by directly entering the desired chapter number with the number buttons. Refer to the manual accompanying the disc. DVD-V CD 1 PLAY TOTAL 1:29:00 SEARCH MODE 21 2 4 5 7 8 0 x repeatedly until this screen appears 3 6 TOTAL 1:29:00 9 Within 30 seconds - Symphonic SD200E | Owner's Manual - Page 12
be cleared when moving to another title, chapter, or track. ¡Repeat playback are not available with all discs or during repeat A-B playback. DVD-V 1 PLAY CD A- A-B at your desired starting point (A). 2 A-B A-B at your desired end point (B). ¡Point B should be in the same title or track as point - Symphonic SD200E | Owner's Manual - Page 13
Display menu, the ( ) icon will not appear. (Refer to pages 14-15) 1 DVD-V CD You can enjoy surround-sound effect over two speakers of your own. 1 PLAY V.SURR. so refer to the manual included in the disc.) ¡If you choose a language that has three-letter-language code, the code will be displayed - Symphonic SD200E | Owner's Manual - Page 14
language. DISC MENU: ∗1 (Default: ENGLISH) Sets the language in DVD menu. PLAYER MENU: QUICK (Default: ENGLISH) Sets the language for the On four-digit number to enter the code for the desired language. (Refer to the language code list on page 18) • Only the languages supported by the disc can be - Symphonic SD200E | Owner's Manual - Page 15
the appropriate audio settings for your equipment. It only affects during the playback of DVD discs. Follow the steps 1) to 3) in the "CUSTOM Menu" section on page 14. 4 Select the desired item or 5 DRC (Dynamic Range Control): (Default: ON) Set to "ON" to compress the range between soft and loud - Symphonic SD200E | Owner's Manual - Page 16
you have set a password already, enter the current four-digit password. SETUP PARENTAL PASSWORD Enter current password. Hint CONTROL LEVELS • ALL: All parental locks are cancelled. • Levels 8: DVD softwares of any grades (adult/general/children) can be played back. • Levels 7 to 2: Only - Symphonic SD200E | Owner's Manual - Page 17
pressing buttons on the remote, the remote control is working. -To completely reset the player, unplug the AC cord from the AC outlet for 5-10 seconds. -Operations may not be permitted by the disc. Refer to the instructions of the disc. -Use a commonly available cleaning CD/DVD to clean the lens - Symphonic SD200E | Owner's Manual - Page 18
choose a Language that has a 3 letter language code, the code will be displayed every time you change the , replaced, defaced, missing or if service was attempted by an unauthorized service center COVER PACKING MATERIALS, ANY ACCESSORIES (EXCEPT REMOTE CONTROL), ANY COSMETIC PARTS, COMPLETE ASSEMBLY - Symphonic SD200E | Owner's Manual - Page 19
sintonizador de audio (de venta en los comercios) están en el canal correcto. DVD-V 1 POWER CD 2 OPEN/CLOSE 3 Mando a distancia Pantalla de TV PLAY 1 3 5 3 or Seleccione el idioma deseado para las indicaciones en la pantalla PLAYER MENU ENGLISH FRANÇAIS ESPAÑOL ENTER 4 Para salir del menú - Symphonic SD200E | Owner's Manual - Page 20
Guide ✄ 1 Connections If your TV has AUDIO/VIDEO input jacks, see the section "Connections" on pages 6-7. If not, see the section "Before using your DVD player" on the front page. 2 Installing the Batteries for the Remote Control channel. DVD-V 1 POWER CD 2 OPEN/CLOSE 3 Remote Control TV
-
 1
1 -
 2
2 -
 3
3 -
 4
4 -
 5
5 -
 6
6 -
 7
7 -
8
-
9
-
10
-
11
-
12
-
13
-
14
-
15
-
16
-
17
-
18
-
19
-
20
 |
 |
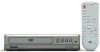
• Remote control
(NB000UD/
NB050UD) with
two AA batteries
• Audio/Video
cables
(WPZ0102TM015/
WPZ0102LTE01)
• Owner’s Manual
(1VMN20046)
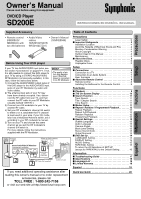
Owner’s Manual
Please read before using this equipment.
DVD/CD Player
SD200E
INSTRUCCIONES EN ESPAÑOL INCLUIDAS.
Precautions
Functions
Setup
Information
Español
Supplied Accessory
Owner's Manual
If you need additional operating assistance after
reading this owner’s manual or to order replacement
accessories, please call
TOLL FREE : 1-800-242-7158
or visit our web site at http://www.funai-corp.com
Precautions
Laser Safety
. . . . . . . . . . . . . . . . . . . . . . . . . . . . . . . . . 2
■
Important Safeguards . . . . . . . . . . . . . . . . . . . . . . . . . 3
Installation Location. . . . . . . . . . . . . . . . . . . . . . . . . . . . 4
Avoid the Hazards of Electrical Shock and Fire
. . . . . . . 4
Moisture Condensation Warning
. . . . . . . . . . . . . . . . . . 4
About Copyright. . . . . . . . . . . . . . . . . . . . . . . . . . . . . . . 4
Symbol Used in This Manual . . . . . . . . . . . . . . . . . . . . . 4
Maintenance . . . . . . . . . . . . . . . . . . . . . . . . . . . . . . . . . 4
■
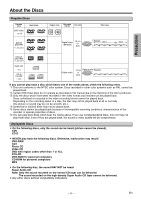
About the Discs. . . . . . . . . . . . . . . . . . . . . . . . . . . . . . 5
Playable Discs. . . . . . . . . . . . . . . . . . . . . . . . . . . . . . . . 5
Unplayable Discs. . . . . . . . . . . . . . . . . . . . . . . . . . . . . . 5
Setup
■
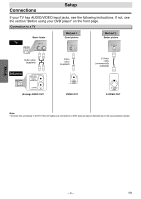
Connections
. . . . . . . . . . . . . . . . . . . . . . . . . . . . . . . . 6
Connection to a TV . . . . . . . . . . . . . . . . . . . . . . . . . . . . 6
Connection to an Audio System. . . . . . . . . . . . . . . . . . . 7
Rear Terminals
. . . . . . . . . . . . . . . . . . . . . . . . . . . . . . . 7
■
About the Remote Control
. . . . . . . . . . . . . . . . . . . . . 8
Remote Control . . . . . . . . . . . . . . . . . . . . . . . . . . . . . . . 8
Installing the Batteries for the Remote Control . . . . . . . . 8
Functions
■
Playback. . . . . . . . . . . . . . . . . . . . . . . . . . . . . . . . . . . . 9
■
The On-Screen Display . . . . . . . . . . . . . . . . . . . . . . . 10
■
Search Function
. . . . . . . . . . . . . . . . . . . . . . . . . . . . 11
Track Search . . . . . . . . . . . . . . . . . . . . . . . . . . . . . . . . 11
Title / Chapter Search . . . . . . . . . . . . . . . . . . . . . . . . . 11
Time Search . . . . . . . . . . . . . . . . . . . . . . . . . . . . . . . . 11
■
Marker Setup . . . . . . . . . . . . . . . . . . . . . . . . . . . . . . . 11
■
Repeat / Random / Programmed Playback . . . . . . . . 12
Repeat Playback . . . . . . . . . . . . . . . . . . . . . . . . . . . . . 12
Repeat A-B Playback. . . . . . . . . . . . . . . . . . . . . . . . . . 12
Random Playback . . . . . . . . . . . . . . . . . . . . . . . . . . . . 12
Programmed Playback. . . . . . . . . . . . . . . . . . . . . . . . . 12
■
Special Settings. . . . . . . . . . . . . . . . . . . . . . . . . . . . . 13
Subtitle Language . . . . . . . . . . . . . . . . . . . . . . . . . . . . 13
Audio Language
. . . . . . . . . . . . . . . . . . . . . . . . . . . . . 13
Camera Angles . . . . . . . . . . . . . . . . . . . . . . . . . . . . . . 13
Black Level Setting
. . . . . . . . . . . . . . . . . . . . . . . . . . . 13
Stereo Sound mode. . . . . . . . . . . . . . . . . . . . . . . . . . . 13
Virtual Surround
. . . . . . . . . . . . . . . . . . . . . . . . . . . . . 13
■
DVD Set Up
. . . . . . . . . . . . . . . . . . . . . . . . . . . . . . . . 14
LANGUAGE Setting. . . . . . . . . . . . . . . . . . . . . . . . . . . 14
DISPLAY Setting . . . . . . . . . . . . . . . . . . . . . . . . . . . . . 15
AUDIO Setting. . . . . . . . . . . . . . . . . . . . . . . . . . . . . . . 15
PARENTAL Setting
. . . . . . . . . . . . . . . . . . . . . . . . . . . 16
To return the All Selections of SET UP
(except for PARENTAL) to the Default Setting. . . . . . . . 16
Information
■
Troubleshooting Guide . . . . . . . . . . . . . . . . . . . . . . . 17
■
Specifications
. . . . . . . . . . . . . . . . . . . . . . . . . . . . . . 18
■
Language List
. . . . . . . . . . . . . . . . . . . . . . . . . . . . . . 18
■
Limited Warranty . . . . . . . . . . . . . . . . . . . . . . . . . . . . 18
Español
. . . . . . . . . . . . . . . . . . . . . . . . . . . . . . . . . . . .19
Quick Use Guide . . . . . . . . . . . . . . . . . . . . . . . . . . . . .20
Table of Contents
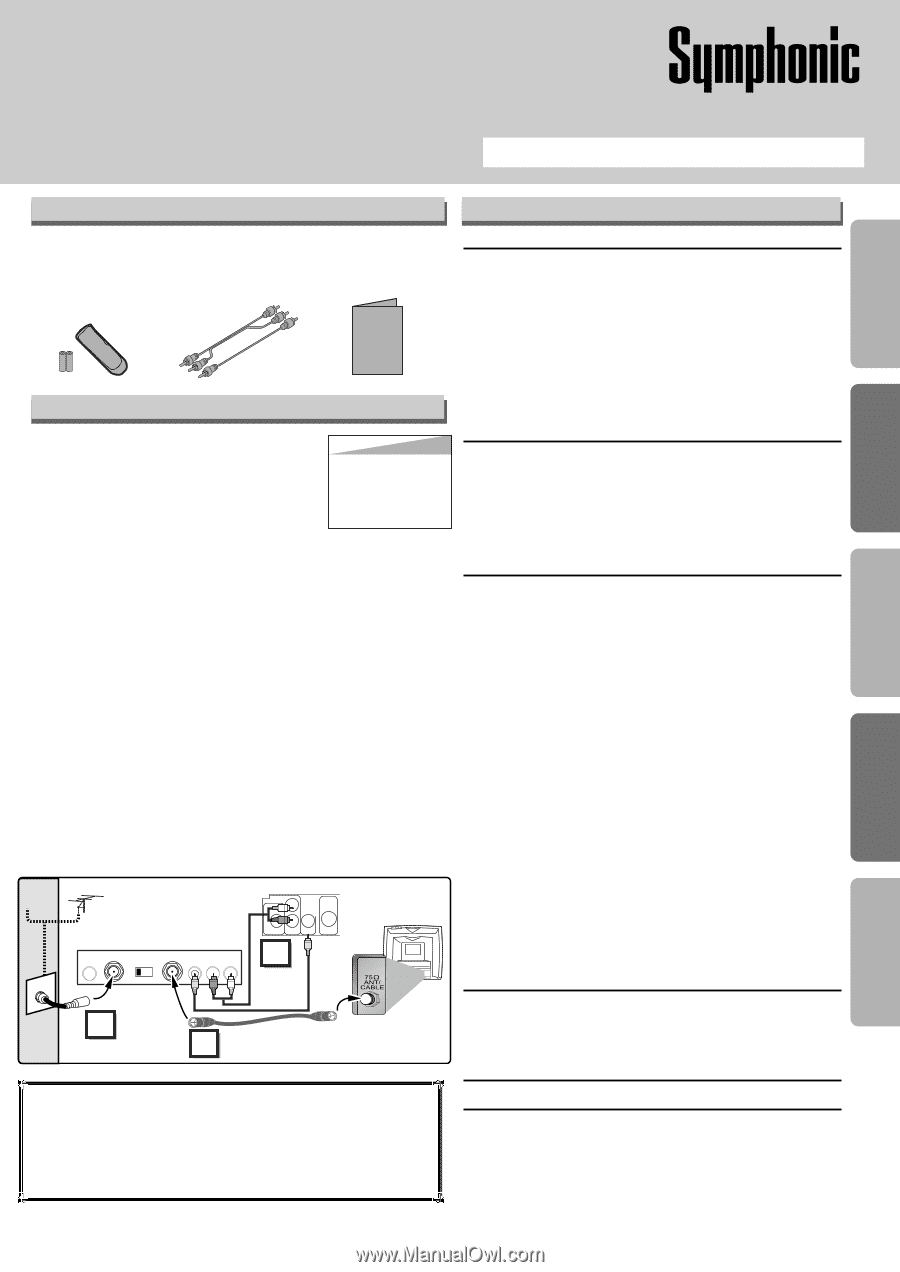
Before Using Your DVD player
If your TV has AUDIO/VIDEO input jacks, see
the section “Connections” on pages 6–7. If not,
it is still possible to connect this DVD player to
your TV by using a STEREO AUDIO/VIDEO
RF Modulator (commercially available.) In this
case, follow the instructions below.
1) Connect the AUDIO/VIDEO output jacks of
this DVD player to the AUDIO/VIDEO input
jacks of your RF Modulator by audio and
video cables.
2) The antenna input jack of your TV may
have been already occupied. If so, discon-
nect the RF cable from your TV, and then
connect the RF cable to your RF Modulator
(usually marked “ANT IN”.)
3) Connect your RF modulator to your TV by
another RF cable.
4) Set your RF modulator’s channel 3/4 switch
to either 3 or 4, whichever the TV channel
is least used in your area. If your RF modu-
lator has a Modulator/Antenna switch, set it
according to your RF modulator’s manual.
5) Turn on your TV and choose the same
channel as you set the RF modulator’s
channel 3/4 switch to.
For more details, follow the instructions
supplied with the RF Modulator.
Hint
Hint
•
The quality of pic-
ture may become
poor if this DVD
player is connected
to an RF Modulator.
TO TV
CHANNEL
VIDEO
AUDIO
R
L
3
4
ANT IN
AC 120V
AUDIO OUT
L
R
DIGITAL
AUDIO OUT
COAXIAL
VIDEO
OUT
S-VIDEO
OUT
Stereo Audio/Video RF Modulator
(commercially available)
(Back of TV)
Audio/Video
Cables
(Supplied)
(Back of DVD player)
RF Cable (Not supplied)
Antenna
Cable
Signal
3
2
1
Antenna in jack