TASCAM DM-24 Installation and Use Quick Start Guide
TASCAM DM-24 Manual
 |
View all TASCAM DM-24 manuals
Add to My Manuals
Save this manual to your list of manuals |
TASCAM DM-24 manual content summary:
- TASCAM DM-24 | Installation and Use Quick Start Guide - Page 1
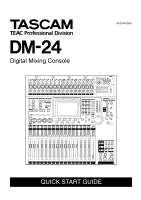
Digital Mixing Console 9101441500 QUICK START GUIDE - TASCAM DM-24 | Installation and Use Quick Start Guide - Page 2
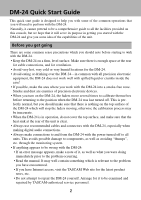
immediately prior to the problem occurring. • Read the manual. It may well contain something which is relevant to the problem you have encountered. • If you have Internet access, visit the TASCAM Web site for the latest product news, etc. • Do not attempt to repair the DM-24 yourself. Arrange for it - TASCAM DM-24 | Installation and Use Quick Start Guide - Page 3
equipment, but this should help to serve as an example. DTRS remote control Mic input TDIF I/O CR ROOM out to power amp in S/PDIF 1 out to DA-45HR in Analog OUT to 2 TR return DA-45HR word sync input from DM-24's WORD SYNC OUT Assignable sends and returns are used to connect with - TASCAM DM-24 | Installation and Use Quick Start Guide - Page 4
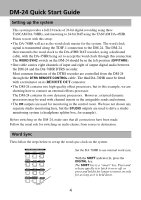
DM-24 Quick Start Guide Setting up the system This system provides a full 24 tracks of 24-bit digital recording using three TASCAM DA-78HRs, and mastering to 24-bit DAT using the TASCAM DA-45HR. Points to note with this setup: • The DA-78HR will act as the word clock master for the system. The word - TASCAM DM-24 | Installation and Use Quick Start Guide - Page 5
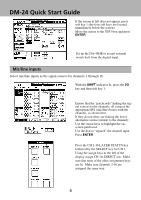
DM-24 Quick Start Guide 3 If the screen at left does not appear, press soft key 1 (the four soft keys are located immediately below the screen). Move the cursor to the TDIF1 box and press ENTER. 4 Set up the DA-45HR to accept external word clock from the digital input. Mic/ - TASCAM DM-24 | Installation and Use Quick Start Guide - Page 6
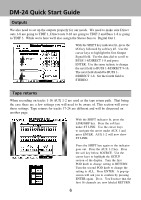
DM-24 Quick Start Guide Outputs We also need to set up the outputs properly for our needs. We need to RETURN. Turn the second POD knob to change the setting to ALL. Press ENTER. A pop up screen will ask you to confirm by pressing ENTER again. Do it. You'll notice that the first 16 channels are now - TASCAM DM-24 | Installation and Use Quick Start Guide - Page 7
DM-24 Quick Start Guide Tape returns continued 3 Press the LAYER STATUS key for CH 1-16 and press the CH 1 SELECT key. Turn SHIFT off and press the AUX 1-2 key. Use the cursor keys to select "Aux level fader control" at the top left of the screen. Press ENTER to select ON. Your Aux send levels - TASCAM DM-24 | Installation and Use Quick Start Guide - Page 8
DM-24 Quick Start Guide Tape returns continued Recording and monitoring tracks 17-24 requires different settings than tracks 1-16. change the value to 17-24 and press ENTER. You will see a pop up screen asking you to confirm your choice. Press ENTER again. Aux 1-2 for CH 17-24 are now all PRE fader - TASCAM DM-24 | Installation and Use Quick Start Guide - Page 9
DM-24 Quick Start Guide Mix Down Mode We are now ready to make the proper settings for mix down. First we must make channels 1-16 Tape Return channels. 1 With - TASCAM DM-24 | Installation and Use Quick Start Guide - Page 10
DM-24 Quick Start Guide 3 Return to the CH 17-32 IN screen by pressing the 2nd soft key. Move the monitor the signal being recorded on the DA-45HR. 1 There are three programable selection keys in the control room section. SEL 3 defaults to 2 TR IN. To change these assignments press the SHIFT key so - TASCAM DM-24 | Installation and Use Quick Start Guide - Page 11
DM-24 Quick Start Guide Channel-to-buss assignments Making buss assignments to multiple channels is easier to do LAYER STATUS keys and the SELECT keys select CH 1. To the left of your display screen are the ASSIGN keys. You can make the same buss asssignments on a per channel basis from here. 11 - TASCAM DM-24 | Installation and Use Quick Start Guide - Page 12
DM-24 Quick Start Guide Setting EQ in the modules The EQ settings on the DM-24 are made using the PODs (immediately below the screen) or the four rotary encoders to their left. 1 Press the SEL key of the channel to be edited. 2 Press the MODULE key and then soft - TASCAM DM-24 | Installation and Use Quick Start Guide - Page 13
DM-24 Quick Start Guide Snapshot recall The DM-24 allows almost all mixer settings to be stored as the SHIFT key unlatched press the LIBRARY key. Press the soft key under LIBRARY. A small pop up screen will let you choose which type of snapshot you want to recall. Choose SNAPSHOT by using the first - TASCAM DM-24 | Installation and Use Quick Start Guide - Page 14
DM-24 Quick Start Guide Controlling the DA-78HR The DM-24 allows control over the DA-78HR DTRS recorder, using the built-in transport controls the screen where the DA-78HR is listed. Move the cursor to the TRA button and press ENTER. This allows the transport controls of the DM-24 to control the DA - TASCAM DM-24 | Installation and Use Quick Start Guide - Page 15
DM-24 Quick Start Guide Mixing Snap Shot 1. All channel EQ set to ON. Hi =10.1kHz, H. SHELF TDIF-2=Direct out 9-16/Bus 1-8, TDIF-3=Direct out 1-8/Buss 1-8. 15. Aux sends should be set to fader control. 16. Aux 1-2 should be linked. 17. Aux 1-2 source should be set to Return for channels 1-16. - TASCAM DM-24 | Installation and Use Quick Start Guide - Page 16
DM-24 Quick Start Guide System Default Settings * Clock set to TDIF 1 * SETUP-Time Code, LCD screen popup, Coarse, Snapshot, OL -3dB * PREFRENCES-Select Module Return, ST Link by Select Key, Balance Level Center 0dB, Select Key Follows Fader Level, Fader Meter Follow, Cursor Follows EQ Band Key. *
-
 1
1 -
 2
2 -
 3
3 -
 4
4 -
 5
5 -
 6
6 -
 7
7 -
8
-
9
-
10
-
11
-
12
-
13
-
14
-
15
-
16
 |
 |

Digital Mixing Console
QUICK START GUIDE
9101441500