TEAC DM-3200 DM-3200 Quick Start
TEAC DM-3200 Manual
 |
View all TEAC DM-3200 manuals
Add to My Manuals
Save this manual to your list of manuals |
TEAC DM-3200 manual content summary:
- TEAC DM-3200 | DM-3200 Quick Start - Page 1
guide as a quick reference to a few of the more commonly used functions of the DM-3200. For full details of the functions described here and the full description of all functions, consult the Ownerʼs Manual. Routing inputs To route the MIC/LINE inputs, digital inputs, effect returns, etc. to channel - TEAC DM-3200 | DM-3200 Quick Start - Page 2
a card. When a project is selected in the list at the right of the screen, use the on-screen buttons under the list to load (LOAD), protect (PROTECT), rename (RENAME) or delete (DELETE) the highlighted project. ✒ See Section 2, "Basic operational concepts" of the Ownerʼs Manual. TASCAM DM-3200 Quick
-
 1
1 -
 2
2
 |
 |
TASCAM DM-3200 Quick Reference – Page 5
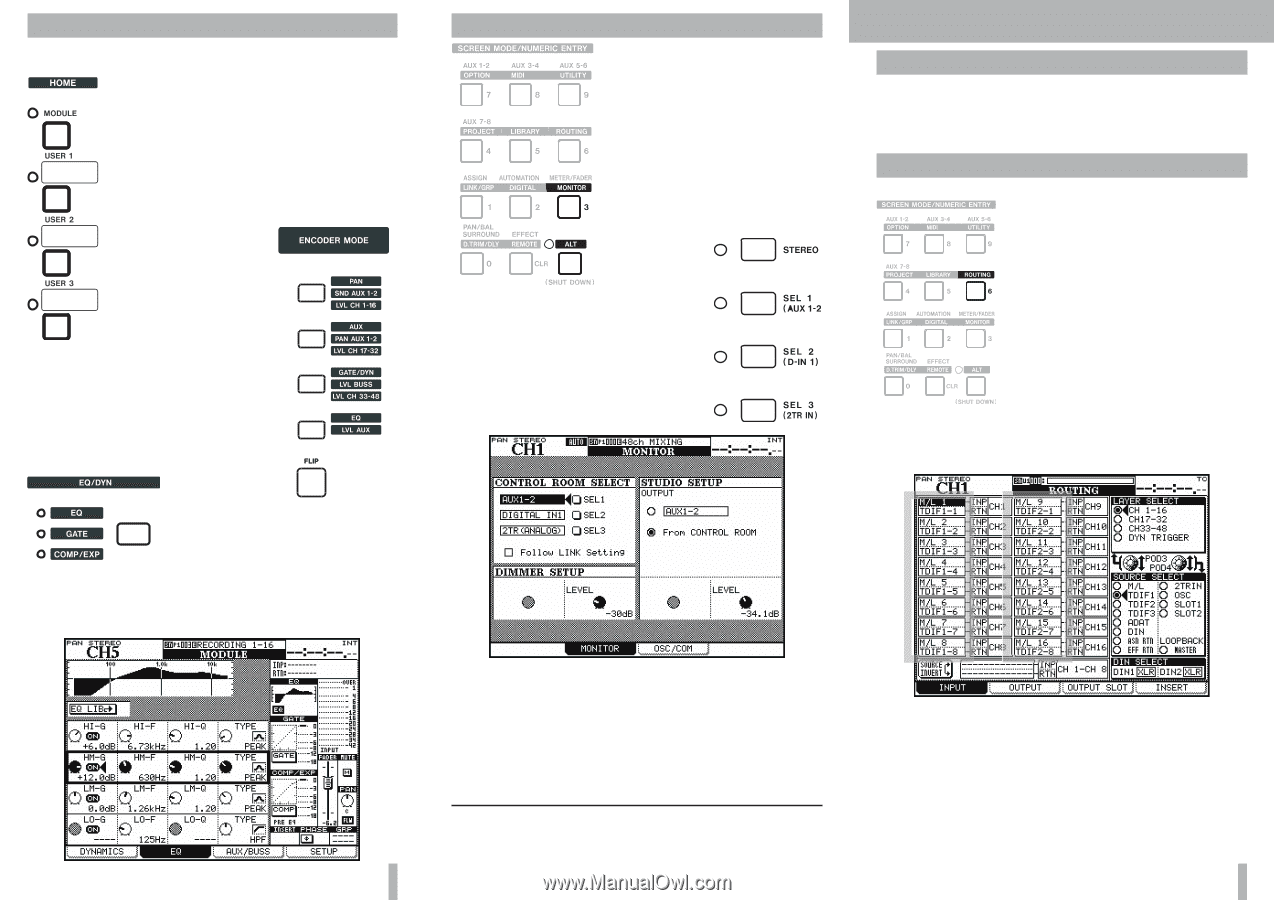
Making EQ settings
The channel modules from 1 through 32 have full 4-band
parametric EQ.
You can see the numerical values of the set-
tings, as well as a frequency response curve,
when you press the
MODULE
key, followed by
the POD 2 key under the display.
Use a channelʼs
SEL
key to select the channel
you want to edit.
Press the
EQ
encoder mode key (this is the
fourth key down in the
ENCODER
group.
The encoders above the
channel modules act as
EQ controls, allowing
the control of gain, fre-
quency, Q (width) and
the type of filter for each
of the four EQ
bands.
As you adjust these controls, the indica-
tors around the encoders light to give an
indication of the current setting, and the
display also shows the current EQ re-
sponse curve.
Use the
EQ/DYN
key to the left of
the card slot to turn EQ for the module
on (
EQ
indicator is lit) and off (
EQ
in-
dicator is unlit).
Use the cursor keys to highlight the individual band switches,
and the
ENTER
key to turn individual EQ bands on and off.
✒
See section 3, “Modules” of the
Ownerʼs Manual
.
Setting up and using monitoring
The control room outputs are +4 dBu
balanced XLR outputs, and the stu-
dio outputs are –10 dBV unbalanced
RCA jacks. The studio feed can
be separately to that of the control
room.
There are four keys allowing selec-
tion of the control room feed. The
first is hard-wired to the
STEREO
buss, but the others may be selected
using the
MONITOR
screen.
Press the
MONI-
TOR
key (with the
ALT
indicator lit)
to make the
MONITOR
screen appear (if it
does not, press the POD 2 switch).
Use the cursor keys and the wheel to select
the sources for the three assignable monitor
selection keys (from individual or paired
aux sends or busses, the digital inputs, the
analog 2-track input or the oscillator).
The studio outputs can be set to mirror the control room (
From
CONTROL ROOM
) or use pairs of busses, or aux sends, digital in-
puts or the analog 2-track inputs. Adjust the levels with the
CONTROL ROOM
controls (the talkback microphone is also there).
The
MONO,
DIM
,
TO SLATE
and
TO STUDIO
keys below the selection
keys are “smart” keys (push and release to latch, push and
hold as non-latching) and control talkback routing, etc.
TEAC CORPORATION 3-7-3 Nakacho Musashino-shi Tokyo 180-8550 JAPAN
+81-422-52-5082
www.tascam.com
TEAC AMERICA, INC 7733 Telegraph Road Montebello CA 90640 USA
+1-323-726-0303
www.tascam.com
Printed in China
TASCAM DM-3200 Quick Reference – Page 1
»
DM-3200
Quick Reference
Introduction
Use this guide as a quick reference to a few of the more com-
monly used functions of the DM-3200.
For full details of the functions described here and the full
description of all functions, consult the
Ownerʼs Manual
.
Routing inputs
To route the
MIC/LINE
inputs, digital inputs, effect returns, etc.
to channel modules, press the
ROUTING
key:
When youʼve done this, use the POD 3
encoder (under the screen) to choose the
destination channels (or dynamic trig-
gers).
Use the POD 4 encoder to choose the
source: mic/line inputs, TDIF and ADAT
digital inputs, assignable returns, and ef-
fect returns, etc. as well as any installed
option cards.
Use the cursor keys to navigate around the input slots (high-
lighted in the screen below), to the left of the destination.
Note that channels 1 through 32 have two switchable inputs:
input and return, similar to traditional analog recording mix-
ing consoles.
These can be “flipped” using the on-screen
SOURCE INVERT
but-
ton at the bottom right of the display.
✒
See section 4, “Routing and Assignment” of the
Ownerʼs
Manual
.
D00865800A