TEAC SR-L230I-B Owners Manual
TEAC SR-L230I-B Manual
 |
View all TEAC SR-L230I-B manuals
Add to My Manuals
Save this manual to your list of manuals |
TEAC SR-L230I-B manual content summary:
- TEAC SR-L230I-B | Owners Manual - Page 1
SR-L230i ENGLISH FRANÇAIS Includes adapters for: iPod nano iPod with video iPod mini iPod with Click Wheel iPod with color display Adapters sold separately: iPod with dock connector Comprend des adaptateurs pour: iPod nano iPod avec vidéo iPod mini iPod avec molette sensitive Click Wheel iPod - TEAC SR-L230I-B | Owners Manual - Page 2
the presence of important operating and maintenance (servicing) instructions in the literature accompanying the appliance. IMPORTANT SAFETY INSTRUCTIONS 1) Read these instructions. 2) Keep these instructions. 3) Heed all warnings. 4) Follow all instructions. 5) Do not use this apparatus near water - TEAC SR-L230I-B | Owners Manual - Page 3
THE ELECTRONICS. NO USER SERVICEABLE PARTS ARE WITHIN! < IF YOU ARE EXPERIENCING PROBLEMS WITH THIS PRODUCT, CONTACT TEAC FOR A SERVICE REFERRAL. DO NOT USE THE radio frequency energy and, if not installed and used in accordance with the instructions, may cause harmful interference to radio - TEAC SR-L230I-B | Owners Manual - Page 4
4 Remote Control Unit 5 Connections 6 Unit Functions 8 Display 10 Getting Started 10 Setting the Clock 12 Basic Operation 13 Listening to iPod 15 Operating iPod 16 Listening to an External Source 17 Listening to the Radio 18 Preset Tuning 19 Timer 20 Specifications 22 Troubleshooting - TEAC SR-L230I-B | Owners Manual - Page 5
operation may be impossible if there are any obstacles between the unit and the remote control unit. < If the remote control unit is operated near other products which generate infrared rays, or if other remote control devices using infrared rays are used near the unit, it may operate incorrectly - TEAC SR-L230I-B | Owners Manual - Page 6
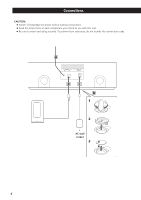
Connections CAUTION: < Switch off (standby) the power before making connections. < Read the instructions of each component you intend to use with this unit. < Be sure to insert each plug securely. To prevent hum and noise, do not bundle the connection cords. A B C D 1 2 AC wall socket 3 6 - TEAC SR-L230I-B | Owners Manual - Page 7
shock, etc. Be sure to connect the adapter to an AC outlet that supplies the correct voltage. 4. Replace the lid. Battery replacement If the clock comes to indicate the wrong time, replace the battery with a new one. Precautions concerning button-shaped battery < Be sure to insert the battery with - TEAC SR-L230I-B | Owners Manual - Page 8
on or off the timer function. D Dock connector Before use, insert an appropriate Dock adapter in the Dock (see page 10). Insert an iPod mobile digital device into this dock. E CLOCK ADJ Use this button for clock adjustment. F FM MODE In FM TUNER mode, use this button to select stereo or monaural. 8 - TEAC SR-L230I-B | Owners Manual - Page 9
these buttons to select a preset station. In iPod mode, use these buttons to scroll up and down the menu. T MEMORY/CLOCK ADJ In the TUNER mode, use this button instructions in this manual refer to the names of the buttons and controls on the front panel only. Associated controls on the remote control - TEAC SR-L230I-B | Owners Manual - Page 10
adapter "60GB (color) + Photo 40/60GB". To play your iPod through the SR-L230i, you have first to check if the factory mounted adapter fits your model of iPod. If it does not, you have to replace it with a correct one, as explained below. GF E DC A Shows the digital clock, frequency, sleep time - TEAC SR-L230I-B | Owners Manual - Page 11
is inserted correctly. Compatible iPod Software In case your iPod will not work with the SR-L230i or with the remote control unit, software update may solve the problem. Visit the Apple website and download the latest iPod Software. 1 http://www.apple.com/ipod/download/ iPod is a trademark of - TEAC SR-L230I-B | Owners Manual - Page 12
4 Press the skip button (.//) to set the current hour. / CLOCK ADJ 5 Press the CLOCK ADJ button. The "minute" value blinks. < You cannot set the clock when the source is "TUNER". 1 Press the CLOCK ADJ button to display the clock. 6 Press the skip button (.//) to set the current minute. 2 Press - TEAC SR-L230I-B | Owners Manual - Page 13
the unit on. < The unit turns on with the source that was last selected. If the iPod that is in playback mode is inserted into the Dock, the SR-L230i will automatically turn on and start playback of the iPod. 2 Press the FUNCTION button to select a source. You can change the front panel's display - TEAC SR-L230I-B | Owners Manual - Page 14
Basic Operation 2 Adjusting the bass and treble sound You can change the bass and treble sound between "-5" to "+5". Press the BASS or TREBLE button. And then press the VOLUME buttons (-/+) to adjust the sound level within 3 seconds. Sleep timer Each press of the SLEEP button permits setting an - TEAC SR-L230I-B | Owners Manual - Page 15
Listening to iPod Insert the iPod into the Dock of the SR-L230i. To select iPod mode Then push the Play/Pause button (y/J) on the iPod or the SR-L230i. The SR-L230i will automatically turn on and start playback from the iPod's music list. < Make sure to use an appropriate Dock adapter (see " - TEAC SR-L230I-B | Owners Manual - Page 16
menu MENU BC A A To suspend playback temporarily (pause mode) Press the MENU button. This button works with the same functions as its iPod counterpart. Select the menu item Press the Play/Pause button (G/J) during playback. Playback stops at the current position. To resume playback, press the - TEAC SR-L230I-B | Owners Manual - Page 17
the supplied stereo mini plug cable. 3 Play the source, and adjust the volume of both the SR-L230i and the audio player. You can use this way of connection to listen to an iPod that has no Dock connector or that has, but an appropriate Dock adapter is not available. 2 Select "AUX" using - TEAC SR-L230I-B | Owners Manual - Page 18
Listening to the Radio Checking the tuner frequency Press the DISPLAY button. The current band and the auto selection, press the skip button. Selecting stations which cannot be tuned automatically (manual selection) When the skip button (.or/) is pressed momentarily the frequency changes by a - TEAC SR-L230I-B | Owners Manual - Page 19
18). How to select a preset station 1 To select FM or AM, press the FM/AM button. FM/AM 2 Press the MEMORY button. MEMORY/ CLOCK ADJ 2 Press the PRESET (‡/°) buttons repeatedly until the desired preset station is found. PRESET/SCROLL 3 Within 10 seconds, select a preset channel to store the - TEAC SR-L230I-B | Owners Manual - Page 20
< The unit can be set two different timer setting separately. < Adjust the clock before setting the timer (see page 12). 4 Press the skip buttons (. or ALARM 2 button. Now the off time is set. "iPod" or "TUNER" blinks. 6 Select a source (iPod or TUNER) using the skip buttons (.//), and then press - TEAC SR-L230I-B | Owners Manual - Page 21
ALARM 2 button to turn the timer on. The Timer indicator ( or ) appears on the display. 2 Prepare the source. When the source is set to "iPod", insert an iPod. When the source is set to "TUNER", tune in a station. 3 Press the button to turn the unit standby. Don't forget to turn the unit - TEAC SR-L230I-B | Owners Manual - Page 22
-1151W or RC-1151B) x 1 Battery for Remote Control Unit (AAA) x 2 Battery for Memory Backup (CR2032) x 1 AM loop antenna x 1 Dock adapter x 5 (adapter "60GB (color) + Photo 40/60GB" premounted) Stereo mini plug cable x 1 AC Adapter x 1 Owner's Manual x 1 Warranty Card x 1 < Design and specifications - TEAC SR-L230I-B | Owners Manual - Page 23
obstacles between the remote control unit and the main unit. e If a strong light is near the unit, turn it off. iPod Player Cannot insert the iPod. e Check the dock adapter (see page 10). eRemove dust or obstacles from the Dock connector of the SR-L230i and the iPod, and insert the iPod again. Will - TEAC SR-L230I-B | Owners Manual - Page 24
d'un appareil TEAC. Lire ce iPod 35 Contrôle de l'iPod 36 Ecoute d'une source externe 37 Ecoute de la radio 38 Préréglage de stations 39 Réveil 40 Caractéristiques 40 Guide entré dans l'appareil, contactez votre revendeur ou un service technique. < Quand vous débranchez le cordon d' - TEAC SR-L230I-B | Owners Manual - Page 25
Boîtier de télécommande Le boîtier de télécommande fourni permet la commande à distance de l'appareil. Pour l'utilisation du boîtier de télécommande, dirigez-le vers le capteur de télécommande du panneau avant de l'appareil. < Même si le boîtier de télécommande est activé dans la zone de - TEAC SR-L230I-B | Owners Manual - Page 26
Connexions ATTENTION: < Eteignez l'appareil avant de faire des connexions. < Lisez les instructions concernant chaque élément que vous voulez employer avec cet appareil. < Veillez à bien insérer chaque fiche de connexion. Pour prévenir les ronflements et bruits, - TEAC SR-L230I-B | Owners Manual - Page 27
A Antenne FM En mode FM, réglez-vous sur la station FM et étendez le fil d'antenne pour trouver la meilleure position de réception. Cette antenne peut devoir être repositionnée si vous déplacez votre appareil. B Antenne cadre AM Branchez l'antenne cadre AM fournie à la prise AM ANTENNA. Placez l' - TEAC SR-L230I-B | Owners Manual - Page 28
dock Avant utilisation, insérez un adaptateur de dock approprié dans le dock (voir page 30). Insérez un dispositif numérique mobile iPod dans ce dock. E CLOCK ADJ (réglage de l'horloge) Utilisez ce bouton pour le réglage de l'horloge. F FM MODE En mode FM TUNER, utilisez ce bouton pour sélectionner - TEAC SR-L230I-B | Owners Manual - Page 29
préréglée. En mode iPod, utilisez ces boutons pour faire défiler le menu vers le haut ou vers le bas. T MEMORY/CLOCK ADJ En mode TUNER, utilisez page 34 pour des détails. Note: Pour simplifier les explications, les instructions de ce manuel ne se réfèrent qu'aux noms des boutons et commandes - TEAC SR-L230I-B | Owners Manual - Page 30
Affichage Pour commencer A B Le SR-L230i est fourni avec un adaptateur "60GB (color) + Photo 40/60GB" monté en usine. Pour écouter des morceaux de votre iPod sur le SR-L230i, il vous faut tout d'abord vérifier si l'adaptateur prémonté est approprié pour votre modèle d'iPod. S'il ne l'est pas, il - TEAC SR-L230I-B | Owners Manual - Page 31
du SR-L230i. Faites entrer le bord avant de l'adaptateur dans le dock puis appuyez sur le bord arrière de l'adaptateur pour l'enfoncer dans le dock jusqu'à ce qu'un léger "clic" se fasse entendre, indiquant que l'adaptateur est correctement inséré. Logiciel iPod compatible Au cas où votre iPod ne - TEAC SR-L230I-B | Owners Manual - Page 32
" ou "24 HR" clignote sur l'afficheur. Si vous désirez changer le cycle de l'horloge, appuyez sur la touche . ou /. 7 Appuyez sur la touche CLOCK ADJ. L'horloge démarre. < Si vous n'appuyez sur aucune touche dans les 8 secondes, le mode de réglage de minuterie est annulé. 3 Appuyez encore une fois - TEAC SR-L230I-B | Owners Manual - Page 33
213 1 Appuyez sur le bouton l'appareil. pour allumer < L'appareil s'allume avec la dernière source sélectionnée. Si l'iPod qui est en la mode lecture est inséré dans le Dock, le SR-L230i se mettra automatiquement sous tension et entamera la lecture de l'Pod. 2 Appuyez sur le bouton FUNCTION pour - TEAC SR-L230I-B | Owners Manual - Page 34
Fonctionnement de base 2 Réglage du son des basses et des aigus Vous pouvez modifier le son des basses et des aigus entre "-5" et "+5". Appuyez sur le bouton BASS ou TREBLE. Appuyez ensuite sur les boutons VOLUME (-/+) pour régler le niveau sonore dans les 5 secondes. Minuterie d'arrêt différé À - TEAC SR-L230I-B | Owners Manual - Page 35
Ecoute de l'iPod Insérez l'iPod dans le dock du SR-L230i. Sélectionner le mode iPod Ensuite appuyez sur le bouton Lecture/Pause (y/J) de l'iPod ou du SR-L230i. Le SR-L230i se mettra automatiquement sous tension et entamera la lecture des morceaux dans la liste de l'iPod. < Veillez à employer l' - TEAC SR-L230I-B | Owners Manual - Page 36
au menu précédent MENU BC A A Suspendre temporairement la lecture (mode pause). Appuyez sur le bouton MENU. Ce bouton a les même fonctions que celui de l'iPod. Select the menu item Appuyez sur le bouton Lecture/Pause (G/J) durant la lecture. La lecture s'arrête sur la position actuelle. Pour la - TEAC SR-L230I-B | Owners Manual - Page 37
ble à mini-fiche stéréo fourni. 3 Mettez la source en lecture et réglez le volume sonore de l'SR-L230i et du lecteur audio. Vous pouvez employer cette méthode de connexion pour écouter un iPod sans connecteur pour dock ou dont l'adaptateur pour dock n'est pas disponible. 2 Sélectionnez "AUX" avec - TEAC SR-L230I-B | Owners Manual - Page 38
Ecoute de la radio Vérification de la fréquence du syntoniseur Appuyez sur le bouton DISPLAY. La bande et la fréquence actuelle s'affichent pendant 20 secondes. 1 32 1 Sélectionnez " - TEAC SR-L230I-B | Owners Manual - Page 39
des stations préréglées 1 Pour sélectionner FM ou AM, appuyez sur le bouton FM/AM. FM/AM 2 Appuyez sur le bouton MEMORY. MEMORY/ CLOCK ADJ 2 Appuyez répétitivement sur les boutons PRESET (‡/°) jusqu'à obtention de la station préréglée (preset) voulue. PRESET/SCROLL 3 Dans les 10 secondes - TEAC SR-L230I-B | Owners Manual - Page 40
pour régler les minutes, puis appuyez sur le bouton ALARM 1 ou ALARM 2. L'heure de désactivation est maintenant réglée. "iPod" ou "TUNER" clignote. 6 Sélectionnez une source (iPod ou TUNER) avec les boutons skip (.//), puis appuyez sur le bouton ALARM 1 ou ALARM 2. < Vous ne pouvez pas sélectionner - TEAC SR-L230I-B | Owners Manual - Page 41
le réveil, le volume de lecture monte progressivement jusqu'au niveau de volume que vous avez réglé. < Si la source est réglée sur "iPod" alors qu'il n'y a pas d'iPod, l'appareil passe en mode TUNER. < Si la source est réglée sur "TUNER", à l'allumage de l'appareil, ce dernier se place sur la derni - TEAC SR-L230I-B | Owners Manual - Page 42
commande (AAA) x 2 Antenne cadre AM x 1 Pile pour copie de sauvegarde de la mémoire (CR2032) x 1 Adaptateur pour dock x 5 (adaptateur "60GB (color) + Photo 40/60GB" prémonté) Câble stéréo à mini-connecteur x 1 Adaptateur CA x 1 Manuel du propriétaire x 1 Carte de garantie x 1 < La conception et les - TEAC SR-L230I-B | Owners Manual - Page 43
TEAC. Généralités Pas d'alimentation. e Vérifiez la connexion au secteur. Contrôlez et assurez-vous que la prise secteur n'a pas d'interrupteur ou, si elle en a un, qu'elle est en service de dock du SR-L230i et de l'iPod, et réinsérez l'iPod. Pas de lecture. eRetirez l'iPod du dock, attendez - TEAC SR-L230I-B | Owners Manual - Page 44
de un TEAC. Lea detenidamente este manual a fin de obtener el mejor rendimiento de esta unidad. Antes de utilizar la unidad 44 Mando a distancia 45 Conexiones 46 Funciones 48 Pantalla 50 Primeros pasos 50 Ajuste del reloj 52 Funcionamiento básico 53 Escucha de iPod 55 Control del iPod 56 - TEAC SR-L230I-B | Owners Manual - Page 45
el mando a distancia. < Si se utiliza la unidad cerca de otros aparatos que generen rayos infrarrojos o si se emplean otros aparatos de control remoto por rayos infrarrojos cerca del reproductor, es posible que éste no funcione correctamente. Del mismo modo, es posible que los otros aparatos tampoco - TEAC SR-L230I-B | Owners Manual - Page 46
Conexiones PRECAUCIÓN: < Apague la unidad antes de realizar las conexiones. < Lea las instrucciones de cada uno de los componentes que tiene intención de usar con esta unidad. < Inserte correctamente los conectores. Para evitar zumbidos y ruidos, no tienda los cables de conexión en el mismo mazo. A - TEAC SR-L230I-B | Owners Manual - Page 47
A Antena de FM En el modo FM, sintonice una emisora de frecuencia modulada y despliegue el cable hasta lograr la mejor recepción. La antena quizá deba reorientarse si cambia la unidad de emplazamiento. B Antena de cuadro de AM Conecte la antena de cuadro de AM suministrada al terminal AM ANTENNA. - TEAC SR-L230I-B | Owners Manual - Page 48
. D Conector para base (Dock) Antes de usarlo, instale un adaptador apropiado en la base (véase página 50). Inserte un dispositivo digital portátil iPod en esta base. E CLOCK ADJ Use este botón para el ajuste del reloj. F FM MODE En el modo FM TUNER, use este botón para seleccionar entre los modos - TEAC SR-L230I-B | Owners Manual - Page 49
use estos botones para seleccionar una presintonía. En modo iPod, use estos botones para desplazarse por el menú. T MEMORY/CLOCK ADJ En el modo TUNER, use este botón del manual se refieren únicamente a los nombres de los botones y controles del panel frontal. Los botones y controles correspondientes - TEAC SR-L230I-B | Owners Manual - Page 50
Pantalla Primeros pasos A B El SR-L230i es suministrado con un adaptador "60GB (color) + Photo 40/60GB" premontado. Para escuchar el iPod en el SR-L230i, usted primero tiene que comprobar si el adaptador premontado es apropiado por su modelo de iPod. Si esto no lo es, tiene que sustituirlo por - TEAC SR-L230I-B | Owners Manual - Page 51
el borde posterior hasta que oiga un ligero clic, que indicará que el adaptador está correctamente insertado. 1 2 Software de iPod compatible Si el iPod no funciona con el SR-L230i o con el mando a distancia, una actualización de software puede resolver el problema. Visite el sitio web de Apple - TEAC SR-L230I-B | Owners Manual - Page 52
el valor de "minuto". < No podrá ajustar la hora mientras la fuente sea "TUNER". 1 Pulse el botón CLOCK ADJ para mostrar el reloj. 6 Pulse el botón skip (. o /) para ajustar el minuto actual. 2 Pulse el botón CLOCK ADJ. Parpadea "12 HR" o "24 HR". Si desea cambiar el modo de hora, pulse el bot - TEAC SR-L230I-B | Owners Manual - Page 53
. < La unidad se enciende con la última fuente de sonido seleccionada. Si el iPod que está en la reproducción es insertado en la bas, el SR-L230i se apagará automáticamente y comenzará a reproducir del iPod. 2 Pulse el botón FUNCTION button para seleccionar una fuente. Puede cambiar el brillo - TEAC SR-L230I-B | Owners Manual - Page 54
Funcionamiento básico 2 Ajuste de graves (bass) y agudos (treble) Puede cambiar los sonidos graves y agudos en un escala de "-5" a "+5". Pulse los botones BASS (grave) o TREBLE (agudo) Y ahora pulse los botones de VOLUME (-/+) para ajustar el nivel de sonido en 5 segundos. Temporizador Al pulsar - TEAC SR-L230I-B | Owners Manual - Page 55
Escucha de iPod Inserte el iPod en la base del SR-L230i. Selección del modo iPod Despues pulse el botón de reproducción/pausa (y/J) del iPod o del SR-L230i. El SR-L230i se apagará automáticamente y comenzará a reproducir la lista de canciones del iPod. < Asegúrese de usar un adaptador apropiado - TEAC SR-L230I-B | Owners Manual - Page 56
Control del iPod Para retroceder al menú anterior MENU BC A A Para interrumpir momentáneamente la reproducción (pausa). Pulse el botón MENU. Este botón tiene las mismas funciones que el mismo botón del iPod. Para elegir una opción de menú Pulse el botón de reproducción/pausa (G/J) durante la - TEAC SR-L230I-B | Owners Manual - Page 57
el jack PHONES (salida de audio) de un reproductor de audio portátil a la entrada AUX IN del SR-L230i utilizando el cable con miniconector estéreo suministrado. 3 Reproduce la fuente sonora y ajuste el volumen tanto del iPod como del reproductor de audio. Puede usar este método de conexión si el - TEAC SR-L230I-B | Owners Manual - Page 58
Escucha de la radio Compruebe la frecuencia del sintonizador Pulse el botón DISPLAY. La banda y la automáticamente. < Para detener la selección automática, pulse el botón salto. Selección manual de emisoras que no se pueden sintonizar automáticamente Si pulsa momentáneamente el botón de salto - TEAC SR-L230I-B | Owners Manual - Page 59
gina 58). Cómo seleccionar presintonías 1 Pulse el botón FM/AM para seleccionar FM o AM FM/AM 2 Pulse el botón MEMORY. MEMORY/ CLOCK ADJ 2 Pulse les botónes PRESET (‡/°) repetidas veces hasta localizar la presintonía deseada. PRESET/SCROLL 3 Antes de 10 segundos, seleccione con PRESET (‡/°) un - TEAC SR-L230I-B | Owners Manual - Page 60
la hora y, a continuación, pulse los botones ALARM 1 o ALARM 2. La hora de desactivación ha sido ajustada. Parpadean "iPod" o "TUNER". 6 Seleccione una fuente de sonido (iPod o TUNER) con los botones de salto (.//), y a continuación pulse ALARM 1 o ALARM 2. < No se puede seleccionar "AUX". 60 - TEAC SR-L230I-B | Owners Manual - Page 61
TIMER ON se ilumina, y en la pantalla aparece el indicador del temporizador ( or ). 2 Prepare la fuente de sonido. Si la fuente seleccionada es "iPod", inserte un iPod en la unidad. Si la fuente seleccionada es "TUNER", sintonice una emisora. 3 Pulse el el botón para modo de espera. No olvide para - TEAC SR-L230I-B | Owners Manual - Page 62
) x 1 Batería para control remoto (AAA) x 2 Batería para la copia de seguridad de la memoria (CR2032) x 1 Antena de cuadro de AM x 1 Adaptador para la base x 5 (adaptador "60GB (color) + Photo 40/60GB" premontado) Cable estéreo con tapón mini x 1 Adaptador de c.a. x 1 Manual del usuario x 1 Póliza - TEAC SR-L230I-B | Owners Manual - Page 63
distribuidor o al centro de asistencia técnica de TEAC. General No hay corriente e Revise la conexi gina 45). e Utilice el mando a distancia dentro del radio de acción (5 m), y apunte al sensor remoto del del SR-L230i y el iPod, e insértelo de nuevo. No se inicia la reproducción. e Retire el iPod de - TEAC SR-L230I-B | Owners Manual - Page 64
-8550, Japan Phone: (0422) 52-5081 TEAC AMERICA, INC. TEAC CANADA LTD. TEAC MEXICO, S.A. De C.V TEAC UK LIMITED TEAC EUROPE GmbH 7733 Telegraph Road, Montebello, California 90640 number located on the rear panel. Please record the model number and serial number and retain them for your records
-
 1
1 -
 2
2 -
 3
3 -
 4
4 -
 5
5 -
 6
6 -
 7
7 -
8
-
9
-
10
-
11
-
12
-
13
-
14
-
15
-
16
-
17
-
18
-
19
-
20
-
21
-
22
-
23
-
24
-
25
-
26
-
27
-
28
-
29
-
30
-
31
-
32
-
33
-
34
-
35
-
36
-
37
-
38
-
39
-
40
-
41
-
42
-
43
-
44
-
45
-
46
-
47
-
48
-
49
-
50
-
51
-
52
-
53
-
54
-
55
-
56
-
57
-
58
-
59
-
60
-
61
-
62
-
63
-
64
 |
 |

046-R230i010
SR-L230i
Hi-Fi Table Radio
OWNER’S MANUAL
MANUEL DU PROPRIÉTAIRE
MANUAL DEL USUARIO
Z
Includes adapters for:
iPod nano
iPod with video
iPod mini
iPod with Click Wheel
iPod with color display
Adapters sold separately:
iPod with dock connector
Comprend des adaptateurs pour:
iPod nano
iPod avec vidéo
iPod mini
iPod avec molette sensitive Click Wheel
iPod avec écran couleur
Adaptateurs vendus séparément:
iPod avec connecteur pour dock
Incluye adaptadores para:
iPod nano
iPod con vídeo
iPod mini
iPod con rueda de clic
iPod con pantalla en color
Adaptadores no incluidos:
iPod con conector para base
ENGLISH
FRANÇAIS
ESPAÑOL