TP-Link AP200 AP200EU V1 Quick Install Guide
TP-Link AP200 Manual
 |
View all TP-Link AP200 manuals
Add to My Manuals
Save this manual to your list of manuals |
TP-Link AP200 manual content summary:
- TP-Link AP200 | AP200EU V1 Quick Install Guide - Page 1
VLANs. Multi-SSID Mode 7106505931 REV1.0.0 Configure the AP Device AP Mode (Default)The AP device transforms your wired network into wireless. Internet AP200 and Password. 4. Click Quick Setup, then select Access Point mode and click Next. Follow the step-by-step on-screen instructions to - TP-Link AP200 | AP200EU V1 Quick Install Guide - Page 2
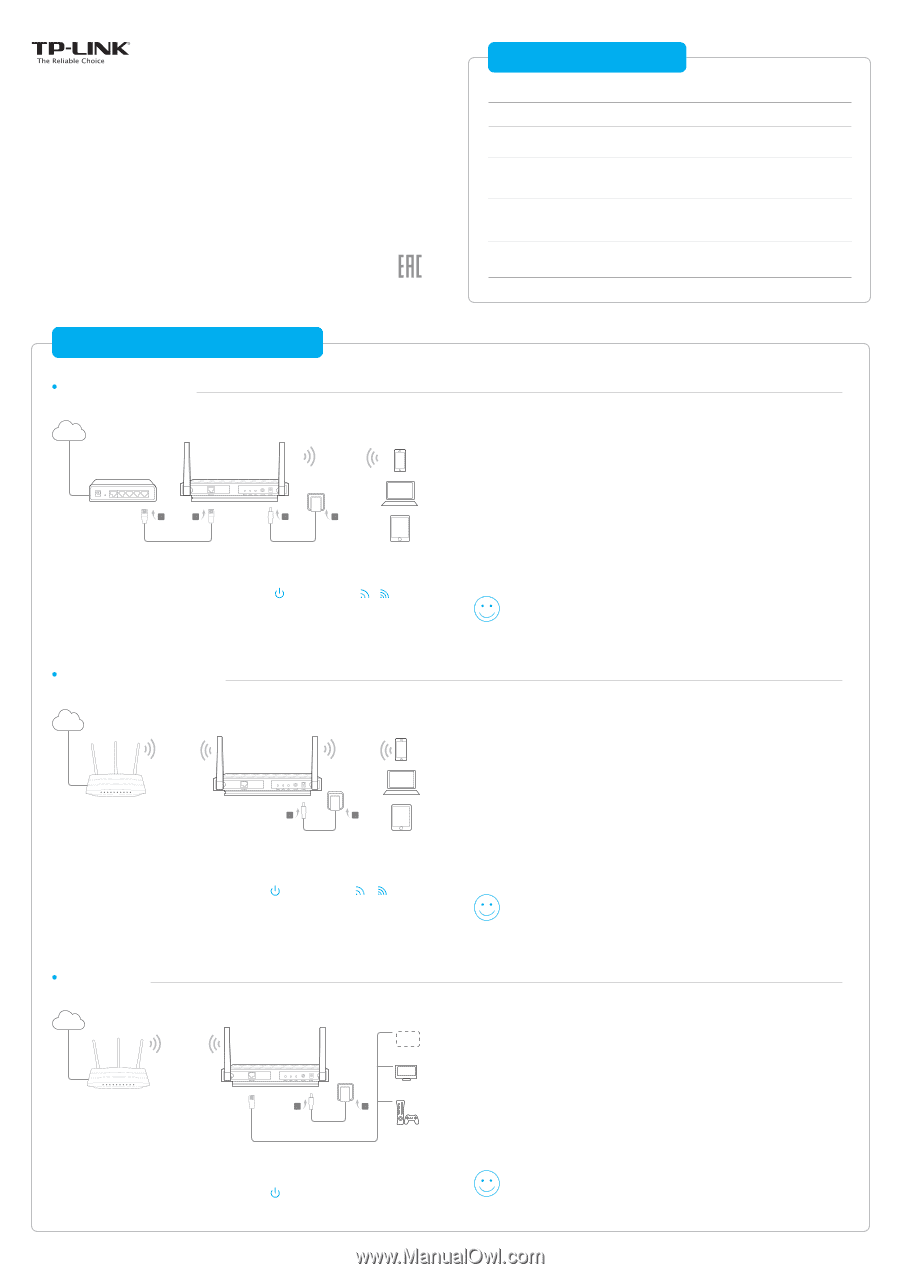
to provide VLAN groups. Internet Wired Router B A AP200's SSID C D VLAN 1 VLAN 2 1. Connect the AP device according to steps A to D in the diagram. 2. Turn on the power and wait until the Power ( ) and Wireless ( & ) LEDs are lit and stable, use the default SSID and Password printed on
-
 1
1 -
 2
2
 |
 |
7106505931
REV1.0.0
Wired Router
A
B
C
D
Internet
AP200’s SSID
Internet
Host AP
Host AP’s SSID
A
B
AP200’s SSID
Host AP’s SSID
or
or
Other
Device
TV
Host AP
Internet
A
B
AP200
11AC Wireless Gigabit Access Point
Quick
Installation Guide
Before your start
Now, connect your wired-only device to the AP device using an Ethernet cable.
5.
Click
Quick Setup
, then select
Client
mode and click
Next
. Follow the
step-by-step on-screen instructions to complete the configuration.
Client Mode
The AP device functions as a wireless adapter to connect the wired device (e.g. Xbox/TV) to a wireless network.
AP Mode (Default)
The AP device transforms your wired network into wireless.
Repeater/Bridge Mode
The AP device extends the range of an existing Wi-Fi network.
Configure the AP Device
3.
Launch a web browser and enter
http://tplinkap.net
, then log in using
admin
(all lowercase) for both Username and Password.
Note:
You can enjoy the Internet surfing now. For your wireless network security, it is recommended to change the
default SSID (network name) and the password of your Wi-Fi network. To do so, perform the following steps.
1.
Connect the AP device according to steps
A
and
B
in the diagram.
2.
Turn on the power and wait until the Power (
) and Wireless (
&
) LEDs
are lit and stable, use the default SSID and Password printed on the product
label to join the AP device’s Wi-Fi network.
1.
Connect the device according to the steps
A
and
B
in the diagram.
2.
Turn on the power and wait until the Power (
) LED is lit and stable.
Now, connect your wireless devices to the Wi-Fi network using the AP device’s
SSID and password.
5.
Relocate the AP device to a good place. For details, you can refer to Q5 in
Frequently Asked Questions (FAQ).
Enjoy!
Enjoy!
Enjoy!
Now, reconnect your wireless devices to the new Wi-Fi network.
4.
Click
Quick Setup
, then select
Access Point
mode and click
Next
. Follow the
step-by-step on-screen instructions to complete the configuration.
Operating Modes
AP Mode (Default Mode)
Repeater/Bridge Mode
Client Mode
Scenarios
You are in a Wi-Fi dead-zone or a place with weak wireless
signal. You want to have a greater effective range of the
wireless signal throughout your home or office.
You want to convert your wired (Ethernet) network to a
wireless network.
You have a wired device with an Ethernet port and no wireless
capability, for example, a Smart TV, Media Player, or game
console. You want to connect it to the Internet wirelessly.
Which mode do you need? Please refer to the table to choose a proper mode.
You want your devices connected to different wireless
networks and isolated by VLANs.
Multi-SSID Mode
3.
Launch a web browser and enter
http://tplinkap.net
, then log in using
admin
(all lowercase) for both Username and Password.
3.
Connect your computer or smart device to the AP device via a wired or
wireless connection. The default SSID and wireless password are printed on
the product label.
1.
Connect the AP device according to steps
A to D
in the diagram.
2.
Turn on the power and wait until the Power (
) and Wireless (
&
) LEDs
are lit and stable, use the default SSID and Password printed on the product
label to join the AP device’s Wi-Fi network.
4.
Click
Quick Setup
, then select
Repeater/Bridge
mode and click
Next
. Follow
the step-by-step on-screen instructions to complete the configuration.
4.
Launch a web browser and enter
http://tplinkap.net
, then log in using
admin
(all lowercase) for both Username and Password
.