TP-Link T1600G-52PS Jetstream Smart Switch Installation Guide
TP-Link T1600G-52PS Manual
 |
View all TP-Link T1600G-52PS manuals
Add to My Manuals
Save this manual to your list of manuals |
TP-Link T1600G-52PS manual content summary:
- TP-Link T1600G-52PS | Jetstream Smart Switch Installation Guide - Page 1
Business Networking Solution Installation Guide Jetstream Smart Switch - TP-Link T1600G-52PS | Jetstream Smart Switch Installation Guide - Page 2
Appendix A Troubleshooting Appendix B Hardware Specifications Audience This Installation Guide is for: Network Engineer Network Administrator Conventions • Some models featured in this guide may be unavailable in your country or region. For local sales information, visit https://www.tp-link.com - TP-Link T1600G-52PS | Jetstream Smart Switch Installation Guide - Page 3
Port 12 3.2 SFP/SFP+ Port 12 3.3 Verify Installation 12 3.4 Power On 12 3.5 Initialization 13 Chapter 4 Configuration----------- 14 4.1 Configuration Overview 14 4.2 Standalone Mode 14 4.3 Controller Mode 15 Appendix A Troubleshooting--------- 18 Appendix B Specifications---------- 19 - TP-Link T1600G-52PS | Jetstream Smart Switch Installation Guide - Page 4
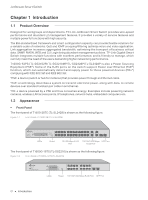
workgroups and departments, TP-Link JetStream Smart Switch provides wire-speed performance and abundant L2 management features. It provides a variety of service features and multiple powerful functions with high security. The EIA-standardized framework and smart configuration capacity can provide - TP-Link T1600G-52PS | Jetstream Smart Switch Installation Guide - Page 5
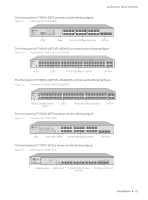
1-3 Front Panel of T1600G-28TS JetStream Smart Switch LEDs Reset 10/100/1000 Mbps RJ45 Port SFP Port The front panel of T1600G-52TS (TL-SG2452) is shown as the following figure. Figure 1-4 Front Panel of T1600G-52TS (TL-SG2452) T1600G-52TS Smart Switch PWR SYS Reset Reset LEDs 10/100 - TP-Link T1600G-52PS | Jetstream Smart Switch Installation Guide - Page 6
SFP Port LEDs LED Mode Reset 10/100 Mbps RJ45 10/100/1000 Mbps SFP Port Switch Button Port and PoE Port RJ45 Port LEDs For T1500-28TC ( TL-SL2428)/ T1600G-18TS ( TL-SG2216)/ T1600G-28TS/ T1600G-52TS (TG-SG2452)/T1700G-28TQ/T1700X-16TS LED PWR SYS 10/100M Link/Act Indication On: The switch - TP-Link T1600G-52PS | Jetstream Smart Switch Installation Guide - Page 7
is transmitting or receiving data. Off: No device is linked to the corresponding port. Note: 1000Base-X for port 25-28 of T1600G-28TS. 100Base-FX/1000Base-X for port 49-52 of T1600G-52TS (TL-SG2452). Port 49-52 of T1600G-52TS (TL-SG2452) doesn't support 10 Mbps devices. Green On: Running at 10 Gbps - TP-Link T1600G-52PS | Jetstream Smart Switch Installation Guide - Page 8
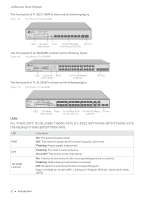
data transmission rate. When the PoE LED is on, the port LED is indicating the power supply status. By default the Speed LED is on. Pressing device is linked to the corresponding port. Note: 1000M for TL-SL2428P. Speed or PoE for TL-SG2210MP, port 1-24 of TLSG2428P and port 1-48 of T1600G-52PS (TL - TP-Link T1600G-52PS | Jetstream Smart Switch Installation Guide - Page 9
-FX and 1000Base-X ports don't support 10 Mbps device. LED Mode Switch Button Press this button to switch the LED status indication between Speed and PoE. Reset With the switch powered on, press Reset button for 5 seconds to reset the switch to its factory default settings. Unit ID LED Designed - TP-Link T1600G-52PS | Jetstream Smart Switch Installation Guide - Page 10
Panel The rear panel is shown as the following figure. Here we take T1600G-28TS as an example. Figure 1-11 Rear Panel Kensington Security slot Grounding Terminal Support web page, refer to the Lightning Protection Guide from the Related Documents: https://www.tp-link.com/us/configuration-guides - TP-Link T1600G-52PS | Jetstream Smart Switch Installation Guide - Page 11
of the listed items is damaged or missing, please contact your distributor. One Switch One Power Cord Installation Guide Business Networking Solution Installation Guide Two mounting brackets, eight screws and four rubber feet 2.2 Safety Precautions To avoid any device damage and bodily injury - TP-Link T1600G-52PS | Jetstream Smart Switch Installation Guide - Page 12
or too little humidity may lead to bad insulation, leakage of electricity, mechanical property changes, and corrosion. High temperatures may accelerate aging of the insulation materials, significantly shortening the service life of the device. To find out the best temperature and humidity conditions - TP-Link T1600G-52PS | Jetstream Smart Switch Installation Guide - Page 13
, search the model number of your switch and go to the product Support web page, refer to the Lightning Protection Guide from the Related Documents: https://www.tp-link.com/us/configuration-guides/lightning_protection_guide/. Installation Site When installing the device on a rack or a flat workbench - TP-Link T1600G-52PS | Jetstream Smart Switch Installation Guide - Page 14
Installation Feet Bottom of the Device Notch ■■ Rack Installation To install the device in an EIA standard-sized, 19-inch rack, follow the instructions described below: 1. Check the efficiency of the grounding system and the stability of the rack. 2. Secure the supplied rack-mounting brackets to - TP-Link T1600G-52PS | Jetstream Smart Switch Installation Guide - Page 15
JetStream Smart Switch Chapter 3 Connection 3.1 Ethernet Port Connect an Ethernet port of the switch to the computer by RJ45 cable as the following figure shows. Figure 3-1 Connecting the RJ45 Port RJ45 Port RJ45 Cable 3.2 SFP/SFP+ Port The following figure demonstrates the connection of - TP-Link T1600G-52PS | Jetstream Smart Switch Installation Guide - Page 16
JetStream Smart Switch Figure 3-3 Connecting to Power Supply Note: The figure is to illustrate the application and principle. The provided plug and the socket in your region may differ from the figures above. 3.5 Initialization After the device is powered on, it begins the Power-On Self-Test. A - TP-Link T1600G-52PS | Jetstream Smart Switch Installation Guide - Page 17
on the top side and left side to configure the corresponding functions. For the detailed configurations, refer to the User Guide and CLI Guide. The guides can be found on the download center of our official website: https://www.tp-link.com/support/download/. ■■ Using the CLI ■■ Set up a Telnet or - TP-Link T1600G-52PS | Jetstream Smart Switch Installation Guide - Page 18
configurations, refer to the User Guide and CLI Guide. The guides can be found on the download center of our official website: https://www.tp-link.com/download-center.html Note: For certain devices, you may need to change obtains IP address from the DHCP server. You can check the switch's IP address - TP-Link T1600G-52PS | Jetstream Smart Switch Installation Guide - Page 19
Omada Cloud Service. Follow the steps below. 1. Enable Cloud Access on the setting page on the controller and bind a TP-Link ID to your controller. If you have configured this in the setup wizard, skip the step. 2. Launch a web browser and enter https://omada.tplinkcloud.com in the address bar - TP-Link T1600G-52PS | Jetstream Smart Switch Installation Guide - Page 20
the Omada app, you can also manage your controller at a local site or a remote site via your mobile device. For the detailed configurations, refer to the User Guide of the controller. The guide can be found on the download center of our official website: https://www.tp-link.com/support/download/. 17 - TP-Link T1600G-52PS | Jetstream Smart Switch Installation Guide - Page 21
is set within the subnet of the switch. 5. If you still cannot access the configuration page, please reset the switch to its factory defaults. Then the IP address of your PC should be set as 192.168.0.x ("x" is any number from 2 to 254) and subnet mask as 255.255.255.0. Appendix A Troubleshooting 18 - TP-Link T1600G-52PS | Jetstream Smart Switch Installation Guide - Page 22
-28TC: Power, System, 10/100M, 1000M TL-SL2428P: PWR, SYS, PoE MAX, FAN, 10/100M or PoE, 1000M, 10/100M, PoE TL-SG2210MP: PWR, SYS, PoE MAX, FAN, Speed or PoE, SFP1, SFP2, PoE, Speed T1600G-18TS: PWR, SYS, 1000Mbps, Link/Act T1600G-25TS/ T1600G-52TS: PWR, SYS, 10/100/1000Mbps,100BaseTX/1000Base-X TL - TP-Link T1600G-52PS | Jetstream Smart Switch Installation Guide - Page 23
required to take adequate measures. EU declaration of conformity TP-Link hereby declares that the device is in compliance with the )2015/863. The original EU declaration of conformity may be found at https://www.tp-link.com/en/ce. Safety Information • Keep the device away from water, fire, - TP-Link T1600G-52PS | Jetstream Smart Switch Installation Guide - Page 24
To ask questions, find answers, and communicate with TP-Link users or engineers, please visit https://community.tp-link.com to join TP-Link Community. For technical support, the user guide and other information, please visit https://www.tp-link.com/support, or simply scan the QR code. If you have
-
 1
1 -
 2
2 -
 3
3 -
 4
4 -
 5
5 -
 6
6 -
 7
7 -
8
-
9
-
10
-
11
-
12
-
13
-
14
-
15
-
16
-
17
-
18
-
19
-
20
-
21
-
22
-
23
-
24
 |
 |

Business Networking Solution
Installation Guide
Jetstream Smart Switch