TP-Link TD-W8101G Quick Installation Guide
TP-Link TD-W8101G Manual
 |
UPC - 845973060251
View all TP-Link TD-W8101G manuals
Add to My Manuals
Save this manual to your list of manuals |
TP-Link TD-W8101G manual content summary:
- TP-Link TD-W8101G | Quick Installation Guide - Page 1
network connections to configure the Router. Power down all of your network devices, including your computer(s) and the Modem Router. If you currently use a modem, disconnect it now - the Modem Router will replace your current modem. Connect your computer to the LAN port on the Modem Router with an - TP-Link TD-W8101G | Quick Installation Guide - Page 2
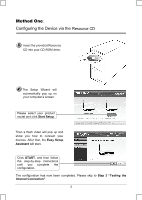
the Router display normally as the diagram below describes. Solid light Solid light or flashing Solid light or flashing Solid light if the LAN port is To configure the device, you can either run the setup CD-ROM (method one), or run the Web based Quick Setup Wizard (method two). TP-LINK strongly - TP-Link TD-W8101G | Quick Installation Guide - Page 3
and show you how to connect your devices. After that, the Easy Setup Assistant will start. Click START, and then follow the step-by-step instructions until you complete the configuration. The configuration has now been completed. Please skip to Step 3 "Testing the Internet Connection". 3 - TP-Link TD-W8101G | Quick Installation Guide - Page 4
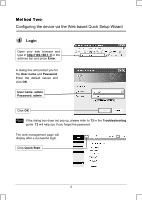
box will prompt you for the User name and Password. Enter the default values and click OK. User name: admin Password: admin Click OK Note If the dialog box does not pop up, please refer to T3 in the Troubleshooting guide. T2 will help you if you forget the password. The web management page will - TP-Link TD-W8101G | Quick Installation Guide - Page 5
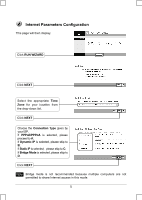
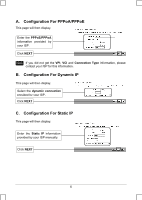
Internet Parameters Configuration This page will then display. Click RUN WIZARD Click skip to B; If Static IP is selectedLjplease skip to C; If Bridge Mode is selected, please skip to D. Click NEXT Note Bridge mode is not recommended because multiple computers are not permitted to share Internet - TP-Link TD-W8101G | Quick Installation Guide - Page 6
by your ISP. Click NEXT Note If you did not get the VPI, VCI and Connection Type information, please contact your ISP for this information. B. Configuration For Dynamic IP This page will then display. Select the dynamic connection provided by your ISP. Click NEXT - TP-Link TD-W8101G | Quick Installation Guide - Page 7
For Bridge Mode This page will then display. Enter the Bridge information provided by your ISP. Click NEXT After completing the above configuration, please proceed to Configuration. Wireless Settings Wireless Settings Configuration This page will then display. Keep the default setting: Activated - TP-Link TD-W8101G | Quick Installation Guide - Page 8
Click CLOSE Now, your Modem Router has been configured and is rebooting. Please do not turn off the Modem Router while it's rebooting. The basic settings for your Router are completed. Please open the web browser and log on to the following websites: http://www.tp-link.com http://www.google.com - TP-Link TD-W8101G | Quick Installation Guide - Page 9
can I do if I don't know or forgot my password? 1) Restore the Router's configuration to its factory default settings. If you don't know how to do that, please refer to section T1. 2) Use the default user name and password: admin, admin. 3) Try to configure your Router once again by following the - TP-Link TD-W8101G | Quick Installation Guide - Page 10
Click Network Connections Right-click Local Area Connection Click Properties Double-click Internet Protocol (TCP/IP) 10 - TP-Link TD-W8101G | Quick Installation Guide - Page 11
Select Obtain an IP address automatically Select Obtain DNS server address automatically Click OK Click OK 11 - TP-Link TD-W8101G | Quick Installation Guide - Page 12
For Windows Vista OS Go to Start > Settings > Control Panel, and then you will see the following page. Click View network status and tasks Click View status Click Properties 12 - TP-Link TD-W8101G | Quick Installation Guide - Page 13
Double-click Internet Protocol Version 4 (TCP/IPv4). Select Obtain an IP address automatically Select Obtain DNS server address automatically Click OK 13 - TP-Link TD-W8101G | Quick Installation Guide - Page 14
after the above settings have been configured. If you still cannot access the configuration page, please restore your Router's factory default settings and reconfigure your Router following the instructions of this QIG. Please feel free to contact our Technical Support if the problem persists. T4 - TP-Link TD-W8101G | Quick Installation Guide - Page 15
following the instructions of this QIG. 4) Please feel free to contact our Technical Support if the problem still exists. Note For more details about Troubleshooting and Technical Support contact information, please log on to our Technical Support Website: http://www.tp-link.com/support/Support.asp - TP-Link TD-W8101G | Quick Installation Guide - Page 16
Technical Support „ For more troubleshooting help, go to www.tp-link.com/support/faq.asp „ To download the latest Firmware, Driver, Utility and User Guide, go to www.tp-link.com/support/download.asp „ For all other technical support, please contact us by using the following: Global USA/Canada
-
 1
1 -
 2
2 -
 3
3 -
 4
4 -
 5
5 -
 6
6 -
 7
7 -
8
-
9
-
10
-
11
-
12
-
13
-
14
-
15
-
16
 |
 |
1
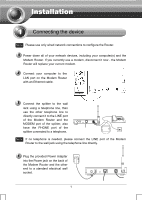
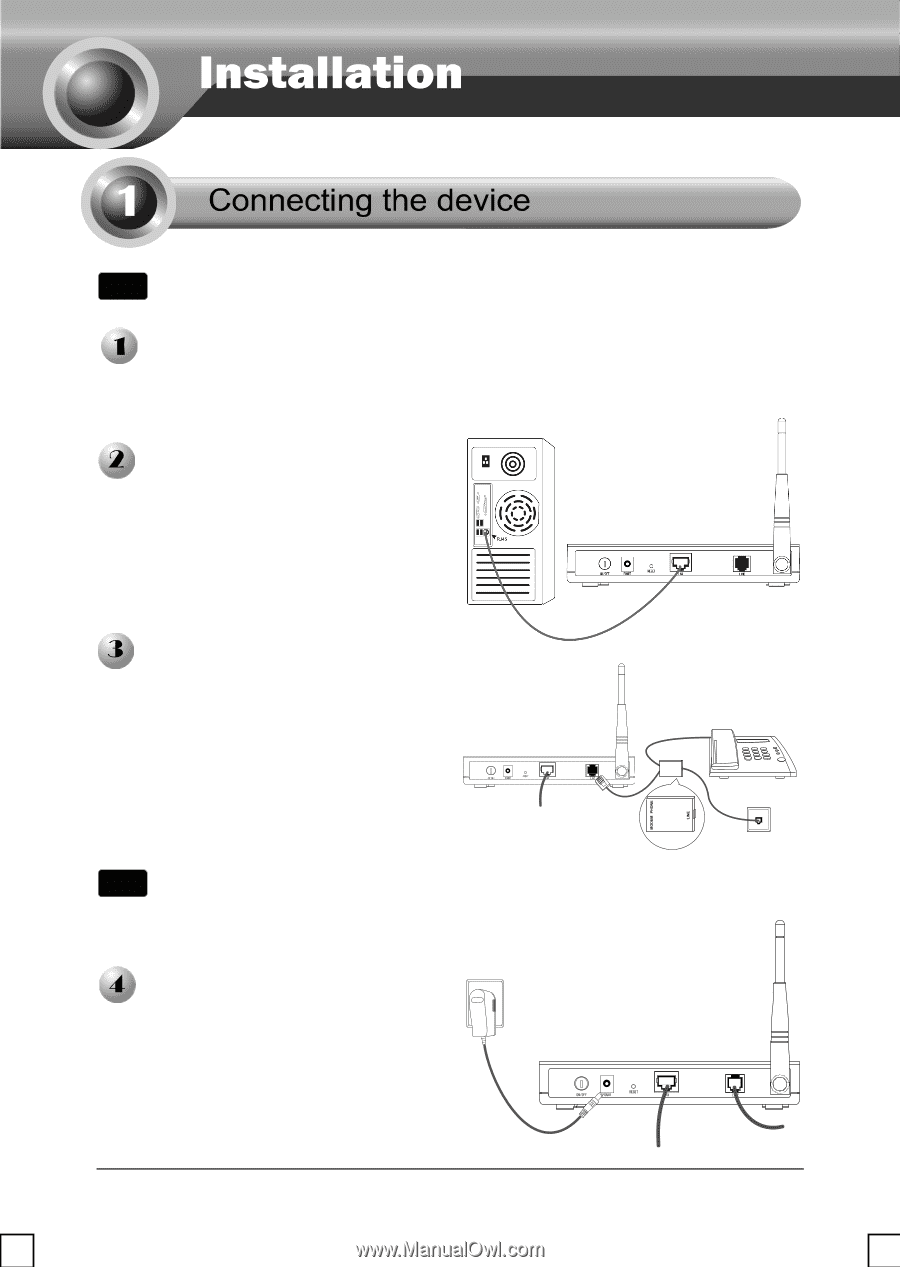
Power down all of your network devices, including your computer(s) and the
Modem Router. If you currently use a modem, disconnect it now - the Modem
Router will replace your current modem.
Connect your computer to the
LAN port on the Modem Router
with an Ethernet cable.
Connect the splitter to the wall
jack using a telephone line, then
use the other telephone line to
directly connect it to the LINE port
of the Modem Router and the
MODEM port of the splitter, also
have the PHONE port of the
splitter connected to a telephone.
Plug the provided Power Adapter
into the Power jack on the back of
the Modem Router and the other
end to a standard electrical wall
socket.
Note
If no telephone is needed, please connect the LINE port of the Modem
Router to the wall jack using the telephone line directly.
Note
Please use only wired network connections to configure the Router.