TP-Link TL-MR3220 User Guide - Page 68
Enable/ Disabled All, IP Address
 |
UPC - 845973051501
View all TP-Link TL-MR3220 manuals
Add to My Manuals
Save this manual to your list of manuals |
Page 68 highlights
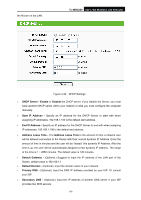
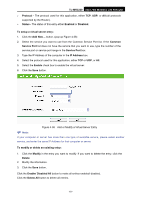
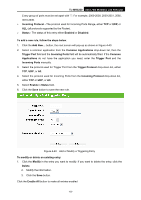
TL-MR3220 3G/3.75G Wireless Lite N Router ¾ Protocol - The protocol used for this application, either TCP, UDP, or All (all protocols supported by the Router). ¾ Status - The status of this entry either Enabled or Disabled. To setup a virtual server entry: 1. Click the Add New... button. (pop-up Figure 4-38) 2. Select the service you want to use from the Common Service Port list. If the Common Service Port list does not have the service that you want to use, type the number of the service port or service port range in the Service Port box. 3. Type the IP Address of the computer in the IP Address box. 4. Select the protocol used for this application, either TCP or UDP, or All. 5. Select the Enable check box to enable the virtual server. 6. Click the Save button. Figure 4-38 Add or Modify a Virtual Server Entry ) Note: If your computer or server has more than one type of available service, please select another service, and enter the same IP Address for that computer or server. To modify or delete an existing entry: 1. Click the Modify in the entry you want to modify. If you want to delete the entry, click the Delete. 2. Modify the information. 3. Click the Save button. Click the Enable/ Disabled All button to make all entries enabled/ disabled. Click the Delete All button to delete all entries. -61-
-
 1
1 -
2
-
3
-
4
-
5
-
6
-
7
-
8
-
9
-
10
-
11
-
12
-
13
-
14
-
15
-
16
-
17
-
18
-
19
-
20
-
21
-
22
-
23
-
24
-
25
-
26
-
27
-
28
-
29
-
30
-
31
-
32
-
33
-
34
-
35
-
36
-
37
-
38
-
39
-
40
-
41
-
42
-
43
-
44
-
45
-
46
-
47
-
48
-
49
-
50
-
51
-
52
-
53
-
54
-
55
-
56
-
57
-
58
-
59
-
60
-
61
-
62
-
 63
63 -
 64
64 -
 65
65 -
 66
66 -
 67
67 -
 68
68 -
 69
69 -
 70
70 -
 71
71 -
 72
72 -
 73
73 -
74
-
75
-
76
-
77
-
78
-
79
-
80
-
81
-
82
-
83
-
84
-
85
-
86
-
87
-
88
-
89
-
90
-
91
-
92
-
93
-
94
-
95
-
96
-
97
-
98
-
99
-
100
-
101
-
102
-
103
-
104
-
105
-
106
-
107
-
108
-
109
-
110
-
111
-
112
-
113
-
114
-
115
-
116
-
117
-
118
-
119
-
120
-
121
-
122
 |
 |