TP-Link TL-PS110U User Manual
TP-Link TL-PS110U Manual
 |
UPC - 845973031008
View all TP-Link TL-PS110U manuals
Add to My Manuals
Save this manual to your list of manuals |
TP-Link TL-PS110U manual content summary:
- TP-Link TL-PS110U | User Manual - Page 1
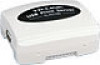
TL-PS110U Single USB2.0 Port Fast Ethernet Print Server Rev: 2.0.0 1910010381 - TP-Link TL-PS110U | User Manual - Page 2
. No part of the specifications may be reproduced in any form or by any means or used to make any derivative such as translation, transformation, or adaptation without permission from TP-LINK TECHNOLOGIES CO., LTD. Copyright © 2010 TP-LINK TECHNOLOGIES CO., LTD. All rights reserved. http://www - TP-Link TL-PS110U | User Manual - Page 3
reasonable protection against harmful interference in a residential installation. This equipment generates, uses and can radiate radio frequency energy and, if not installed and used in accordance with the instructions, may cause harmful interference to radio communications. However, there is no - TP-Link TL-PS110U | User Manual - Page 4
2483.5 MHz Country Restriction Reason/remark Bulgaria General authorization required for outdoor use and public service France Outdoor use limited to 10 mW e.i.r.p. within the band 2454-2483.5 MHz Military Radiolocation use. Refarming of the 2.4 GHz band has been ongoing in recent years to - TP-Link TL-PS110U | User Manual - Page 5
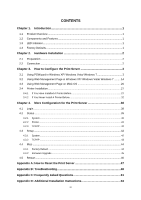
How to Configure the Print Server 3 3.1 Using PSWizard in Windows XP/ Windows Vista/ Windows 7 3 3.2 Using Web Management Page in to Reset the Print Server 47 Appendix B: Troubleshooting 48 Appendix C: Frequently Asked Questions 51 Appendix D: Additional Installation Instructions 53 IV - TP-Link TL-PS110U | User Manual - Page 6
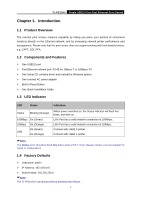
TL-PS110U Single USB2.0 Port Fast Ethernet Print Server Chapter 1. Introduction 1.1 Product Overview The external print servers enhance capability by letting you place your printers at convenient locations directly on the Ethernet network, and by increasing network printer performance and - TP-Link TL-PS110U | User Manual - Page 7
TL-PS110U Single USB2.0 Port Fast Ethernet Print Server Chapter 2. Hardware Installation 2.1 Preparation Before you start, you should prepare the following items: ¾ One printer with USB port ¾ One USB printer cable ¾ One Router 2.2 Connection Follow the instructions below to connect the print server - TP-Link TL-PS110U | User Manual - Page 8
TL-PS110U Single USB2.0 Port Fast Ethernet Print Server Chapter 3. How to Configure the Print Server 3.1 Using PSWizard in Windows XP/ Windows Vista/ Windows 7 To connect to the print server using PSWizard, the configuration for Windows XP, Windows Vista and Windows 7 are similar. Here take Windows - TP-Link TL-PS110U | User Manual - Page 9
TL-PS110U Single USB2.0 Port Fast Ethernet Print Server 3. Then you will enter to the "Welcome" page as shown in Figure 3-3. Click Next. Figure 3-3 4. From the "Select A Print Server" screen as shown in Figure 3-4, select the print server that you want to configure and click Next. Figure 3-4 4 - TP-Link TL-PS110U | User Manual - Page 10
TL-PS110U Single USB2.0 Port Fast Ethernet Print Server 5. On the Change Settings screen as shown in Figure 3-5, select Yes or No. ¾ Select "Yes" if you want to change the settings. The TL-PS110U is produced without password. Click Next and then appears "TCP/IP Settings" screen as shown in Figure - TP-Link TL-PS110U | User Manual - Page 11
TL-PS110U Single USB2.0 Port Fast Ethernet Print Server Figure 3-6 7. Confirm your settings on the screen in Figure 3-7. Click Next and your changes will be saved as shown in Figure 3-8. Figure 3-7 6 - TP-Link TL-PS110U | User Manual - Page 12
-PS110U Single USB2.0 Port Fast Ethernet Print Server Figure 3-8 8. After that the "Select a Printer" page will appear, as shown in Figure 3-9. ¾ If the printer desired has already existed in the list, select it and then click Next and skip to Step 16 to complete the installation. ¾ If you never use - TP-Link TL-PS110U | User Manual - Page 13
TL-PS110U Single USB2.0 Port Fast Ethernet Print Server ) Note: Figure 3-9 To add a new printer, you can also go Start > Printers and Faxes, and then click "Add a printer" on the left to begin the - TP-Link TL-PS110U | User Manual - Page 14
TL-PS110U Single USB2.0 Port Fast Ethernet Print Server Figure 3-11 10. Make sure the Automatically detect and install my Plug and Play printer check box is NOT checked. Then click Next. Figure 3-12 11. Check "Use the following port" radio button and select "LPT1: (Recommended Printer Port)" from - TP-Link TL-PS110U | User Manual - Page 15
TL-PS110U Single USB2.0 Port Fast Ethernet Print Server Figure 3-13 12. Select Manufacturer and Printer from the lists of printer's driver. Then click Next. Figure 3-14 13. If you already have the printer's - TP-Link TL-PS110U | User Manual - Page 16
TL-PS110U Single USB2.0 Port Fast Ethernet Print Server Figure 3-15 14. Then, choose whether you want to share the printer with other network users, print a test page (please select No.), etc. Select the appropriate radio-button and click Next. 15. Click Finish. Figure 3-16 11 - TP-Link TL-PS110U | User Manual - Page 17
TL-PS110U Single USB2.0 Port Fast Ethernet Print Server Figure 3-17 16. Then you will see the printer be added to the list. Select the printer and click Next. Follow the step by step instruction to finish the installation. Figure 3-18 17. From Windows system, go to Start > Printers and Faxes and - TP-Link TL-PS110U | User Manual - Page 18
TL-PS110U Single USB2.0 Port Fast Ethernet Print Server Figure 3-19 18. Select Ports and verify that the print server's port appears. Figure 3-20 19. Go to General; click Print Test Page to verify the configuration. 13 - TP-Link TL-PS110U | User Manual - Page 19
TL-PS110U Single USB2.0 Port Fast Ethernet Print Server Figure 3-21 ) Note: If you wish to install more print servers, repeat the above steps. 3.2 Using Web Management Page in Windows XP/ Windows Vista/ Windows 7 To connect to the print server using the web management page, the configuration for - TP-Link TL-PS110U | User Manual - Page 20
TL-PS110U Single USB2.0 Port Fast Ethernet Print Server Figure 3-22 2. Select and double-click Networking Connections. Figure 3-23 3. Right click Wireless Network Connection, and select Properties. 15 - TP-Link TL-PS110U | User Manual - Page 21
TL-PS110U Single USB2.0 Port Fast Ethernet Print Server Figure 3-24 4. Select Internet Protocol (TCP/IP), and then double click it or click Properties. Figure 3-25 5. Select "Use the following IP address" and input a static IP address 192.168.0.X (1 - TP-Link TL-PS110U | User Manual - Page 22
TL-PS110U Single USB2.0 Port Fast Ethernet Print Server Figure 3-26 6. Open a web-browser and type in the IP address of the print server (the default is 192.168.0.10) in the address field of the browser to login to the web management of the print server. Figure 3-27 7. After a moment, a login window - TP-Link TL-PS110U | User Manual - Page 23
TL-PS110U Single USB2.0 Port Fast Ethernet Print Server 8. Then the print server web management page will appear, with which you can configure all print server settings. Figure 3-29 9. Click "Setup" and then choose "TCP/IP". Check "Use the following TCP/IP Settings" radio button and then fill in the - TP-Link TL-PS110U | User Manual - Page 24
TL-PS110U Single USB2.0 Port Fast Ethernet Print Server Figure 3-30 10. Click Save & Restart and then wait the print server to save the changes and restart. Figure 3-31 19 - TP-Link TL-PS110U | User Manual - Page 25
TL-PS110U Single USB2.0 Port Fast Ethernet Print Server 10 - TP-Link TL-PS110U | User Manual - Page 26
TL-PS110U Single USB2.0 Port Fast Ethernet Print Server Figure 3-33 2. On the new window, please choose Network. Figure 3-34 3. Follow the steps to set the airport's IP address. 21 - TP-Link TL-PS110U | User Manual - Page 27
TL-PS110U Single USB2.0 Port Fast Ethernet Print Server 2 1 3 4 5 Figure 3-35 4. Open the Safari and log into the TL-PS110U. Change its IP Address, Subnet Mask and Default Router to 192.168.1.10, 255.255.255.0 and 192.168.1.1. After the configuration, click Save & Restart. 22 - TP-Link TL-PS110U | User Manual - Page 28
TL-PS110U Single USB2.0 Port Fast Ethernet Print Server 1 2 3 4 Figure 3-36 Figure 3-37 5. On the MACbook, change the airport's IP Address, Subnet Mask and Router to 192.168.1.101, 255.255.255.0 and 192.168.1.1. 23 - TP-Link TL-PS110U | User Manual - Page 29
TL-PS110U Single USB2.0 Port Fast Ethernet Print Server Figure 3-38 6. Click the Apple icon > System Performances > Print & Fax to add a Standard TCP/IP port for the printer. Figure 3-39 24 - TP-Link TL-PS110U | User Manual - Page 30
TL-PS110U Single USB2.0 Port Fast Ethernet Print Server 7. Click Printing and then . Figure 3-40 8. Select "IP Printer", and then configure the following parameters. Select "LPD" for Protocol, enter 192.168.1.10 for Address and lp1 - TP-Link TL-PS110U | User Manual - Page 31
TL-PS110U Single USB2.0 Port Fast Ethernet Print Server 1 2 3 4 5 6 Figure 3-41 9. Till now you've installed the print server successfully and can print through the TL-PS110U. 26 - TP-Link TL-PS110U | User Manual - Page 32
TL-PS110U Single USB2.0 Port Fast Ethernet Print Server Figure 3-42 3.4 Printer Installation Other computers in the same local network that need to share the printing should add the Standard TCP/IP port on their system. There're two conditions. Please choose one according to your system. In this - TP-Link TL-PS110U | User Manual - Page 33
TL-PS110U Single USB2.0 Port Fast Ethernet Print Server Figure 3-43 2. Find your installed printer icon, right-click on it, and select Properties. Figure 3-44 3. Click Ports > Add Port > Standard TCP/IP Port > New Port > Next. 28 - TP-Link TL-PS110U | User Manual - Page 34
TL-PS110U Single USB2.0 Port Fast Ethernet Print Server Figure 3-45 4. Input the exact IP address of print server. Here takes 192.168.0.10 for example. Click Next. Figure 3-46 5. Select Custom, and click Settings. 29 - TP-Link TL-PS110U | User Manual - Page 35
TL-PS110U Single USB2.0 Port Fast Ethernet Print Server Figure 3-47 6. Choose LPR, and input the queue name as lp1. Click OK. Figure 3-48 7. Click Next and then Finish, to complete the wizard. 30 - TP-Link TL-PS110U | User Manual - Page 36
TL-PS110U Single USB2.0 Port Fast Ethernet Print Server Figure 3-49 8. Click Close and Apply. Figure 3-50 31 - TP-Link TL-PS110U | User Manual - Page 37
TL-PS110U Single USB2.0 Port Fast Ethernet Print Server Figure 3-51 Figure 3-52 9. Now, the printer port has been created. 3.4.2 If You Never Install A Printer Before 1. Click Star > Control Panel, and select Devices and Printers. 32 - TP-Link TL-PS110U | User Manual - Page 38
TL-PS110U Single USB2.0 Port Fast Ethernet Print Server 2. Click Add a printer. Figure 3-53 3. Select Add a local printer. Figure 3-54 Figure 3-55 4. Select "Create a new port", and the type of port is "Standard TCP/IP Port". 33 - TP-Link TL-PS110U | User Manual - Page 39
TL-PS110U Single USB2.0 Port Fast Ethernet Print Server Figure 3-56 5. Input the IP address of the print server and click Next. The windows will detect the TCP/IP Port. Please wait for the next page. Figure 3-57 34 - TP-Link TL-PS110U | User Manual - Page 40
TL-PS110U Single USB2.0 Port Fast Ethernet Print Server Figure 3-58 6. On the following page, select Custom and click Settings. And then on the next page, please select LPR as the Protocol and the - TP-Link TL-PS110U | User Manual - Page 41
TL-PS110U Single USB2.0 Port Fast Ethernet Print Server Figure 3-60 Figure 3-61 36 - TP-Link TL-PS110U | User Manual - Page 42
TL-PS110U Single USB2.0 Port Fast Ethernet Print Server Figure 3-62 8. After that, the new printer is in the list. And you can enjoy the sharing. Figure 3-63 37 - TP-Link TL-PS110U | User Manual - Page 43
TL-PS110U Single USB2.0 Port Fast Ethernet Print Server Chapter 4. More Configuration for the Print Server The Print Server contains an embedded web server that can be accessed through a supported web browser on a WLAN, for example, IE6, Firefox or above is recommended. The embedded web server - TP-Link TL-PS110U | User Manual - Page 44
TL-PS110U Single USB2.0 Port Fast Ethernet Print Server Figure 4-3 4.2 Status The Status page shows the current information about the print server as shown in Figure 4-3. By clicking the corresponding tab, you can view the following information, including System, Printer, and TCP/IP. 39 - TP-Link TL-PS110U | User Manual - Page 45
System TL-PS110U Single USB2.0 Port Fast Ethernet Print Server Figure 4-4 ¾ Print Server Name: This option allows you to view device name of the print server. To correct the print server's device name. ¾ System Contact: This option allows you to view contact name of the print server. ¾ System - TP-Link TL-PS110U | User Manual - Page 46
TL-PS110U Single USB2.0 Port Fast Ethernet Print Server Figure 4-5 ¾ Manufacturer: This option allows you to view manufacturer of the printer. When the printer connected with the print server with the print server, it will be show in the model box. ¾ Printing Language Supported: This option - TP-Link TL-PS110U | User Manual - Page 47
/IP TL-PS110U Single USB2.0 Port Fast Ethernet Print Server Figure 4-6 ¾ Use DHCP/BOOTP: This option allows you to view DHCP/ BOOTP status. If there is a DHCP/BOOTP server on your network, this option allows the print server to obtain IP-related settings automatically from your DHCP server. ¾ IP - TP-Link TL-PS110U | User Manual - Page 48
TL-PS110U Single USB2.0 Port Fast Ethernet Print Server Figure 4-7 ¾ E-mail Alert: This option allows you to receive alert of the device. ¾ SMTP Server IP Address: Enter the IP Address of the SMTP Server. ¾ Administrator E-mail Address: Enter the e-mail address used to receive alert. ¾ Print Server - TP-Link TL-PS110U | User Manual - Page 49
TL-PS110U Single USB2.0 Port Fast Ethernet Print Server Figure 4-8 ¾ Use DHCP/BOOTP: This option allows you to select DHCP/ BOOTP option. If there is a DHCP/BOOTP server on your network. This option allows the print server to obtain IP-related settings automatically from your DHCP server. ¾ IP - TP-Link TL-PS110U | User Manual - Page 50
TL-PS110U Single USB2.0 Port Fast Ethernet Print Server Figure 4-9 4.4.2 Firmware Upgrade Click Browse... to select the firmware file and then click Firmware Upgrade to upgrade the firmware of the print server. Figure 4-10 45 - TP-Link TL-PS110U | User Manual - Page 51
TL-PS110U Single USB2.0 Port Fast Ethernet Print Server 4.5 Restart Click OK to reboot the print server. Figure 4-11 46 - TP-Link TL-PS110U | User Manual - Page 52
TL-PS110U Single USB2.0 Port Fast Ethernet Print Server Appendix A: How to Reset the Print Server If you lose the connection with the TL-PS110U by doing wrong configuration, you need to reset it to factory and reconfigure it again. Here are the steps for the resetting 1. Unplug the power - TP-Link TL-PS110U | User Manual - Page 53
TL-PS110U Single USB2.0 Port Fast Ethernet Print Server Appendix B: Troubleshooting General Troubleshooting Overview The most common problems, which cause the print server to perform improperly, are covered in this chapter. If a problem still exists after reading this chapter, please contact your - TP-Link TL-PS110U | User Manual - Page 54
TL-PS110U Single USB2.0 Port Fast Ethernet Print Server print server's configuration file and save its IP address permanently. I can't, therefore, continue installing the print server." Regarding this problem, there are three possible causes: A. The print server's Node ID you specified in the "arp" - TP-Link TL-PS110U | User Manual - Page 55
TL-PS110U Single USB2.0 Port Fast Ethernet Print Server 2. If the solution described above is not applicable, you have to follow the instructions below to set up the print server's IP address. For the purpose of explanation, we assume the NT server is on Segment A and its IP address is 192.72.214.66 - TP-Link TL-PS110U | User Manual - Page 56
TL-PS110U Single USB2.0 Port Fast Ethernet Print Server Appendix C: Frequently Asked Questions 1) Question A: Print jobs are sent to the print queue successfully, but fail to be sent to the printer. Possible explanations: 1. The Print server Name/Print Queue configuration is incorrect. 2. The Print - TP-Link TL-PS110U | User Manual - Page 57
TL-PS110U Single USB2.0 Port Fast Ethernet Print Server 1) Check the wireless network connection, especially from the workstation running the PSAdmin to the print server unit. 2) Upgrade the print server again by PSAdmin or WEB browser. 4) Question D The setup Wizard can't find print server. - TP-Link TL-PS110U | User Manual - Page 58
TL-PS110U Single USB2.0 Port Fast Ethernet Print Server Appendix D: Additional Installation Instructions Panasonic KX-P6100/6300/6500 If you are using a Panasonic KX-P6100/6300/6500 laser printer with the print server through the Network Print Port under Windows 95/98, please redirect the printer
-
 1
1 -
 2
2 -
 3
3 -
 4
4 -
 5
5 -
 6
6 -
 7
7 -
8
-
9
-
10
-
11
-
12
-
13
-
14
-
15
-
16
-
17
-
18
-
19
-
20
-
21
-
22
-
23
-
24
-
25
-
26
-
27
-
28
-
29
-
30
-
31
-
32
-
33
-
34
-
35
-
36
-
37
-
38
-
39
-
40
-
41
-
42
-
43
-
44
-
45
-
46
-
47
-
48
-
49
-
50
-
51
-
52
-
53
-
54
-
55
-
56
-
57
-
58
 |
 |

TL-PS110U
Single USB2.0 Port Fast Ethernet Print
Server
Rev: 2.0.0
1910010381