TP-Link TL-SG108E TL-SG108E V1 IG 7106504641
TP-Link TL-SG108E Manual
 |
View all TP-Link TL-SG108E manuals
Add to My Manuals
Save this manual to your list of manuals |
TP-Link TL-SG108E manual content summary:
- TP-Link TL-SG108E | TL-SG108E V1 IG 7106504641 - Page 1
of the Product The TL-SG108E 8-Port Gigabit Easy Smart Switch is an ideal upgrade from an unmanaged switch, designed for Small and Medium Business networks that require simple network management. Network administrators can e ectively monitor tra c via Port Mirroring, Loop Prevention and Cable - TP-Link TL-SG108E | TL-SG108E V1 IG 7106504641 - Page 2
rights reserved. http://www.tp-link.com Technical Support For more troubleshooting help, go to www.tp-link.com/en/support/faq To download the latest Firmware, Driver, Utility and User Guide, go to http://www.tp-link.com/en/support/download/ For all other technical support, please contact us by
-
 1
1 -
 2
2
 |
 |
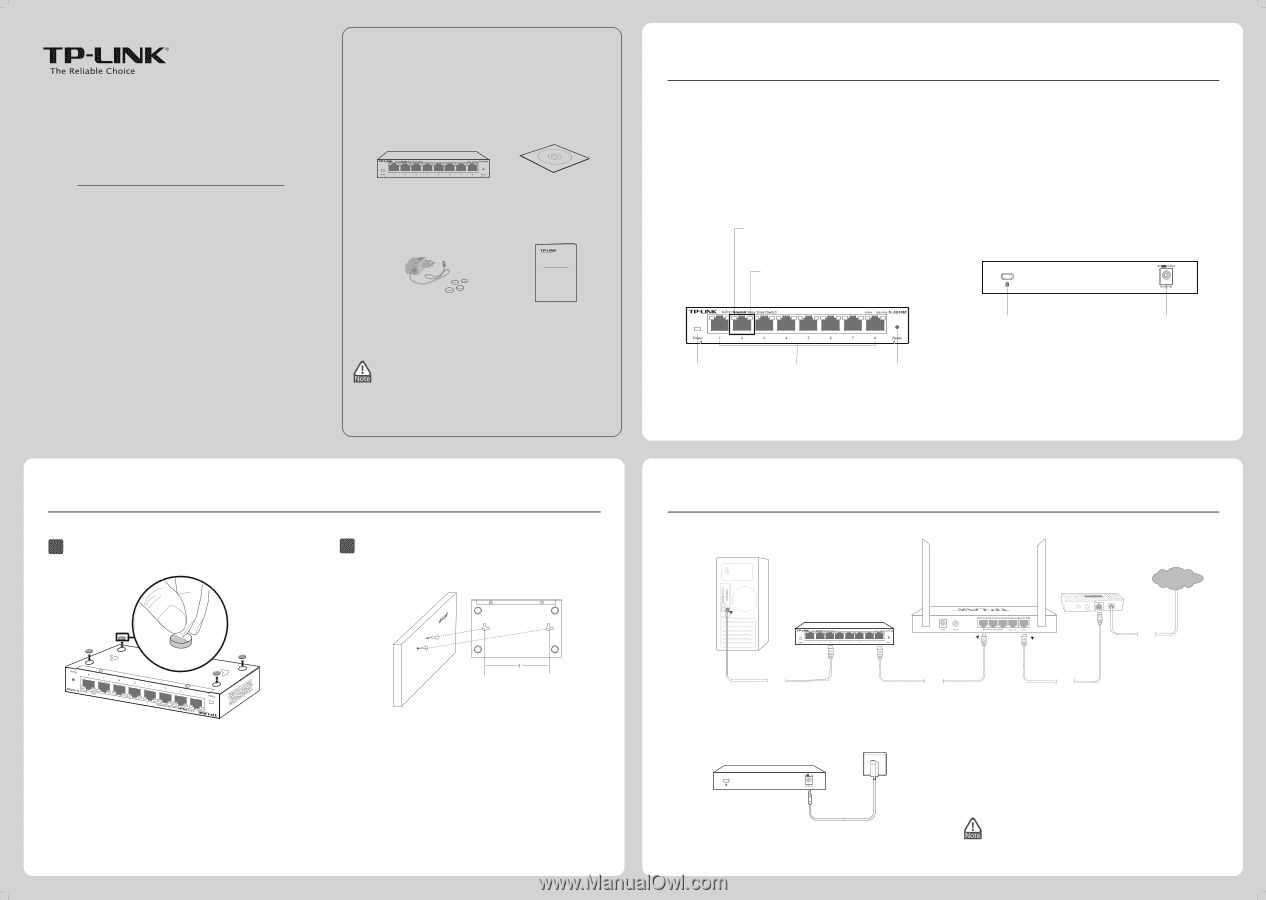
Overview of the Product
1
8-Port Gigabit Easy Smart Switch
MODEL NO.
TL-SG108E
Package Contents
Installation Guide
IG
TL-SG108E
TL-SG108E
Installation Guide
8-Port Gigabit Easy Smart Switch
The TL-SG108E 8-Port Gigabit Easy Smart Switch is an ideal upgrade from an unmanaged switch, designed for Small and Medium Business networks
that require simple network management. Network administrators can effectively monitor traffic via Port Mirroring, Loop Prevention and Cable Test
features. To optimize traffic on your business network, it offers both port and tag based QoS to keep latency-sensitive traffic moving smoothly and
jitter-free. Additionally, port-based, tag-based and MTU VLAN can improve security and meet more network segmentation requirements. Moreover,
with the innovative energy-efficient technology, they are eco-friendly solution for your business network.
Front Panel
Rear Panel
1.
Make sure that the box contains the above items. If any of
the listed items are damaged or missing, please contact
your distributor.
2.
The switch or TL-SG108E mentioned in this User Guide
stands for TL-SG108E 8-Port
Gigabit Easy Smart
Switch
without any explanation.
Initialization
1.
The Power LED indicator will light on all the time.
2.
After keeping off for several seconds, the rest of the LED
indicators will flash momentarily, and then work normally
after the initialization.
Powering on the switch, it will automatically initialize and its LED
indicators will respond as follows:
If the LED indicators don’t respond as described above,
please check the power supply and its connection.
Resource CD
Power LED
On: Power on
Off: Power off
Ethernet Ports(1-8)
Reset Button
10/100M LED(Yellow)
On: Connected to a
10/100Mbps device
Flashing: Transimitting/receiving data
Kensington
Security Slot
Power Socket
Power Cord and Rubber Cushions
Installation
2
Connection
3
The switch can be either located on a desktop or mounted on a wall.
7106504641
REV1.0.0
1
Mounting the Switch on a Desk
2
Place the switch upside down on a flat desk
.
Step 1.
Remove the adhesive backing paper from the rubber
cushions.
Step 2.
Attach the supplied four rubber cushions to the
recessed areas on the bottom at each corner of the
switch.
Step 3.
Step 4.
Turn over the switch.
Mounting the Switch on a Wall
Bottom of the Switch
L=110mm
Drill two holes into the wall. Insert a screw into each hole
and leave a part of its head exposed.
Step 1.
Place the two wall-mounting slots over the screws and
slide the switch down to fasten it.
Step 2.
3
Connect equipment
Step 1.
Connect power
Step 2.
1000M LED(Green)
On: Connected to a
1000Mbps device
Flashing: Transimitting/receiving data
RJ45
Cable
TL-SG108E
Router
(TL-ER604W for example)
Cable
Cable
Modem
(
TD-8816
for example)
WAN
LAN
Internet
Line