TP-Link TL-WA5110G User Guide - Page 43
DHCP Settings
 |
UPC - 845973051327
View all TP-Link TL-WA5110G manuals
Add to My Manuals
Save this manual to your list of manuals |
Page 43 highlights
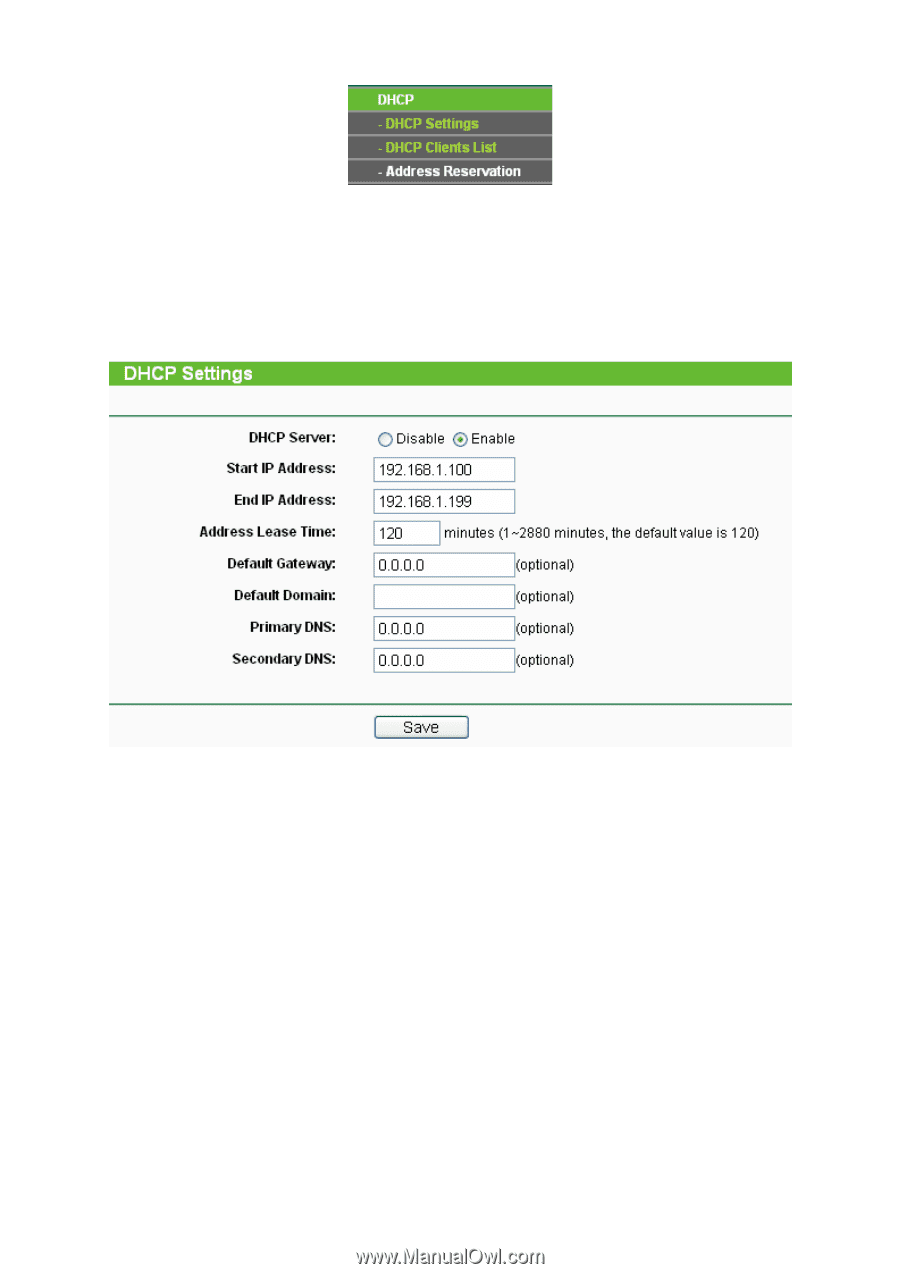
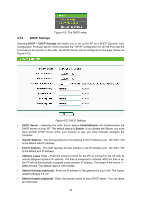
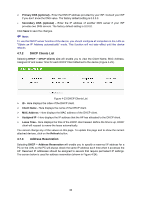
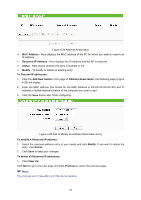
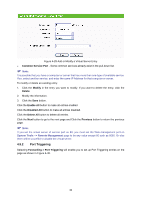
Figure 4-21 The DHCP menu 4.7.1 DHCP Settings Selecting DHCP > DHCP Settings will enable you to set up the AP as a DHCP (Dynamic Host Configuration Protocol) server, which provides the TCP/IP configuration for all the PCs that are connected to the system on the LAN. The DHCP Server can be configured on the page (shown as Figure 4-22). Figure 4-22 DHCP Settings ¾ DHCP Server - Selecting the radio button before Disable/Enable will disable/enable the DHCP server on your AP. The default setting is Enable. If you disable the Server, you must have another DHCP server within your network or else you must manually configure the computer. ¾ Start IP Address - This field specifies the first address in the IP Address pool. 192.168.1.100 is the default start IP address. ¾ End IP Address - This field specifies the last address in the IP Address pool. 192.168.1.199 is the default end IP address. ¾ Address Lease Time - Enter the amount of time for the PC to connect to the AP with its current assigned dynamic IP address. The time is measured in minutes. After the time is up, the PC will be automatically assigned a new dynamic IP address. The range of the time is 1 ~ 2880 minutes. The default value is 120 minutes. ¾ Default Gateway (optional) - Enter the IP address of the gateway for your LAN. The factory default setting is 0.0.0.0. ¾ Default Domain (optional) - Enter the domain name of your DHCP server. You can leave the field blank. 35
-
 1
1 -
2
-
3
-
4
-
5
-
6
-
7
-
8
-
9
-
10
-
11
-
12
-
13
-
14
-
15
-
16
-
17
-
18
-
19
-
20
-
21
-
22
-
23
-
24
-
25
-
26
-
27
-
28
-
29
-
30
-
31
-
32
-
33
-
34
-
35
-
36
-
37
-
 38
38 -
 39
39 -
 40
40 -
 41
41 -
 42
42 -
 43
43 -
 44
44 -
 45
45 -
 46
46 -
 47
47 -
 48
48 -
49
-
50
-
51
-
52
-
53
-
54
-
55
-
56
-
57
-
58
-
59
-
60
-
61
-
62
-
63
-
64
-
65
-
66
-
67
-
68
-
69
-
70
-
71
-
72
-
73
-
74
-
75
-
76
-
77
-
78
-
79
-
80
-
81
-
82
-
83
-
84
-
85
-
86
-
87
-
88
-
89
-
90
-
91
-
92
-
93
-
94
-
95
-
96
-
97
-
98
-
99
-
100
-
101
-
102
-
103
-
104
-
105
-
106
-
107
-
108
-
109
 |
 |