TP-Link TL-WA5110G User Guide - Page 57
Remote Management
 |
UPC - 845973051327
View all TP-Link TL-WA5110G manuals
Add to My Manuals
Save this manual to your list of manuals |
Page 57 highlights
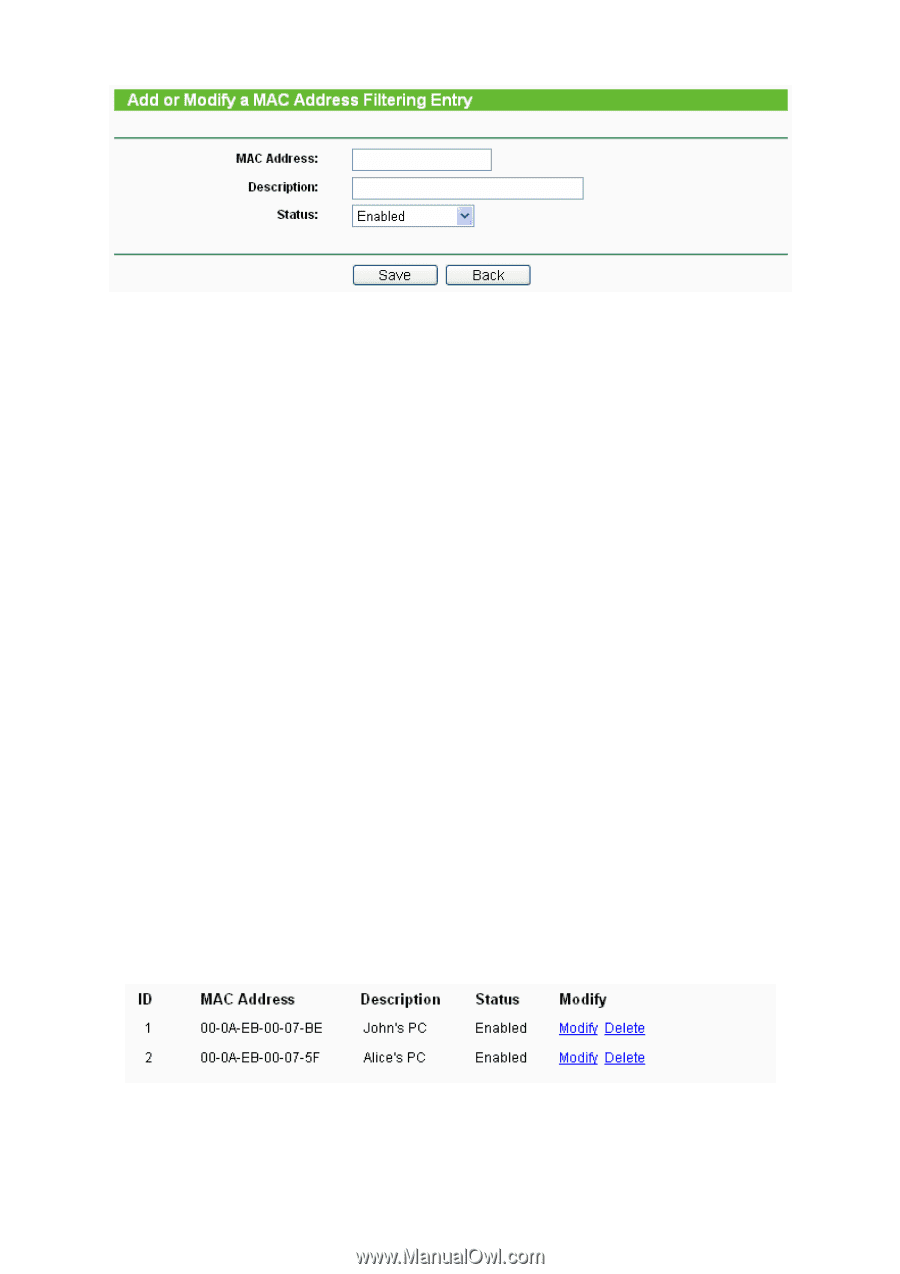
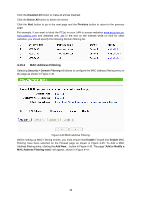
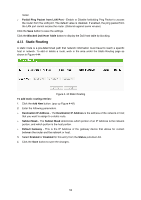
Figure 4-41 Add or Modify a MAC Address Filtering entry To add or modify a MAC Address Filtering entry, follow these instructions: 1. Enter the appropriate MAC Address into the MAC Address field. The format of the MAC Address is XX-XX-XX-XX-XX-XX (X is any hexadecimal digit). For example: 00-0E-AE-B0-00-0B. 2. Type the description of the PC in the Description field. Fox example: John's PC. 3. Status - Select Enabled or Disabled for this entry on the Status pull-down list. 4. Click the Save button to save this entry. To add additional entries, repeat steps 1-4. When finished, click the Return button to return to the MAC Address Filtering page. To modify or delete an existing entry: 1. Click the Modify in the entry you want to modify. If you want to delete the entry, click the Delete. 2. Modify the information. 3. Click the Save button. Click the Enable All button to make all entries enabled. Click the Disabled All button to make all entries disabled. Click the Delete All button to delete all entries Click the Next button to go to the next page and click the Previous button to return to the previous page. Fox example: If you want to block the PC with MAC addresses 00-0A-EB-00-07-BE and 00-0A-EB-00-07-5F to access the Internet, first, enable the Firewall and MAC Address Filtering on the Firewall page, then, you should specify the Default MAC Address Filtering Rule "Deny these PC(s) with effective rules to access the Internet" on the Firewall page and the following MAC address filtering list on this page: 4.10.5 Remote Management Selecting Security > Remote Management will allow you to configure the Remote Management function in the screen as shown in Figure 4-42. This feature allows you to manage your Router 49
-
 1
1 -
2
-
3
-
4
-
5
-
6
-
7
-
8
-
9
-
10
-
11
-
12
-
13
-
14
-
15
-
16
-
17
-
18
-
19
-
20
-
21
-
22
-
23
-
24
-
25
-
26
-
27
-
28
-
29
-
30
-
31
-
32
-
33
-
34
-
35
-
36
-
37
-
38
-
39
-
40
-
41
-
42
-
43
-
44
-
45
-
46
-
47
-
48
-
49
-
50
-
51
-
 52
52 -
 53
53 -
 54
54 -
 55
55 -
 56
56 -
 57
57 -
 58
58 -
 59
59 -
 60
60 -
 61
61 -
 62
62 -
63
-
64
-
65
-
66
-
67
-
68
-
69
-
70
-
71
-
72
-
73
-
74
-
75
-
76
-
77
-
78
-
79
-
80
-
81
-
82
-
83
-
84
-
85
-
86
-
87
-
88
-
89
-
90
-
91
-
92
-
93
-
94
-
95
-
96
-
97
-
98
-
99
-
100
-
101
-
102
-
103
-
104
-
105
-
106
-
107
-
108
-
109
 |
 |