TP-Link TL-WDR3600 Quick Installation Guide
TP-Link TL-WDR3600 Manual
 |
View all TP-Link TL-WDR3600 manuals
Add to My Manuals
Save this manual to your list of manuals |
TP-Link TL-WDR3600 manual content summary:
- TP-Link TL-WDR3600 | Quick Installation Guide - Page 1
on to install TP-LINK USB Printer Controller̻Then follow the instructions step by step. 2 Select TL-WDR3600 andclick EasySetupAssistant. 4 Follow the instructions until you see the screen below. Click FINISH to complete the setup. 2 Click START and the USB Printer Setup Wizard will guide you step - TP-Link TL-WDR3600 | Quick Installation Guide - Page 2
. With the Router powered on, press and hold the WPS/RESET button on the rear panel for approximately 8 seconds before releasing it. Technical Support For more troubleshooting help, go to http://www.tp-link.com/en/support/faq To download the latest Firmware, Driver, Utility and User Guide, go to
-
 1
1 -
 2
2
 |
 |

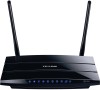
Hardware Connection
1
Quick Installation Guide
N600 Wireless Dual Band Gigabit Router
MODEL NO.
TL-WDR3600
Configuration for Windows with Setup Wizard
2
7106503913
Package Contents
Resource CD
Ethernet Cable
Power Adapter
If you are using a MAC/Linux or a Windows computer without a CD drive to run the mini CD, please refer to
Appendix 2
for configuration.
2
Click
START
and the
USB Printer Setup Wizard
will
guide you step by step to set up the USB Printer.
TL-WDR3600
QIG
TL-WDR3600
N600 Wireless Dual Band Gigabit Router
1
Insert the TP-LINK Resource CD into the CD-ROM drive.
Select
TL-WDR3600
and click
USB Printer Setup
.
3
Select your language from the drop-down menu.
Click
START
and
the
Easy Setup Assistant
will
guide you step by step to set up the Router.
4
Follow the instructions until you see the screen
below. Click
FINISH
to complete the setup.
1
Insert the TP-LINK Resource CD into the CD-ROM drive.
2
Select
TL-WDR3600
and click
Easy Setup Assistant
.
Appendix 1: Configuring the USB Printer
The USB Printer Setup Wizard is currently supported in Windows 7 32/64bit, Windows Vista 32/64bit, Windows XP 32/64bit. Please follow
the steps below to finish the printer configuration. For Mac users, please go to our website
www.tp-link.com
to download the utility.
3
5
Computer
Wall Socket
4
Cable/DSL Modem
Internet
Power off your modem.
1
Connect the
INTERNET
port on your Router to the Modem’s
LAN
port with an Ethernet cable.
2
To use the Router to share files or printer,
plug an external USB hard
drive/USB flash disk into the
USB
port, or connect a USB printer to the
USB
port.
For specific configuration procedures of the USB Printer,
please refer to
Appendix 1
.
Connect your computer to one of the ports labeled 1~4 on
the Router with an Ethernet cable.
3
Power on the modem and wait for one minute.
4
Plug the provided Power Adapter into the
Power
jack and
the other end to a standard electrical wall socket. Press the
On/Off
button to power on the Router.
5
Wall Socket
Click
Next
and go on to install TP-LINK USB Printer
Controller
.
Then follow the instructions step by step.
3
Click
Finish
on final screen to complete the
installation for TP-LINK USB Print Controller.
4
For more details about the configuration of USB Storage/FTP Server/Media Server functions for USB ports, please refer to
User Guide
in the resource CD.
For more details about the Print server, please refer to
Print Server Application Guide
downloaded from our website:
www.tp-link.com
.
2
Printer/MFP/Scanner
USB flash disk
USB hard drive
* Some USB hard drives that work at a high
power without using any external power
adapter might not be supported.