TP-Link TL-WR740N User Guide - Page 68
MAC Address of Parental PC, MAC Address of Your PC
 |
UPC - 813120016543
View all TP-Link TL-WR740N manuals
Add to My Manuals
Save this manual to your list of manuals |
Page 68 highlights
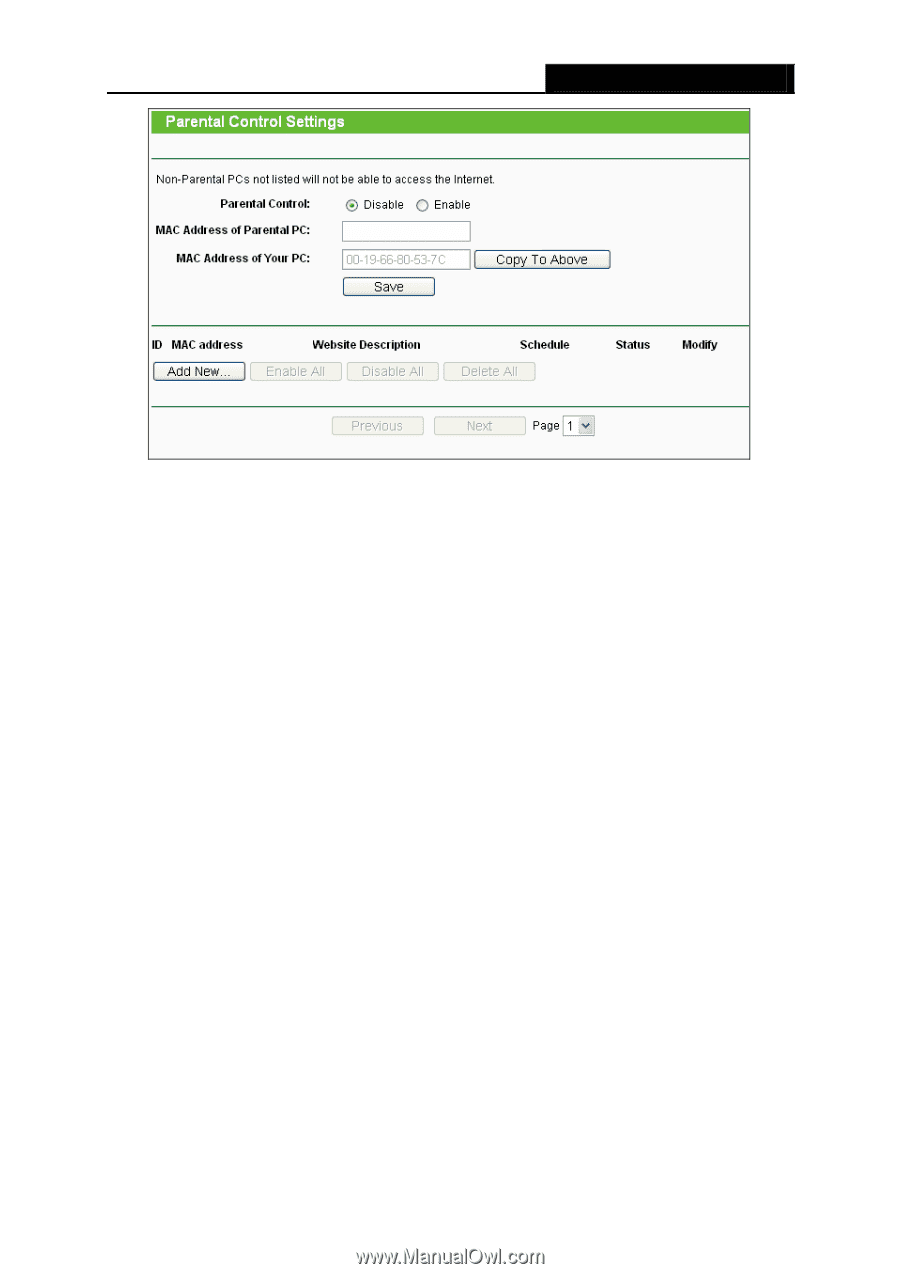
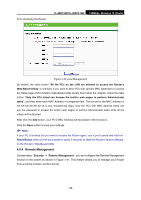
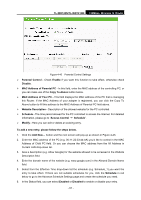
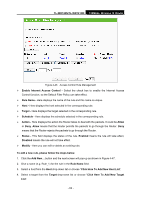
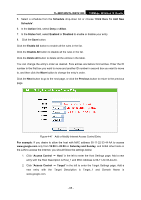
TL-WR740N/TL-WR741ND 150Mbps Wireless N Router Figure 4-42 Parental Control Settings ¾ Parental Control - Check Enable if you want this function to take effect, otherwise check Disable. ¾ MAC Address of Parental PC - In this field, enter the MAC address of the controlling PC, or you can make use of the Copy To Above button below. ¾ MAC Address of Your PC - This field displays the MAC address of the PC that is managing this Router. If the MAC Address of your adapter is registered, you can click the Copy To Above button to fill this address to the MAC Address of Parental PC field above. ¾ Website Description - Description of the allowed website for the PC controlled. ¾ Schedule - The time period allowed for the PC controlled to access the Internet. For detailed information, please go to "Access Control → Schedule". ¾ Modify - Here you can edit or delete an existing entry. To add a new entry, please follow the steps below. 1. Click the Add New... button and the next screen will pop-up as shown in Figure 4-43. 2. Enter the MAC address of the PC (e.g. 00-11-22-33-44-AA) you'd like to control in the MAC Address of Child PC field. Or you can choose the MAC address from the All Address in Current LAN drop-down list. 3. Give a description (e.g. Allow Google) for the website allowed to be accessed in the Website Description field. 4. Enter the domain name of the website (e.g. www.google.com) in the Allowed Domain Name field. 5. Select from the Effective Time drop-down list the schedule (e.g. Schedule_1) you want the entry to take effect. If there are not suitable schedules for you, click the Schedule in red below to go to the Advance Schedule Settings page and create the schedule you need. 6. In the Status field, you can select Enabled or Disabled to enable or disable your entry. - 61 -
-
 1
1 -
2
-
3
-
4
-
5
-
6
-
7
-
8
-
9
-
10
-
11
-
12
-
13
-
14
-
15
-
16
-
17
-
18
-
19
-
20
-
21
-
22
-
23
-
24
-
25
-
26
-
27
-
28
-
29
-
30
-
31
-
32
-
33
-
34
-
35
-
36
-
37
-
38
-
39
-
40
-
41
-
42
-
43
-
44
-
45
-
46
-
47
-
48
-
49
-
50
-
51
-
52
-
53
-
54
-
55
-
56
-
57
-
58
-
59
-
60
-
61
-
62
-
 63
63 -
 64
64 -
 65
65 -
 66
66 -
 67
67 -
 68
68 -
 69
69 -
 70
70 -
 71
71 -
 72
72 -
 73
73 -
74
-
75
-
76
-
77
-
78
-
79
-
80
-
81
-
82
-
83
-
84
-
85
-
86
-
87
-
88
-
89
-
90
-
91
-
92
-
93
-
94
-
95
-
96
-
97
-
98
-
99
-
100
-
101
-
102
-
103
-
104
-
105
-
106
-
107
-
108
-
109
-
110
 |
 |