TRENDnet TEW-634GRU User's Guide - Page 59
IP Range Start - how to change password
 |
UPC - 710931600629
View all TRENDnet TEW-634GRU manuals
Add to My Manuals
Save this manual to your list of manuals |
Page 59 highlights
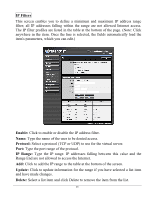
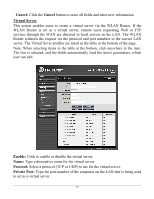
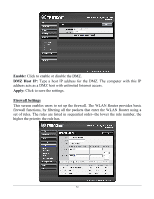
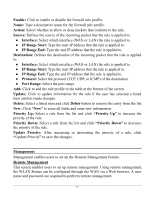
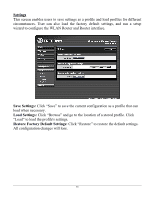
Enable: Click to enable or disable the firewall rule profile. Name: Type a descriptive name for the firewall rule profile. Action: Select whether to allow or deny packets that conform to the rule. Source: Defines the source of the incoming packet that the rule is applied to. ● Interface: Select which interface (WAN or LAN) the rule is applied to. ● IP Range Start: Type the start IP address that the rule is applied to. ● IP Range End: Type the end IP address that the rule is applied to. Destination: Defines the destination of the incoming packet that the rule is applied to. ● Interface: Select which interface (WAN or LAN) the rule is applied to. ● IP Range Start: Type the start IP address that the rule is applied to. ● IP Range End: Type the end IP address that the rule is applied to. ● Protocol: Select the protocol (TCP, UDP, or ICMP) of the destination. ● Port Range: Select the port range. Add: Click to add the rule profile to the table at the bottom of the screen. Update: Click to update information for the rule if the user has selected a listed item and has made changes. Delete: Select a listed item and click Delete button to remove the entry from the list. New: Click "New" to erase all fields and enter new information. Priority Up: Select a rule from the list and click "Priority Up" to increase the priority of the rule. Priority Down: Select a rule from the list and click "Priority Down" to decrease the priority of the rule. Update Priority: After increasing or decreasing the priority of a rule, click "Update Priority" to save the changes. Management Management enables users to set up the Remote Management feature. Remote Management This screen enables users to set up remote management. Using remote management, the WLAN Router can be configured through the WAN via a Web browser. A user name and password are required to perform remote management. 53
-
 1
1 -
2
-
3
-
4
-
5
-
6
-
7
-
8
-
9
-
10
-
11
-
12
-
13
-
14
-
15
-
16
-
17
-
18
-
19
-
20
-
21
-
22
-
23
-
24
-
25
-
26
-
27
-
28
-
29
-
30
-
31
-
32
-
33
-
34
-
35
-
36
-
37
-
38
-
39
-
40
-
41
-
42
-
43
-
44
-
45
-
46
-
47
-
48
-
49
-
50
-
51
-
52
-
53
-
 54
54 -
 55
55 -
 56
56 -
 57
57 -
 58
58 -
 59
59 -
 60
60 -
 61
61 -
 62
62 -
 63
63 -
 64
64 -
65
-
66
-
67
-
68
-
69
-
70
-
71
-
72
-
73
 |
 |
